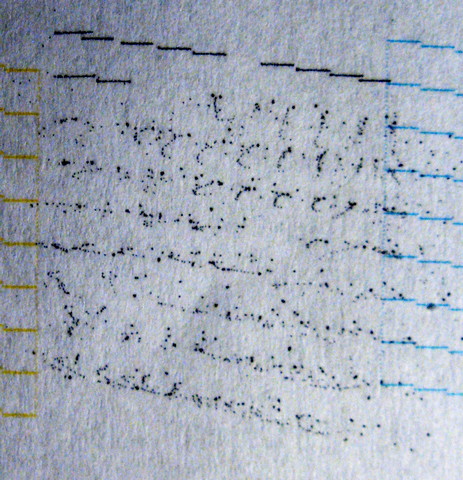
Just installed a new set of capsules in EZFill keys for my Epson 1430. A few empty nozzles but that’s pretty common on a fresh set of carts or refills. So I ran a head clean or two but got what I would describe as a “spatter” pattern for the K, or Black, position. Following Dana’s excellent video I did a head clean (the “shoe shine” method), capping station and wiper blade clean. Got rid of most of the spatter, but then the right side of the black pattern moved a little bit into the Light Cyan Pattern, and the left side moved away the Yellow, leaving a small gap.
Ran the Alignment utility, and after 13 (!) adjustments the black pattern settled correctly into its space. Finally got an excellent pattern. This morning, 24 hours later, I ran a nozzle check and immediately got another spatter pattern. Note how the pattern moves into the Light Cyan pattern as mentioned earlier.
Any suggestions? I have never seen a nozzle check like this. I’m about to try the syringe push/pull technique Dana mentions but somehow this doesn’t seem to call for that… I could certainly be wrong.
Your link to a previous thread on a similar problem about this nozzle pattern was helpful… I’m going to try a purge. Let me clear a few things up:
First, some of the initials are new to me. TBH = To Be Honest? WAG = Wild A_s Guess?
And a couple of terms - do they have to do with Piezography by any chance? SEL1 (shade 1 for gloss) and then conversion to P2?
Finally, the other thread mentions printing an Ink Separation page… this is also known as the Calibration Mode, right? That tells me we’re using QTR, and the purges are printed while in this mode. Do I understand correctly?
It was encouraging to see this pattern discussed at such length… thank you!
I may end up not so keen on these EZFill capsules and keys. If I do too many purges my K capsule will diminish before the others and I’d either have to buy a whole new set for just that one color, or buy three of the black only capsules. Sorry, that’s a bit OT. (I do know that one!)
PS: I also noted in that oher thread you didn’t use the syringe push-pull technique, which you were very helpful in getting me to use in another situation. I didn’t use it in this case either, I was following a gut feeling this didn’t seem the place for it. Is that what you surmised also?
Studied that link to the earlier thread discussing similar issue of strange nozzle checks, and ran a purge on the black channel. As was said then, is true now… the smeared K channel cleared up right away. It did leave several what I would call regular dashes missing, but that’s something we’re used to dealing with. I’m going to let the printer sit a while, I too try to avoid the overuse of the Head Cleaning utility.
I have two sets of purge files, one set uses TIFF files and is meant to be printed in QTR’s Calibration Mode. Those TIFFs are what I call “pure” colors. I obtained these here on IJM, they were in a zip file in one of the Articles. The other set are more like “ordinary” jpgs, available just about anywhere, and can be printed using an ordinary app. I chose the “ordinary” jpgs as being simpler to deal with. Sound ok?
Last post was made in a hurry before heading off for a few days. Hence the delay.
That other thread is incomplete. I was waiting for a comment from Dana that never came. A number of other posters offered comment, but as their problems were different to mine the thread got a bit confused.
In the end I gave up and put a piezoflush cart in that slot. I had been using the printer for Piezography K7 and so the yellow slot held shade 7 - the lightest shade with the least pigment - without any problems. I switched from K7 to P2 (which uses six shades rather than seven, which allows you to put photo shade 1 in the Y slot where shade 7 used to go, which removes the need to swap photo shade 1 and matte shade 1, i.e. MK & PK). The problems started shortly afterwards.
All my attempts to clear it were successful for only a short time. Eventually I tired of this and put in a flush cart which has stayed there ever since. This worked for me because I mostly print on matte papers - I use the Special Edition inkset and find it too warm on PK papers - and so it hasn’t been a major problem to leave flush in that position. I have it in mind try again in the near future, although I’m undecided whether I should try photo shade 1 or shade 7 again.
In terms of using the cleaning kit with the syringe, it’s two years ago now and I don’t recall. I suspect not, as I probably thought that there was little point if a purge pattern cleared the problem, albeit briefly. But it’s all academic now, as for the past two years I’ve always had a perfect flush nozzle check. Hence why I considered having another go with ink in that slot.
In your case … who knows? I’d like to think that I’ve got to the bottom of most printer problems that I’ve encountered, even those I didn’t resolve. But not that one. It remains a mystery.
I think most of your guesses about abbreviations are correct. The other purge patterns - the ordinary JPGs with coloured columns - will sort of work for purging. But they won’t give you pure prints from each channel. They’re in RGB mode and the printer driver converts them to a CMYK colour space, and if you open one of those purge JPGs and convert to CMYK you’ll see that every column becomes a mix of C & M & Y & K, even the pure Yellow bar isn’t just Y. Mostly Y, and probably enough for purging, but not 100% Y. Ditto for M & C etc. Just remember this. It’s why I prefer those special TIFFs and calibration mode.
This must be a tough one, all right. I showed my “spatter” nozzle check to the printer guru at a local computer repair shop and he said that’s the only problem he’d ever run across he couldn’t solve.
I take your point on the different purge patterns, and it’s pretty much what I suspected - although you give more background.
I had Piezoflush in that computer (my 1430) for a month or two while and may go back to that, running a nozzle check now and then to keep things fluid. The 1400 is running well, and I do mostly black and white anyway. My only complaint with Piezoflush is that the print is hard to see. IJM has added some colorant but I might order a small quantity of Magenta to make the pattern more visible. I got the 1430 primarily as a backup and if and when the 1400 wears out I’ll add b/w carts to it. Maybe by that time someone will have the answer.
It may be that this printer was not up to specs… it was a refurb after all, but I always thought refurbs were better because were gone over more carefully than a unit just off the assembly line. Can you point me to that piece you wrote a while back, how there’s a host of problems and variables that are simply out of our control? It was quite helpful, sort of a philosophical point of view. I’ve searched the forum, it was linked to in one of our exchanges, but can’t find it.
In my case I think there are a few possibilities. (i) That particular channel on the head is on the way out. It’s possible, but then how is it that I’ve had a perfect nozzle check with flush for the past two years? Now flush and ink are different, but even so. (ii) There were some particles of dried ink in that channel of the head that caused intermittent problems. That’s also possible and it’s my best chance of resuscitating that channel, as two years of flush should have dissolved them. The reason that I’m sceptical of this explanation is that that channel only had shade 7 in it until shortly before the problems started, and it’s hard to see a shade so light resulting in particles of dried ink forming. (iii) Some problem with the ink. It is rather coincidental that the problem occurred soon after inserting shade 1 in that slot, but I’m assuming that if there were problems with a batch then we’d have heard about it. I’m confused because none of the possible explanations seem plausible.
I’d strongly discourage you from adding magenta to flush. Yes, flush is hard to see, but with the right light and a loupe you get used to it.
My impression is that the amount of work performed on a refurb is rather limited. The printers, esp the 1430, are cheap and labour is expensive,
What’s interesting is how varied the experiences with the 1400 series are. Some folks have excellent results, hardly any issues. With others there’s no end of woes. Thanks for linking me to your piece on lessons you’ve learned. Very helpful to have this larger perspective… good to know I’m not alone.
I don’t want to get into an argument but I started a thread a while back on the issue of increasing the visibility of nozzle checks with Piezoflush:
I’m thinking more and more about installing flush cartridges and mothballing my 1430.
Walker agreed with your idea to add more magenta dye to the PF. Have you tried that?
Personally, I have found PiezoFlush to be visible enough as is. It’s certainly a lot easier to “read” than yellow! But I also use a light gathering loupe (see link) to view my nozzle checks in closer detail, which probably aides in visibility of the PF red too. Might be worth a try.
It has been remarked here before that the R14x0 series, being cheap, seems to have more production variability than 13" and larger other Epsons.
I’d be a lot less concerned about adding dye ink to flush than adding pigment ink, since I seem to recall that the current colour is a weak dye anyway, but it’s still not something that I’d chose to do, especially for long term storage. Speaking of which …
Given the problems that you’re having with the R1430, if you don’t have a need for it at present then hibernating it seems to be the most sensible option.
Keith, sorry I neglected to thank you for your loupe suggestion. I’ve seen those somewhere, and I noticed how well they magnify and illuminate objects. Someone gave me a “Mamiya 3.5X” loupe a while back, apparently made for viewing 6x6 and 6x4.5 negatives. It has a transparent “skirt” so should help to view pink nozzle checks. I’ll try that first but will keep in mind the Magnabrite.