Hi Jon,
I have the opportunity to attend a 1 to 1 printing course the weekend of July 18th/19th. Will this clash with your visit?
Regards,
Phil
Hi Jon,
I have the opportunity to attend a 1 to 1 printing course the weekend of July 18th/19th. Will this clash with your visit?
Regards,
Phil
Hi Dana,
Any further thoughts now that you have the Lab values and lot numbers?
Regards,
Phil.
Phil,
Dana will report to you probably tomorrow - but it looks like you either have contaminated inks (which would explain the highlights printing too dark) or you measured the lab values improperly. The lab values if correct indicate ink contamination. But, the printout you uploaded does not appear to coincide with these lab values. Your ink smears indicate that the ink in the bottles are correct. But, your lab values indicate that the inks in the carts are not.
Regards,
Jon
Hi Phil~
I converted your L values to density, and compared to our measurements for Special Edition inks on Hahnemuhle Photo Rag paper at 60% density.
Your measurements are:
1= 1.63
2= 1.314
3= .799
4= .820
5= .512
6=.234
7= .146
*NOTE: your shade 4 is measuring darker than shade 3, which is opposite of what it should be- though this does not match the Ink Separation print attached on post #12… so, either your ink output has changed since you made that print (possible cartridge mis-fill?), or your measurements are not correct. What measuring device are you using?
Our measurements are:
1= 1.61
2= 1.26
3= 1.07
4= .80
5= .37
6= .17
7= .09
SO, the main issues are your shade #3 is .27 lighter that it should be, and your shade #5 is .142 darker than it should be. Your other inks are within the normal range, and aren’t far off enough to cause any major difference in output. I have checked your lot#s and are using the exact same inks in our production printers, so I know the inks are correct.
Can you attach a scan of the printed ink sep page on Photo Rag that you measured?
If the ink sep page was printed correctly, and your measurements are accurate, then I recommend starting with new carts and inks in your LC and LM positions.
Please let me know, thanks~ Dana
Hi Dana,
Here’s my ink separation chart.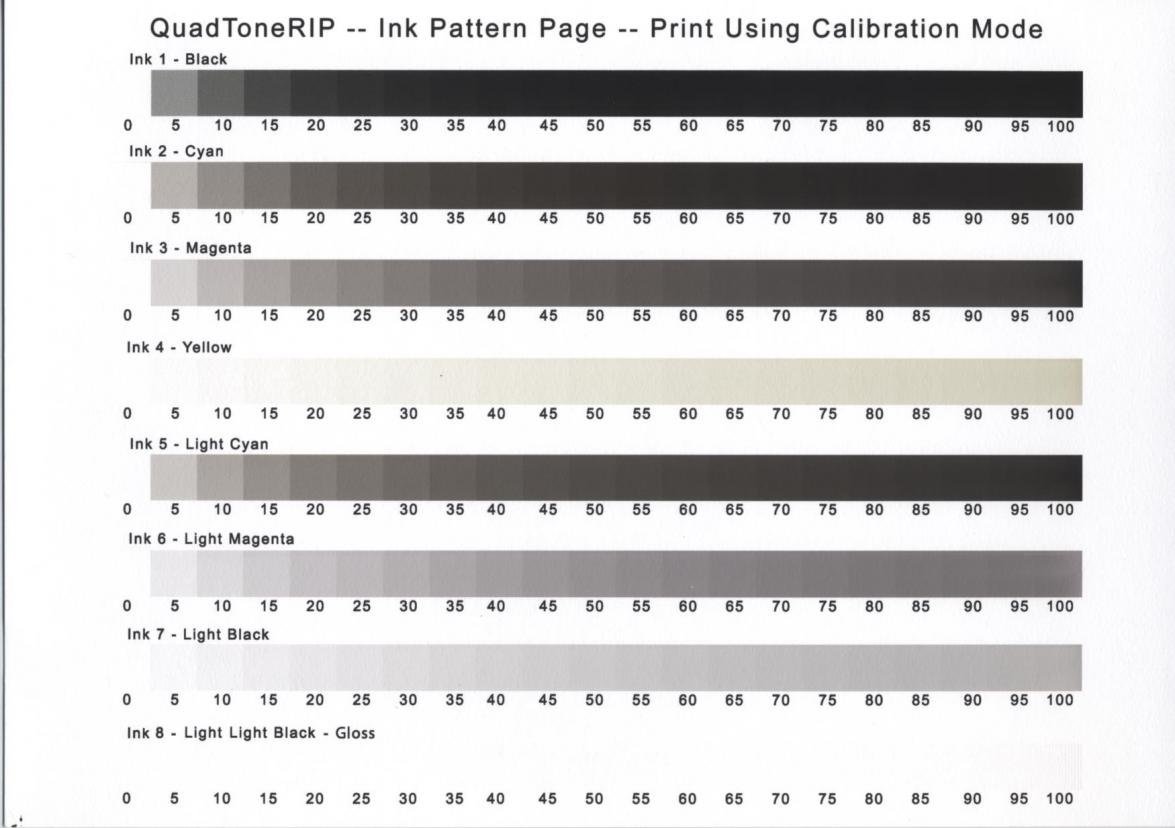
I’ll re-measure the shades from the top of the chart to the bottom (in that order) tomorrow evening.
Regards,
Phil.
Thanks Phil.
This print is showing your shade 3 is visually darker than shade 4, so please do remeasure and let me know what you come up with. What measuring device are you using?
~Dana
OK, here’s the re-measure. I did it twice.
I’m using a ColorMunki to make these measurements.
Black: 17.8 / 17.8
Cyan: 26.5 / 26.3
Magenta: 44 / 44.1
Yellow: 87.9 / 87.8
L. Cyan: 36.9 / 36.6
L. Magenta: 62.5 / 62.6
L. Black: 80.8 / 80.9
Regards,
Phil.
Thanks Phil.
Your measurements are all nearly the same as the first time, except there’s a big difference in shade #3 (LC). Considering the new value for shade #3, that ink is correct, and the only problem I still see is your shade #5 is quite a bit darker than it should be, which I suspect is what’s causing your problems.
I recommend starting fresh with your shade #5/LM position, by getting a new cart and filling with ink from your current bottle (after shaking the ink bottle).
I know you said you were very careful when filling carts, but is there any chance you accidentally refilled that cart with shade 4 ink (that’s the only way I can see that you would get that density, unless you didn’t shake the ink bottle, and drew ink from the bottom after pigment has settled)? I don’t suspect the ink is bad, since I’m using the same lot# in our printers with great results, but if you feel positive that you shook the bottle before filling, and didn’t mis-fill the LM cart to get the dark results you’re experiencing, then I would like to to mail the unused portion of shade #5 ink to me for evaluation, and we will send you a new bottle after checking it for accuracy (even though we check every batch as it’s made).
*After installing a new LM cart with fresh #5 ink, I suggest using QTR’s Calibration Mode to print purge sheets from your LM channel to change ink in that channel, without wasting ink in the other channels, since they’re correct. To use QTR to flush an individual channel, please follow these instructions (flush images are available on this page as well): http://www.inkjetmall.com/tech/content.php?166-Flush-individual-channel-using-QTR-Calibration-Mode
Please let me know if you have questions, your results after changing out the LM/#5 cart with fresh ink, or if there’s anything else I can help you with.
Warmly~ Dana
OK, so I’ll swap out my Light Magenta.
If I filled my cart with #4, wouldn’t i get the same readings as for #4? Anyway, as far as I can be sure now, I didn’t fill incorrectly. I understood at the time the consequences of doing so. I wrote on the actual bottles the cart name the ink should be going in to. I suppose there’s an outside chance I didn’t shake the bottle but, honestly, I think it’s unlikely.
I’m happy to mail you my #5 ink. I need to order a new #5 cart from you guys and it makes sense to order that ink too doesn’t it? I’d also best get some Piezoflush as well, in case your purge technique above doesn’t work for my yellow ink (which I also need to purge). I’ll need to have all this shipped from the US to here in the UK as there’s no UK distributor yet 
Regards,
Phil.
Hi Dana,
Just a little nervous about spending more money, so I wonder if you you would respond to these questions:
Also, were the readings I’m getting sufficiently bad to have produced the results I provided? In other words, is a replacement ink standing a good chance of sorting this issue out?
Regards,
Phil.
Hi Phil~
I’m not saying you screwed up, but am just thinking of possible causes for your dark/wrong density for shade #5/LM.
Considering shade 4 should be around .80 and 5 around .37, the figure you’re getting for shade 5 (.512) doesn’t match up to any full strength ink shade, which makes me suspect the cartridge may have been filled correctly the first time, but you were struggling with yellow staining, so had to do more cleaning, at which time you refilled carts, and if the LM/shade 5 cart was accidentally refilled with shade 4 ink, the combination of shade 4 + 5 could have caused the ink measurement you got. It’s just a thought. If this happened, you would have had about 75% of shade 5 and added about 25% of shade 4 to get around the density measurement you’re getting.
I would certainly want to test your ink, though have personally used the exact same lot# you have (in several printers), and have been getting good/normal results, so don’t suspect your ink is bad in the bottle (unless possibly it was settled in the bottle, not shaken before filling carts, and ink was drawn from the bottom of the bottle, where settled/thicker ink would be- though this amount of settling would require ink bottles sat still for weeks, which I don’t think happened, and if it did, I would suspect more than one ink shade would be off, unless you somehow shook all bottles except #5 before filling carts, which I also don’t think happened).
Since your other inks are all within the normal range, and only your shade #5 is incorrect, I recommend using a fresh cart either with ink from your current bottle (after shaking), or ink from a new bottle of Selenium #5, then print purge sheets from QTR calibration mode to move ink from the new LM cart to the print head (following instructions I linked to above). It should take between 3-4SF of printed purge sheets to purge ink from the internal ink line, and get ink from the newly installed cart to the print head.
Also, for your yellow staining, I recommend flushing that line with PiezoFlush as you are thinking, by installing the yellow position flush cart, then printing purge sheets to get PiezoFlush to the head. Because the yellow pigment is so stubborn, I think it gets trapped in the nooks and crannies of the damper, which makes it look like it’s gone after you do lots of printing, then slowly seeps out again while the printer sits idle, causing the next prints to have yellow staining again. With this in mind, I recommend letting the printer sit for at least 12 hrs after installing PiezoFlush in the yellow channel, then print a few more purge sheets (if you see yellow at first, transitioning to pink PiezoFlush), and depending on the amount of color staining, you may want to let it sit for a while longer then print some more purge sheets until you no longer get yellow staining in your prints. At this time, reinstall the yellow/shade #7 cartridge, and print purge sheets to purge PiezoFlush and get shade #7 to the head.
Please let me know if you have questions, or there’s anything else I can help you with.
Warmly~ Dana
[QUOTE=Dana-IJM;7754]Hi Phil~
Considering shade 4 should be around .80 and 5 around .37, the figure yfor shade 5 (.512) doesn’t match up to any full strength ink shade, which makes me suspect the cartridge may have been filled correctly the first time, but you were struggling with yellow staining, so had to do more cleaning, at which time you refilled carts, and if the LM/shade 5 cart was accidentally refilled with shade 4 ink, the combination of shade 4 + 5 could have caused the ink measurement you got. It’s just a thought. If this happened, you would have had about 75% of shade 5 and added about 25% of shade 4 to get around the density measurement you’re getting.
Please let me know if you have questions, or there’s anything else I can help you with.
Warmly~ Dana[/QUOTE]
Hi Dana,
It seems like a reasonable theory but I’ve not had 1 single good print out of this print since installing the inks, not one. Like I mentioned previously, the matte prints don’t seem so bad but far from good. The gloss prints have all been very bad indeed.
But it’s clear there an issue with that #5 so I’ll do what’s been suggested and then we’ll see what happens. I’ll place the order in the next day or two.
Thanks again.
Phil.
I’m here to help, so please let me know your results after correcting your shade #5, and we’ll move forward from there to get you set up and happily printing.
Best~ Dana 
Hi Dana,
As well as ordering the Piezoflush do I also need a cartridge or can I flush the line with a syringe like I did with the magic bullet?
What the procedure you recommend for flushing a single color?
Regards,
Phill.
I’m not sure what you mean by flushing the line with a syringe. Our recommended procedure for flushing an individual line is to install a cart filled with PiezoFlush in that channel, then print flush images thru QTR Calibration MOde, following these directions: http://www.inkjetmall.com/tech/content.php?166-Flush-individual-channel-using-QTR-Calibration-Mode
Best~ Dana
[QUOTE=Dana-IJM;7605]Hi Phil~
Yes, Jeff- please send us a few sheets of your ExFiber to test as well, testing samples from around the world will be helpful to figure out why there have been so many problems with it recently.
[/QUOTE]
Ok, you’ve had the paper that I sent since May, 22, at least, according to Australia Post. So far, there has been no acknowledgement by IJM that it has arrived. I would hope that maybe someone could have bothered to say that you have received it. I’ve wasted more time money and ink on this debacle that I think is reasonable, particularly as this paper is highly recommended by IJM.
You also said that you were going to buy some current EEF and report back on it. Silence again. I think that I’ll go back to IGFS. I don’t get any pain using it.
To say that I am extremely disappointed, is a serious understatement. For a company that gives such great service normally, why are you ignoring this? I’m only butting into this thread as the requests that I posted on my own thread have been ignored.
Hi Jeff~
I just replied to your main post “Epson Exhibition Fibre 100% flat”, and will add my response here as well:
Your paper samples arrived, though we’re closed on Fridays, and Monday was a holiday, so we didn’t actually get our hands on your package until Tuesday, and have been getting ready for an upcoming workshop, so with everything going on, I apologize for not responding sooner.
We did make a test print on the TPP you supplied with the standard EPexFiber curve and 30K GO, and compared to results on Exhibition Fiber. Our results look good, and match our results on Exhibition Fiber paper… so, it’s not the paper as we thought. We made tests with both Selenium and Neutral inks (two different printers- a R2880 and 3880), using both Selenium and Warm-Neutral shade 1, and both produced similar results- with slight flatness in the darkest black patches on the target image (which is normal with some gloss papers), but only about 1/2 way down the first black column. Your target and test prints show gloss differential in the first 5-6 columns of the target, and very blotchy/flat shadows…
So, considering the facts in this situation, you’re experiencing very poor results on this Epson Traditional Photo Paper (and so if Brian, also in Australia), BUT you’re not experiencing this problem with other glossy papers, such as Ilford Gold Fibre Silk and Photo Rag Baryta. The fact that it’s only happening with this TPP, and not other papers makes me still think paper, though we’re getting good results with the sample sheets you sent, so maybe this paper produces different results depending on the environmental conditions? When we did the tests, it was about 70F and 35% humidity in our print environment.
I will try to review your situation and show Jon the test prints on Monday morning, before the workshop starts, to see if he possibly has any suggestions/explanation, otherwise I can only report the facts, and am a bit puzzled about our different results.
Best~ Dana
I had the same problem with the yellow ink in my r3000. It was gone after flushing a lot, but it came back later. I do not think that the r3000 is the best printer for Piezography. The ink lines are very long and difficult to flush. I also have a 1500W (=same as 1430). When i am out of ink i will use that one for Piezography and reinstall color cartridges in the r3000.
Regards,
Jozef
IMHO the best printer for piezo is a new one. Converting a desktop (R2880 / R2000 or earlier) is not that hard, so long as the printer is not too old (old printers don’t always like refillables, and sometimes not even new ones).
For a Pro printer with ink lines, the impression I get from these forums is that a lot of flushing is needed, and all the more so the longer that the colour inks were in use. If I had something like a 3880 or larger then I suspect I’d replace the dampers as part of the changeover. The R3000 seems to be the worst of both worlds - ink lines but without replaceable dampers.
I wonder if a new printer is actually the simpler and cheaper option in this case, except that the R3000 is now discontinued. Does the P600 have replaceable dampers? I suspect not.
Hi Dana,
The PiezoFlush and fresh LM ink arrived this week. I have finished flushing the LM channel through but before I take the cartridge out and replace it with the new ink cartridge, I would like to know if it’s going to be ok the move the PiezoFlush cartridge to the yellow channel and flush that through too?
Regards,
Phil.