R3000 LLK ink not flowing

Hi Dana,

Thanks for the reply. The LK and LLK cartridges never ran dray, and they are working now, as is the C. I put a yellow epson cartridge in and tried the QTR to flush it but I get the same problem. The first print has a few lines of yellow and then it fades away to nothing. Even I wait a few hours, the same result happens. I’m at a loss what to do next. Every time I unplug the printer to move the head, it powers back on with a clean cycle, and I’ve done that so many times that it’s used so much of my ink that I can’t even run a cycle of head cleaning anymore to try to charge the yellow line.

The strange thing is, that when I inject the piezo flush into the channel, I get fluid coming through the head. I ran enough through that I got pink coming out.
Is it safe to just print the yellow QTR all day long to see if the yellow finally purges? Or will that destroy my head?

I’m starting to think the head is damaged and is unfixable and I might be better off getting a new printer.

It is becoming very obvious that the Cone inks simply do not work properly in the R3000 printer. As a result we both have printers that have been rendered useless. I would like someone to tell me how this ink system can be purged from the system without having to take the printer in for a expensive repair. The so-called “economy” of third party inks is a myth.

If used as instructed, the system works brilliantly. We provide extensive instructions and caution against allowing carts to run dry. We sell on average 70 systems a month for the R3000 since introduction and it is one of our most popular systems. If it didn’t work there would be hundreds upon hundreds of R3000 users here with the same problem as you have. This is a very public technical support system and 100% of our customers have access to it and this is where help is administered.

If you mis-fill carts or let them run dry you will get yourself into issues (air in the ink lines and or dampers) that become difficult to overcome - but not impossible. Currently, Epson has not provided the end-user with any way to POWER CLEAN the R3000 printer. Obviously that makes things difficult for the end-user when they venture “off the menu”. The same POWER CLEAN function is missing from the X900 printers and those printers are having massive head failures with Epson inks which tend to clog them easily - as customers perform massive amounts of head cleanings and end up heating the heads beyond safe measures.

The best practices way to recover from allowing air to enter the system, or if you wish to charge the system with another brand of ink, is to use the Epson Adjustment Utility Software’s INK CHARGE function. This is what the Epson tech will do and it is an easy recovery. The INK CHARGE moves the equivalent of about 50 head cleaning operations in just under 8 minutes. Running 50 head cleanings is not recommended. It takes hours and will heat up the heads and it may not be effective when you have air in your system.

Install the Epson Adjustment Utility Software (on Windows or Windows for Mac) and select and run the INK CHARGE function. You can get the utility from 2manuals.com When you run it, all of the inks (and air) currently inside the ink lines and the damper system will be sucked through the capping station into the waste ink area. If you install the Epson carts prior to the INK CHARGE - then everything is purged out and replaced with Epson inks. If you simply run the INK CHARGE with the ConeColor ink carts, all of the inks (and air) in your system is purged out and replaced with fresh ink and you should be able to continue printing.

Chips need to be reset to 100% full only when the cartridge is 100% full. If the cartridge is less than 100% full and a chip is reset, the cartridge will run out of ink prior to the chip reading empty. That bit can be confusing to many because the assumption sometimes is that if a cart is half full and the chip is reset - that the chip somehow knows the cart is half full and resets to 50%. It doesn’t. It resets only to 100%. You could reset the chip on an empty cart and the chip will still read 100%.

I hope that you will run the utility and purge the air out of the system and keep ConeColor. If you would like to contact me off list - I will arrange a discount for fresh inks for you. We try to be here for you in every way we can - and I think it’s very possible for both of you to join the ranks of those using the R3000 successfully. You just got to get the air out! And then you have to not allow it back in again. Purge your systems from freshly filled carts and reset chips. You should be good to go. Contact me if you wish to at jon (at) inkjetmall (dot) com.

Jon

Everett,
I wouldn’t say the inks don’t work–they’ve worked great for me for the last 7 months or so. The problem was running dry, which is way easier to do with refillable cartridges than with the Epson ones. If I can get my printer going again, I’ll happily stay with the Cone inks, and be sure to be way more vigilante with keeping them topped off.

Jon, I’ve run ink charges 3 times now on different days and each time I print the QTR Y purge page after and get a hopeful strip of yellow but that fades away to nothing after a couple pages. It’s almost like I get ink in the line and then it prints out with no new ink flowing in after it until I do another ink charge. Same thing happened with an Epson ink cartridge in now too. And when I get some printing with the QTR, if I do a nozzle check, I get just a few dashes of yellow showing, (even immediately after the ink charging and before printing the Y QTR) and on the second check nothing at all. I’ve soaked the capping station with cleaner and left the head parked on it for long periods. I’ve pushed piezo flush through the yellow line gently with the syringe (and fluid sprays out). ANd then I get the same result when printing–a page of yellow and then fade to nothing.

Before I give up, I’m trying to learn what could be going on in the system between cartridge and head, but it’s hard to fine info. Or if there’s something damaged in the head itself.

Peter,

What is in between is the damper. It’s what holds a charge of ink and dispenses it into the print head.

If it is the damper these are available from Compass Micro. Compass is online and they are who “officially” dispenses EPSON spares to the end-user for self maintenance.

It might be that it is spent and needs to be replaced, or a very tiny leak (large enough to allow more air in than the piezo crystals can muster force against) but small enough not to be a match to the venting of the ink carts when doing the INK CHARGE.

I’m not saying that this is exactly what the problem is - but it sounds similar to a damper that is working well enough to allow the capping station to draw ink into it with suction through the print head. Then it prints fine - but eventually the print head starves for ink. Normally if the damper is functioning - all the inkjet orifices pumping ink in and out (piezo crystals) are enough to keep ink flowing into the damper to keep it full enough to do a print run. If the print run is long enough - the printer might perform an auto clean operation during the actual print cycle - and all that is really is a recharging of the damper via the capping station. That happens a lot with LF printers as an example.

  1. Is there some chance that auto cleans is turned off on this printer or you made some settings adjustment with the Adjustment Utility?

  2. Two full pages of yellow is a lot to ask for from a damper. It’s not normally how these printers print. If you were to print yellow signs you would use a setting like 360dpi and a lot less ink would be printed. Have you tried making regular full color prints since this started to see if it is working?

Dana may have some more ideas when she comes in on Monday.

Jon,

What you say about the dampers sounds like what’s happening to me. Do you or Dana know of a way to determine if that’s the case?

I don’t see a setting for Auto Clean anywhere, where can I check that? I didn’t change any settings with the Adjustment Utility. Is there a way to check the settings I have?

Thanks for the additional info.

Hi Peter~

I reviewed the extended parts diagram for the R3000 and see, like the 3800/3880- the cartridge chambers, ink lines, and damper assembly are all one unit. The ink system consists of the cartridge chambers, which lead to a ribbon of round ink tubes, then to a thin aluminum sheet with tiny labyrinth ink lines, which connect to the dampers (dual color dampers), then the print head. I have always been concerned about the tiny labyrinth ink lines as being a point for possibly causing ink flow issues, but after constant testing and use for the past year+, we are very confident in the quality and function of our refillable carts and inks in the R3000 printer, which is proving to be a great little machine (for the most part).

To put this issue in a slightly different perspective, comparing to if you were to let your car engine run out of oil- there are many factors that determine the effects and severity of damage. The biggest factors are the amount of time that passes, and how long the machine is run without fluid.

I am also not sure how your using the print head cleaning kit effected your printer’s ink system, as our cleaning kit is designed and instructed to be used directly on the print head, and I don’t know the effects of using it on the ink system including dampers and the thin labyrinth lines, as well as all the fittings in the ink system. Based on my experience, I don’t believe the dampers can take that pressure, and this may have made things worse…
It would have better to either have installed a new Y cart filled with PiezoFlush and printed the Y pages thru QTR to purge that line (which you essentially did with the Epson cart), or better yet- disconnected the dampers from the print head to use the print head cleaning kit directly on the print head, and/or used a syringe to draw ink thru the line from the base of the Y damper. Although we don’t provide instructions or support for repairing or dismantling printers, we do have the knowledge/experience (I like to take things apart to better understand the parts and how everything works), so if you’re willing and able to follow the repair manual to disconnect the damper assembly from the print head, I can give you some tips for drawing ink thru the damper and flushing the print head.

Please let me know what I can do to help.
Best regards~ Dana :slight_smile:

Hi Everett~

To echo what Jon said above, the R3000 refill carts have been one of our top selling products for over a year, so if there were in fact a problem with the carts and/or inks, we would have several hundred unhappy customers. In reality, these cartridges and our inks DO work very well in the R3000 printers (as long as they are used as instructed). Please know we focus a great deal of our time and energy researching products and manufacturers, thoroughly testing products before releasing for public use, and continue using our products in our own printers on a consistent basis, so have a lot of knowledge and experience with the products we sell, which gives us confidence in the quality, and allows us to fully support them. Many other companies that sell third-party inks and/or carts don’t use the products they sell, so don’t have the in-depth knowledge that we have. Product quality and customer support are very important to us, we stand by our products 100% and are here to support our customers.

Since I am not in front of your printer, I must ask questions to understand the details of your situation and supply information based on the information you provide. On 4/15 I gave you information for purging air from your LLK line, but haven’t heard back from you until the latest message you posted, which doesn’t give me any helpful information regarding what you did or your results, but simply expresses your frustration- which I understand, but is not something that helps me understand your situation to help you resolve this issue and get back to happily printing. I need you- the customer- to help me help you by supplying useful/detailed/factual information, or I have no way of knowing what you are doing or what your results are.

Please supply me with the facts in regards to specifically what you have done and what your results are, so I can help you.

Best regards~ Dana :slight_smile:

Dana,
I’m going forth on the assumption my dampers are clogged. I called Compass Micro, and it sounds like to replace them you have to buy everything from the cartridge dock, ink lines and the damper assembly that mounts on the head at a cost of $172. Given that I’d probably screw up the installation, or it might not even work, I want to avoid that. So is my next option to separate the damper assembly from the head and try to flush the head, and draw ink through the lines and damper?

Before trying that. I’d be willing to get a set of cartridges and piezo flush and ink charge that through the system. Is there much chance that could clean out the dampers at this point?

Peter

Dana,

I have checked and rechecked and all of the carts are properly filled with ink, all the air vent plugs are out of the carts and I filled the LLK cart again using the vacuum method as was suggested. The VLM cart was refilled using the blunt tip needle method. Repeated cleanings have been done to no avail and I now have no ink flow in the VLM, LLK, and PK lines. I’m no expert at printer technology, but I fear that the nozzles may be clogged as well as air in the lines. Please advise.

Hi Peter~ Without knowing exactly why you’re continuing to have issues, and considering the damper may be damaged from pressure of using the print head cleaning kit, I can advise you from afar based on the information you supply and my experience with various printer models.

Since you are having the same results with the Epson Y cart as with the refill Y cart, I suspect the cartridge or ink is not the issue, so don’t feel confident that installing a set of PiezoFlush carts and flushing the lines will give you different results than what you are getting with the two different Y carts. Considering the factors in your situation, I would personally disconnect the dampers from the print head to flush the head and draw ink thru the Y damper, and check for yellow ink on the damper (to indicate a leaking damper), as well as resistance when drawing ink thru the damper + line. To help in this process, I can send you a CD with the repair manual (so you don’t have to purchase it from 2manuals.com) so you can follow the step by step instructions for accessing the print head and dampers. You can use the syringe that came with the refill carts to draw ink thru the damper/ink line, as a slit-tip syringe fits perfectly in the damper exit hole.

Please let me know how you’d like to continue, and what I can do to help.
Best regards~ Dana :slight_smile:

Hi Everett~

I am sorry to hear of your continued problems and will do everything I can to help you get past this and back to happily printing.

After re-reading your past messages, I have a few questions to help me gain a better understanding of your situation, which will help me determine the cause and solution for your problem to get you back to happily printing ASAP.
It would be very helpful if you could please email me photos of the top and non-labeled side of your carts, primarily the three you are currently experiencing problems with, for me to review.
Based on previous messages, you mis-filled the LLK cartridge, but we solved that issue and you said you were happily printing on 3/25. Then, on 4/7 you returned after being away for a week and the LLK was not printing. Before you left and were happily printing, about how many prints did you make? Was the printer left on or off during the week you were away? What are the average temperature and humidity levels in your printing environment recently? Were any carts other than the LLK not originally filled with the vacuum method? Have you ever cleaned the printer’s capping station, wiper blade and/or bottom of the print head as per our instructions and video?

Please let me know so I can help.
Best regards~ Dana :slight_smile:

Dana,

Here are answers to your questions:

While I was out of town the printer was off. Keeping the printer on for extended intervals can dry the heads out.
The temperature is usually a constant 65˚ or 70˚ with humidity 30-40% and sometimes 50%.
All other carts were filled with the vacuum method.
I cleaned the capping station and the print head using Windex today as per the instructions. Then I preformed a couple of cleanings and two nozzle checks. I got back all inks on the nozzle check printout. This should indicate that the heads are not clogged. I made three prints that came out fine, then on the fourth print the VLM stopped working. This was confirmed by another nozzle check. The LLK, LK and PK printed weak.
As far as the level of ink in each cart is concerned, there is a minimum of 50% of ink in each cart and I see no reason why that should be a problem.
I’m left with the dilemma of either buying the QTR software and hoping it works to flush out individual channels or the more expensive option of using the Epson Adjustment Utility as Jon suggested. That option would cost more because I am running a Mac and the software available on the 2manuals.com web site is for a PC only. So I would have to purchase a version of Windows as well as a additional external hard drive. I would have to partition the external hard drive to put the Windows OS on, (I do not want to chance doing that on my Mac hard drive). I would then have to hope that it would all work. Based on Peter’s experience with the QTR method I’m skeptical that option would be helpful, but who knows.
I called a Epson repair in Costa Mesa and they suggested testing to see if the heads are clogged first, which I did after the cleaning. They also said that I should buy new Epson carts and do some cleanings to see if it will flush out the Cone ink and not continue to clog. If that doesn’t work then it would have to come in for servicing.
I don’t understand why the ink would flow OK after my cleaning for a short period and then go back to not flowing within less than a hour. I can see inside the individual ink carts when I hold them up to the light and, as I stated above, there are ink levels of at least 50% or greater inside the carts. The VLM cart is 100% full.
This is a relatively new printer that has worked previously very well. The cleaning I did with the Windex revealed that there was not a abnormal amount of excess ink or overt signs of severely clogged heads.
What to do now?
Thanks.
Everett

Hi Everett~

Thanks for the clear information, this is all very helpful. From my experience with these refill carts in our R3000 for the past year, I have maintained good ink flow even with the cartridge body nearly empty, as long as ink remains in the exit chamber and air is not drawn into the lines. We did actually neglect our R3000 for a few months and let it sit unused with ConeColor inks, but after installing a set of flush carts and doing an initial fill to purge ink from the lines, I immediately got a perfect nozzle check- so the cartridges or print head didn’t dry out, and there were no serious clogs in the ink lines or dampers (I expected to experience one of these problems after that long).

Your conditions are perfect, and it’s great that your printer was off for the week while you were away (many people don’t realize leaving a printer on for extended periods of time can dry out the head).

What do you mean the LLK, LK and PK “printed weak”? Does this mean there were missing nozzles in these three positions on the nozzle check, or the nozzles are all printing, but the output looks faint? I am curious about the ink level in the exit chambers and the ink/air amount in the air channel of these four carts, which is why photos would be helpful for me to see.
Before installing the refill carts and ConeColor inks, had you previously used Epson inks/carts in this printer, or did you install the refill carts into the new printer? If you previously used Epson inks, did you print thru the contents of the starter carts with success before switching to the refill carts?

I can send you a new VLM cartridge, as it seems clear ink is not flowing correctly from that position, but want to clarify the other positions before sending anything.

Please let me know, thanks- Dana :slight_smile:

Dana,

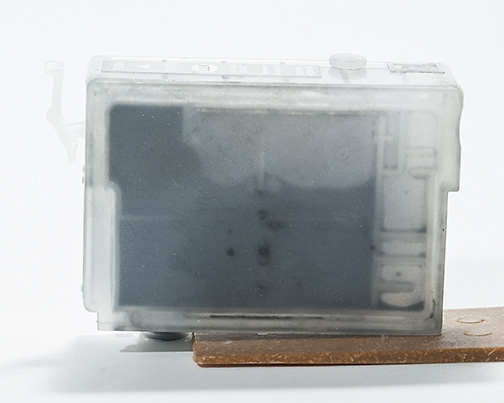
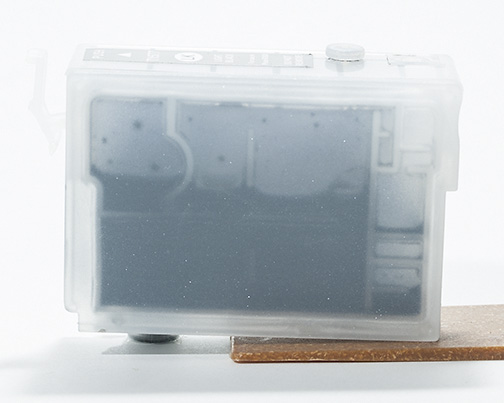
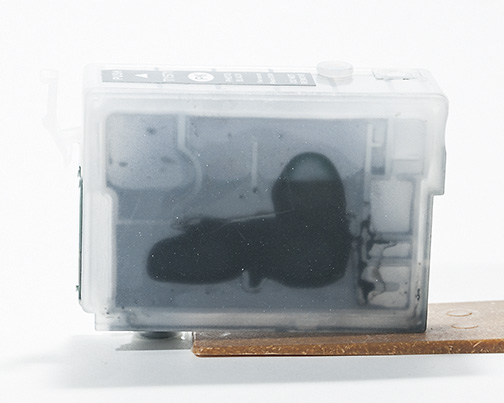
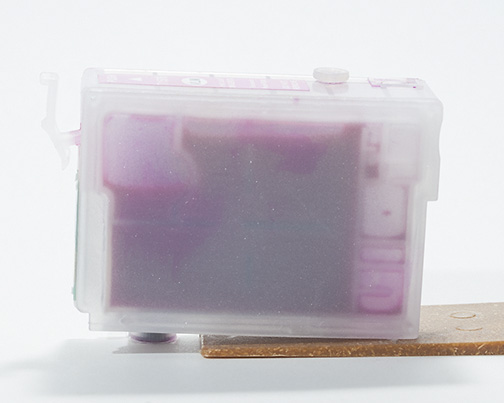
I’ve attached four photos of the VLM, LK,LLK and PK carts. These are the carts where ink is not flowing. In today’s test the VLM does not print at all, the LLK prints faintly, both the LK & the PK print with several broken lines. Normally a number printed in black appears under the nozzle check patterns, now this number does not appear on the nozzle check print out. After a cleaning, the LK & PK print hardly at all nor does the VLM.
I hope you can glean something wrong from the photos I’m sending.
Thanks.
Everett

PS: Now after going through the trouble of photographing each cart, your system won’t except even the smallest jpeg file imaginable. The images won’t up-load. Can I just send you a email with the attachments? FRUSTRATED.[/SIZE][/SIZE]

Please email the photos to me at techsupport@inkjetmall.com, or you can use the “basic uploader” on this forum to upload photos.

Hi Everett~

I uploaded the images you sent me. From left to right, the color positions are: LLK, LK, PK and VLM.

I quickly noticed the ink under the side of the PK cartridge- this could be from messy filling, or could indicate a tiny hole in the thin membrane under the plastic side- a punctured membrane could cause flow issues with that cart.
After examining a variety of R3000 carts I have used here in our printer, and comparing to your photos, I see your LLK cartridge looks most similar to my carts, in that the exit chamber is more than 1/2 full . All my carts, even the ones with just a drop of ink left in the main body, still have exit chambers that are 1/2 to 3/4 filled with ink (and were still having perfect ink flow). I suspect the ink level of your exit chambers is related to your ink flow issue.

I will send you replacement carts for these four positions. You can draw ink out of the current carts and use it to fill the new carts when they arrive. I recommend leaving either the refill or Epson carts installed in your printer to prevent drying until the new carts arrive. Please be sure to vacuum fill the new carts with ink when they arrive, so the exit chambers are all at least 1/2 filled with ink before installing he carts into your printer.

Let me know if you have questions, how things go with the new carts, or if there’s anything else I can help you with.
Best regards~ Dana :slight_smile:


Dana,

Thanks, I will give it a go when the carts arrive and let you know what happens.

Everett

Dana,

I’ve had some success getting my printer working! But I’m not sure I did it the way I should have…

I had the service manual so I took your advice and disassembled the R3000 until I got the ink supply disconnected from the head. I used the cleaning syringe to pull some ink through the Y line. When I used suction I got a bit of ink and then it would lock up, But the other lines that were working did the same thing, so I figured you can’t really pull ink through non-stop. (I think the amount I was able to suction out was about the amount that is stored in the damper.) I also used the cleaning syringe to inject some ink through the Y port on the head and out the capping station. And I put some Y ink though the Y cartridge to see that it did indeed come out the Y damper on the end at the head (it did). The thing I noticed in all this was that if I put pressure into the damper from the head end, I could see the film membrane swell, and I realized I could blow out the damper by doing that.

I made a bit of a mess in all that with dripping syringes, etc. and I cleaned it up as best I could and reassembled. Test print got me a slight improvement–printing a square of Y showed about one line in 10 printing, but it was consistent and not fading away after repeated pages. So I decided ink was getting to the head, so this must be a blocked head issue.

I took the printer apart, and this time heated up a mixture of distilled water and piezo flush (I was running low on flush solution). I flushed warm/hot solution through the head, and put a little in the end of the Y damper and pumped that carefully back and forth, keeping an eye on the damper movement.

Put the printer back together again, and got nothing when printing, but after a couple of head cleaning’s the yellow printed a wonderful solid Y! I was thrilled and was able to print 10 pages or so of backlogged work, and then the yellow faded away again.

So now it was back to being an ink starvation issue because the head was obviously clear. Somewhat dejected, I decided to give it one last go. At this point, I’ve gotten pretty adept at disassembling the printer. I decided maybe it was just clogged sludgy Y line dampers, so this time I took the hot solution and slowly injected at least 1/2 cup through the Y cartridge and out the Y damper. It did become easier as I went, but I wasn’t sure if it was because I’d blown the damper out. But at this point I didn’t care.

After that I injected another 1/3 cup or so through the head. Every time or so, I’d move the head off the capping station and soak up the copious amount of fluid with a paper towel so it didn’t overflow into the printer mechanism. (when flushing through the ink lines I put one of the large filling syringes on the Y damper end to catch the fluid coming through the ink lines). After I reconnected the ink lines I injected a couple syringes of yellow in from the cart end to flush out the cleaning solution and refill the line with ink.

After cleaning it all up and reassembly and one head cleaning, I got Y printing again. Over the next 2 days I’ve printed 30 or 40 full color prints with perfect coverage! I am tentatively hopeful that my printer is saved.

I have a few questions and observations about all this though. First, from what little I can find about ink dampers, I expexted to be able to suction ink through the damper with vacuum ans was surprised when it would lock up. Is there a valve between cartridge and damper that opens and closes the line when printing?

I was worried that injecting ink through from the cartridge end would pressurize and damage things, or blow out a valve, but it seems to be the only thing that worked.

I wish I understood the flow of the damper system better.

What I’ve taken away from this is that the Cone inks were not the problem. My printer sat idle for some periods and I didn’t ever shake the cartridges or print a page during that time. And I let a cartridge run completely dry when I did finally print. I think I ended up with sludgy lines, clogged pigment in the supply dampers, and dried ink in the head nozzles. Lots of warm solution injected through solved the problem.

Given what I did, it probably wouldn’t even be necessary to remove the ink supply to do this. You could just carefully inject the warm solution through the cartridge port of the affected color and on out through the head into the capping station. Between syringes, slide the head over and sop up the cleaning fluid with a paper towel and slide the head back. And repeat over and over until you feel the clogs and old ink are dissolved or flushed out, and then repeat some more.

I can’t guarantee that I didn’t do some damage to the damper, but so far it seems ok.

I also learned that you can’t replace individual damper on the R3000. You have to replace the whole expensive ink supply unit that contains the cartridge holders, ink lines and cover plate/damper assembly.

I’ve also learned that I will check my cartridges evey week, keep them topped off, and run a print at least every week or so!