R3000 LLK ink not flowing

Dana,

I have checked and rechecked and all of the carts are properly filled with ink, all the air vent plugs are out of the carts and I filled the LLK cart again using the vacuum method as was suggested. The VLM cart was refilled using the blunt tip needle method. Repeated cleanings have been done to no avail and I now have no ink flow in the VLM, LLK, and PK lines. I’m no expert at printer technology, but I fear that the nozzles may be clogged as well as air in the lines. Please advise.

Hi Peter~ Without knowing exactly why you’re continuing to have issues, and considering the damper may be damaged from pressure of using the print head cleaning kit, I can advise you from afar based on the information you supply and my experience with various printer models.

Since you are having the same results with the Epson Y cart as with the refill Y cart, I suspect the cartridge or ink is not the issue, so don’t feel confident that installing a set of PiezoFlush carts and flushing the lines will give you different results than what you are getting with the two different Y carts. Considering the factors in your situation, I would personally disconnect the dampers from the print head to flush the head and draw ink thru the Y damper, and check for yellow ink on the damper (to indicate a leaking damper), as well as resistance when drawing ink thru the damper + line. To help in this process, I can send you a CD with the repair manual (so you don’t have to purchase it from 2manuals.com) so you can follow the step by step instructions for accessing the print head and dampers. You can use the syringe that came with the refill carts to draw ink thru the damper/ink line, as a slit-tip syringe fits perfectly in the damper exit hole.

Please let me know how you’d like to continue, and what I can do to help.
Best regards~ Dana :slight_smile:

Hi Everett~

I am sorry to hear of your continued problems and will do everything I can to help you get past this and back to happily printing.

After re-reading your past messages, I have a few questions to help me gain a better understanding of your situation, which will help me determine the cause and solution for your problem to get you back to happily printing ASAP.
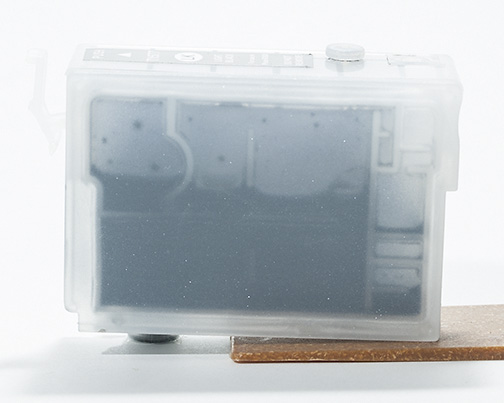
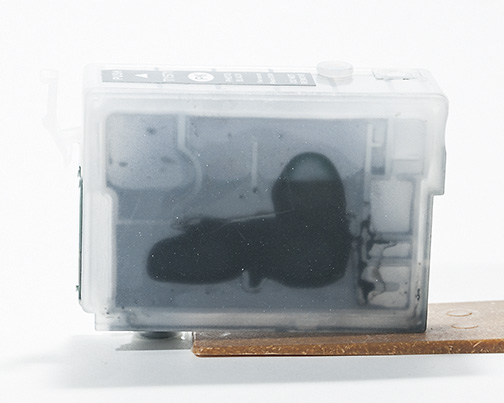
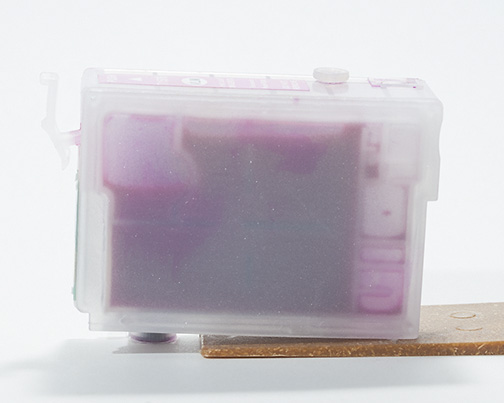
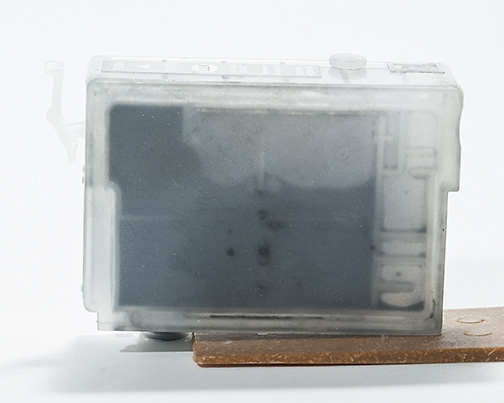
It would be very helpful if you could please email me photos of the top and non-labeled side of your carts, primarily the three you are currently experiencing problems with, for me to review.
Based on previous messages, you mis-filled the LLK cartridge, but we solved that issue and you said you were happily printing on 3/25. Then, on 4/7 you returned after being away for a week and the LLK was not printing. Before you left and were happily printing, about how many prints did you make? Was the printer left on or off during the week you were away? What are the average temperature and humidity levels in your printing environment recently? Were any carts other than the LLK not originally filled with the vacuum method? Have you ever cleaned the printer’s capping station, wiper blade and/or bottom of the print head as per our instructions and video?

Please let me know so I can help.
Best regards~ Dana :slight_smile:

Dana,

Here are answers to your questions:

While I was out of town the printer was off. Keeping the printer on for extended intervals can dry the heads out.
The temperature is usually a constant 65˚ or 70˚ with humidity 30-40% and sometimes 50%.
All other carts were filled with the vacuum method.
I cleaned the capping station and the print head using Windex today as per the instructions. Then I preformed a couple of cleanings and two nozzle checks. I got back all inks on the nozzle check printout. This should indicate that the heads are not clogged. I made three prints that came out fine, then on the fourth print the VLM stopped working. This was confirmed by another nozzle check. The LLK, LK and PK printed weak.
As far as the level of ink in each cart is concerned, there is a minimum of 50% of ink in each cart and I see no reason why that should be a problem.
I’m left with the dilemma of either buying the QTR software and hoping it works to flush out individual channels or the more expensive option of using the Epson Adjustment Utility as Jon suggested. That option would cost more because I am running a Mac and the software available on the 2manuals.com web site is for a PC only. So I would have to purchase a version of Windows as well as a additional external hard drive. I would have to partition the external hard drive to put the Windows OS on, (I do not want to chance doing that on my Mac hard drive). I would then have to hope that it would all work. Based on Peter’s experience with the QTR method I’m skeptical that option would be helpful, but who knows.
I called a Epson repair in Costa Mesa and they suggested testing to see if the heads are clogged first, which I did after the cleaning. They also said that I should buy new Epson carts and do some cleanings to see if it will flush out the Cone ink and not continue to clog. If that doesn’t work then it would have to come in for servicing.
I don’t understand why the ink would flow OK after my cleaning for a short period and then go back to not flowing within less than a hour. I can see inside the individual ink carts when I hold them up to the light and, as I stated above, there are ink levels of at least 50% or greater inside the carts. The VLM cart is 100% full.
This is a relatively new printer that has worked previously very well. The cleaning I did with the Windex revealed that there was not a abnormal amount of excess ink or overt signs of severely clogged heads.
What to do now?
Thanks.
Everett

Hi Everett~

Thanks for the clear information, this is all very helpful. From my experience with these refill carts in our R3000 for the past year, I have maintained good ink flow even with the cartridge body nearly empty, as long as ink remains in the exit chamber and air is not drawn into the lines. We did actually neglect our R3000 for a few months and let it sit unused with ConeColor inks, but after installing a set of flush carts and doing an initial fill to purge ink from the lines, I immediately got a perfect nozzle check- so the cartridges or print head didn’t dry out, and there were no serious clogs in the ink lines or dampers (I expected to experience one of these problems after that long).

Your conditions are perfect, and it’s great that your printer was off for the week while you were away (many people don’t realize leaving a printer on for extended periods of time can dry out the head).

What do you mean the LLK, LK and PK “printed weak”? Does this mean there were missing nozzles in these three positions on the nozzle check, or the nozzles are all printing, but the output looks faint? I am curious about the ink level in the exit chambers and the ink/air amount in the air channel of these four carts, which is why photos would be helpful for me to see.
Before installing the refill carts and ConeColor inks, had you previously used Epson inks/carts in this printer, or did you install the refill carts into the new printer? If you previously used Epson inks, did you print thru the contents of the starter carts with success before switching to the refill carts?

I can send you a new VLM cartridge, as it seems clear ink is not flowing correctly from that position, but want to clarify the other positions before sending anything.

Please let me know, thanks- Dana :slight_smile:

Dana,

I’ve attached four photos of the VLM, LK,LLK and PK carts. These are the carts where ink is not flowing. In today’s test the VLM does not print at all, the LLK prints faintly, both the LK & the PK print with several broken lines. Normally a number printed in black appears under the nozzle check patterns, now this number does not appear on the nozzle check print out. After a cleaning, the LK & PK print hardly at all nor does the VLM.
I hope you can glean something wrong from the photos I’m sending.
Thanks.
Everett

PS: Now after going through the trouble of photographing each cart, your system won’t except even the smallest jpeg file imaginable. The images won’t up-load. Can I just send you a email with the attachments? FRUSTRATED.[/SIZE][/SIZE]

Please email the photos to me at techsupport@inkjetmall.com, or you can use the “basic uploader” on this forum to upload photos.

Hi Everett~

I uploaded the images you sent me. From left to right, the color positions are: LLK, LK, PK and VLM.

I quickly noticed the ink under the side of the PK cartridge- this could be from messy filling, or could indicate a tiny hole in the thin membrane under the plastic side- a punctured membrane could cause flow issues with that cart.
After examining a variety of R3000 carts I have used here in our printer, and comparing to your photos, I see your LLK cartridge looks most similar to my carts, in that the exit chamber is more than 1/2 full . All my carts, even the ones with just a drop of ink left in the main body, still have exit chambers that are 1/2 to 3/4 filled with ink (and were still having perfect ink flow). I suspect the ink level of your exit chambers is related to your ink flow issue.

I will send you replacement carts for these four positions. You can draw ink out of the current carts and use it to fill the new carts when they arrive. I recommend leaving either the refill or Epson carts installed in your printer to prevent drying until the new carts arrive. Please be sure to vacuum fill the new carts with ink when they arrive, so the exit chambers are all at least 1/2 filled with ink before installing he carts into your printer.

Let me know if you have questions, how things go with the new carts, or if there’s anything else I can help you with.
Best regards~ Dana :slight_smile:


Dana,

Thanks, I will give it a go when the carts arrive and let you know what happens.

Everett

Dana,

I’ve had some success getting my printer working! But I’m not sure I did it the way I should have…

I had the service manual so I took your advice and disassembled the R3000 until I got the ink supply disconnected from the head. I used the cleaning syringe to pull some ink through the Y line. When I used suction I got a bit of ink and then it would lock up, But the other lines that were working did the same thing, so I figured you can’t really pull ink through non-stop. (I think the amount I was able to suction out was about the amount that is stored in the damper.) I also used the cleaning syringe to inject some ink through the Y port on the head and out the capping station. And I put some Y ink though the Y cartridge to see that it did indeed come out the Y damper on the end at the head (it did). The thing I noticed in all this was that if I put pressure into the damper from the head end, I could see the film membrane swell, and I realized I could blow out the damper by doing that.

I made a bit of a mess in all that with dripping syringes, etc. and I cleaned it up as best I could and reassembled. Test print got me a slight improvement–printing a square of Y showed about one line in 10 printing, but it was consistent and not fading away after repeated pages. So I decided ink was getting to the head, so this must be a blocked head issue.

I took the printer apart, and this time heated up a mixture of distilled water and piezo flush (I was running low on flush solution). I flushed warm/hot solution through the head, and put a little in the end of the Y damper and pumped that carefully back and forth, keeping an eye on the damper movement.

Put the printer back together again, and got nothing when printing, but after a couple of head cleaning’s the yellow printed a wonderful solid Y! I was thrilled and was able to print 10 pages or so of backlogged work, and then the yellow faded away again.

So now it was back to being an ink starvation issue because the head was obviously clear. Somewhat dejected, I decided to give it one last go. At this point, I’ve gotten pretty adept at disassembling the printer. I decided maybe it was just clogged sludgy Y line dampers, so this time I took the hot solution and slowly injected at least 1/2 cup through the Y cartridge and out the Y damper. It did become easier as I went, but I wasn’t sure if it was because I’d blown the damper out. But at this point I didn’t care.

After that I injected another 1/3 cup or so through the head. Every time or so, I’d move the head off the capping station and soak up the copious amount of fluid with a paper towel so it didn’t overflow into the printer mechanism. (when flushing through the ink lines I put one of the large filling syringes on the Y damper end to catch the fluid coming through the ink lines). After I reconnected the ink lines I injected a couple syringes of yellow in from the cart end to flush out the cleaning solution and refill the line with ink.

After cleaning it all up and reassembly and one head cleaning, I got Y printing again. Over the next 2 days I’ve printed 30 or 40 full color prints with perfect coverage! I am tentatively hopeful that my printer is saved.

I have a few questions and observations about all this though. First, from what little I can find about ink dampers, I expexted to be able to suction ink through the damper with vacuum ans was surprised when it would lock up. Is there a valve between cartridge and damper that opens and closes the line when printing?

I was worried that injecting ink through from the cartridge end would pressurize and damage things, or blow out a valve, but it seems to be the only thing that worked.

I wish I understood the flow of the damper system better.

What I’ve taken away from this is that the Cone inks were not the problem. My printer sat idle for some periods and I didn’t ever shake the cartridges or print a page during that time. And I let a cartridge run completely dry when I did finally print. I think I ended up with sludgy lines, clogged pigment in the supply dampers, and dried ink in the head nozzles. Lots of warm solution injected through solved the problem.

Given what I did, it probably wouldn’t even be necessary to remove the ink supply to do this. You could just carefully inject the warm solution through the cartridge port of the affected color and on out through the head into the capping station. Between syringes, slide the head over and sop up the cleaning fluid with a paper towel and slide the head back. And repeat over and over until you feel the clogs and old ink are dissolved or flushed out, and then repeat some more.

I can’t guarantee that I didn’t do some damage to the damper, but so far it seems ok.

I also learned that you can’t replace individual damper on the R3000. You have to replace the whole expensive ink supply unit that contains the cartridge holders, ink lines and cover plate/damper assembly.

I’ve also learned that I will check my cartridges evey week, keep them topped off, and run a print at least every week or so!

Dana,
Thanks for sending the new carts. They don’t work any better than the old ones. All carts were properly filled with the vacuum method and the batteries are working. Should I just junk the printer or what?

Everett

Everett,
My printer has been working perfectly for 2 weeks now and over 60 8.5X11 prints. You should try what I did before you give up.

Peter

Hi Everett~

I’m sorry to hear you’re having the same results with the new carts I sent you. I agree with Peter and certainly wouldn’t give up on your printer, though I know how frustrating it can be when things aren’t working as they should, especially when you need them to work.

After vacuum filling the new carts with ink and installing them in your printer in place of the original refill carts, what did you do: cleaning cycles, ink fill, print, etc…?

Please let me know so I can continue trying to help- Dana :slight_smile:

Pgross message. Have you solved your problem printing using Epson cartridge?

My printer has been working great since I went through all the steps to flush it out almost a year ago. i use the Cone inks and not the epson cartridges. I make sure to do a print job every week. I’ve had the yellow clog up a few times but was able to clear it with a few regular head cleanings.