hi
i just bought and installed the new QTR(2.7.5)and the new print tool. I’m working with a 2012 mac 10.8.5os and a color edge cg276 Eizo monitor. its calibrated to piezo specs using built in tool. can see 9 on test chart. viewing is with GTI pro desktop viewer in darkroom. using k7 inks and cone type5 paper also using soft proof profile for this paper to view on monitor. and type5 profile in QTR to print. HELP!! why are prints a stop to stop and a half darker than on monitor. nozzle check looks good.
what brightness did you calibrate to on the Eizo?
are you using Color Navigator to set the target measurements of Gamma, WP and Brightness?
have two targets set up one is brightness 79.8 the other is 70.0 while the one at 70 can see more of chart both give proof that look good but print darker. all measurements were set by color navigator please tell me what gamma do you use monitor native,adobe rgb,gray gamma 2.2 or? brightness is set at 80 and white pt. at d50. black level is set at .3 . white is set at 2.20 should priority be set gray balance,standard or contrast?
I use two different Brightness levels. I image in a room without any lighting but it receives small amounts of ambient lighting in around the edges of light blocking blinds. The brightness level for this is 85. At night if I am still imaging with someone - the room becomes fully dark and the 85 is too bright. We reduce to 85 calibration.
Always the Gamma is 2.20 for Piezography. White Point at D50 (5000k). I do not adjust black point but allow it to be a function of brightness. The color space is Adobe RGB 1998.
The prints are viewed in an adjacent 5000k viewing booth that is illuminated at the same exact brightness as the display. That is a D50 requirement. The comparison of proofs and display at Cone Editions using this method is extremely close. Finally, we use a Soft Proof to equalize the two…
Not wishing to hijack this thread, I just calibrated my CG222W as above. Without setting a black point, I get a contrast ratio of 2410:1. When I set the Black Level to 0.4, I get 206:1 which is close to my colour profile. I thought that such a high contrast ratio was to be avoided.
contrast ratio for ink on paper is closer to 250:1 and better than 2410:1
i have set the gamut at RGB1998,brightness at 80,white ptD50,black pt let it float,gamma 2.20 and priority standard. prints are still stop and half dark. booth is set to D50 eye ball brightness to match display. how can get this exact? why are prints dark?? thanks will
possibly your workflow. Can you grab some screen shots of your workflow? if you are on PC grab the QTR GUI interface screenshot of how you are setting everything. If you are on Mac grab both the QTR Print Tool and then the QTR Print window so I can see all the settings…
did you get screen shots via Wells?
Your workflow looks correct…
why you are dark i do not know…
the problem is either the prints are too dark or the display is too bright.
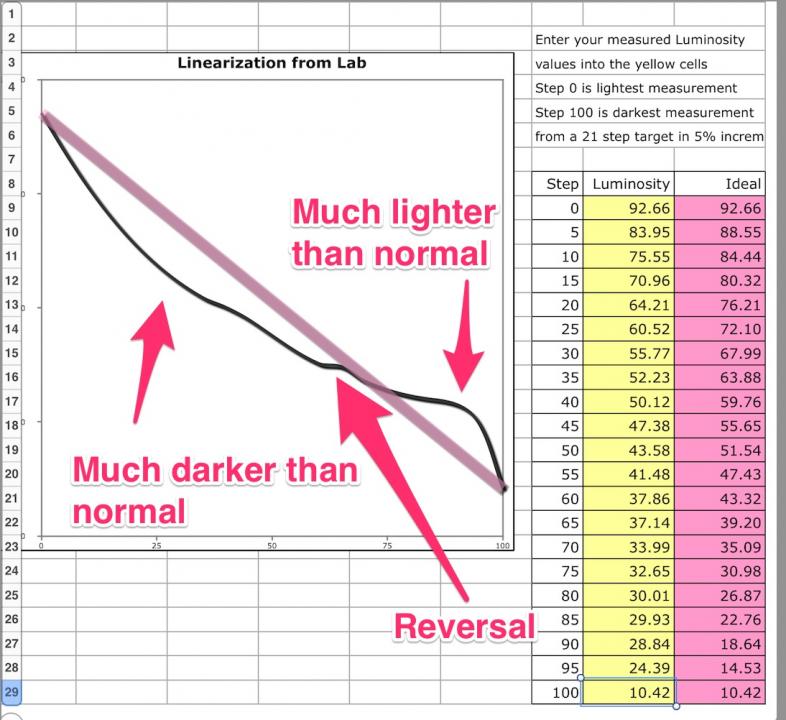
the only way to know if the prints are correct is to check the linearization. Do you have an Eye1 spectro by chance? And anyway to run the measure tool or get L values from measuring a 21 step gray file? you can plot that in the Piezography Linerization Checker. If you are linear - the display is too bright - why ? I can’t say…
Let me know if you can measure a 21 step wedge…
my old macbeth is not working so got an i1pro measured the 21 test strip i printed out but not sure how to interpret the data
Download the linearizationchecker.xls from the custom profiling kit on the Instructions tab here:
http://shopping.netsuite.com/s.nl/c.362672/it.A/id.3682/.f?sc=15&category=-115
Punch the L numbers in. Send a screen grab.
did you get the screen shot i sent via wells? the step wedge densities get dark quick but the nozzle check looks fine.
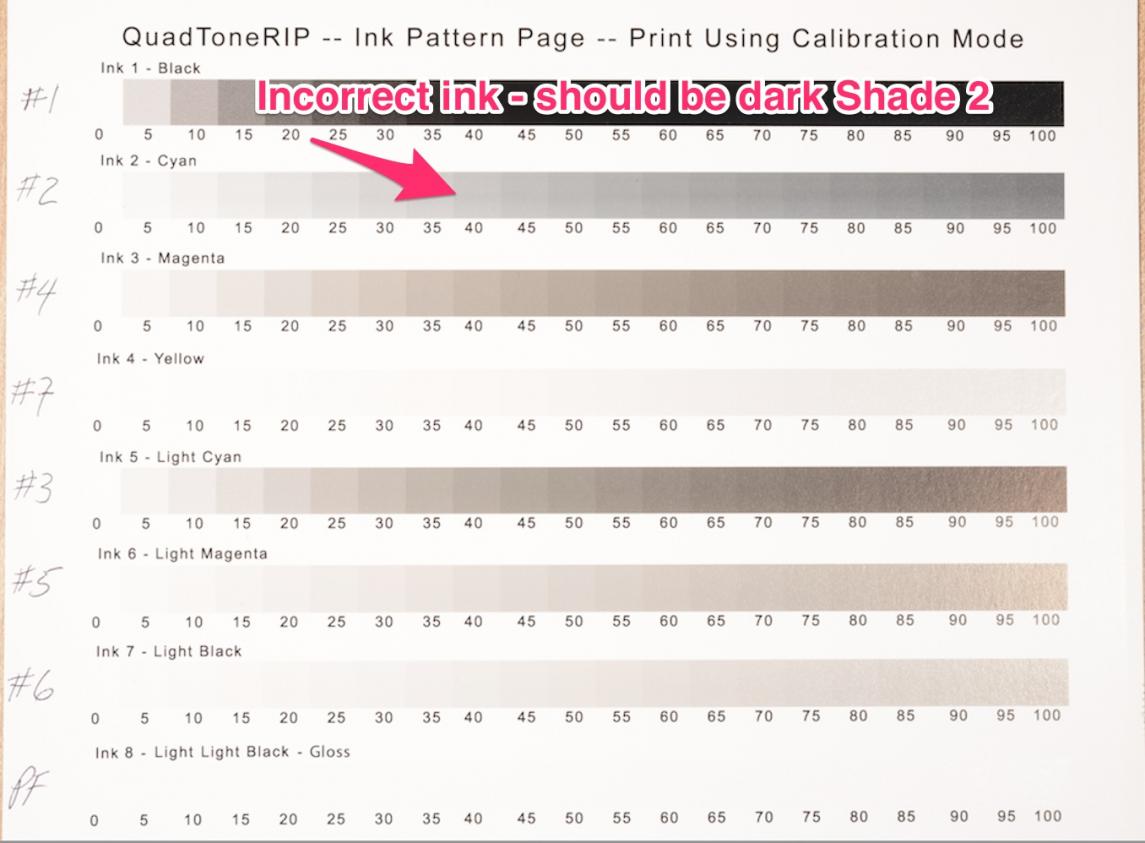
your system is screwed up to be sure! I have doubts about whether your inks in the carts are what they should be. Can you now print out the calibration mode target by following these instructions here. Send us a scan of the print… I think the inks may be out of order. Your linearization shows it printing way too light at the bottom and way too dark at the top to mid tones with a reversal area. You should be seeing posterized output. In fact the output should look really poorly. This may be about the worst linearization I have ever seen!!! Also scan the 21 step you used to measure this from.
We are getting to the bottom of this…
Thanks!
i have triple checked the ink order and the nozzle ck. don’t think it is that. will send scan of print and wedge
printed the cal.target and inks are in correct position. but my #2 looks much cooler than one in scan that is K7 inks also. also my #2 looks, because of its coolness, out of place with other inks in set.
Hi Will,
I am really not certain what you have in the Cyan color position of your printer. But it is not a shade 2 ink according to your calibration mode. All the other inks are very warm and are sequentially in shade order. The Cyan position seems to be using a shade 5 Neutral ink. But I do not see any new ink purchases on your customer record other than a shade 1 black in Nov 2014. All the other inks appear to have been purchased in April 2013. But this ink in Cyan position which should be a very dark shade 2 looks instead like very light ConeColor LLK or a Neutral Shade 5. You have purchased ConeColor LLK but not Neutral Shade 5.
The presence of such a light ink where such a dark ink is expected does explain why your system is printing so light in the shadows. And why your linearization is so off in the shadows. Why your system is so dark in the upper regions is more difficult to trouble shoot. But - with one ink incorrect in the system there is a possibility that this system has been sitting idle for a long time at some point and all the inks have been subjected to changes of some sort from pigment falling out of suspension. That is my best guess. I think that you have two things going on at once. A mis-filled cartridge in the Cyan position and a printer that has sat with pigment ink in it for some time of inactivity.
Normally when a printer is behaving like this we instruct to remove the cartridges and shake them gently for 15 seconds. This will re-suspend the pigment. You can not shake the ink inside the printer’s ink dampers and ink lines. You must push this stale ink out by performing three POWER CLEANS or an INITIAL INK CHARGE. However, I am suspect that you may need to replace the ink in the Cyan position as I do not think it is Warm Neutral Shade 2.
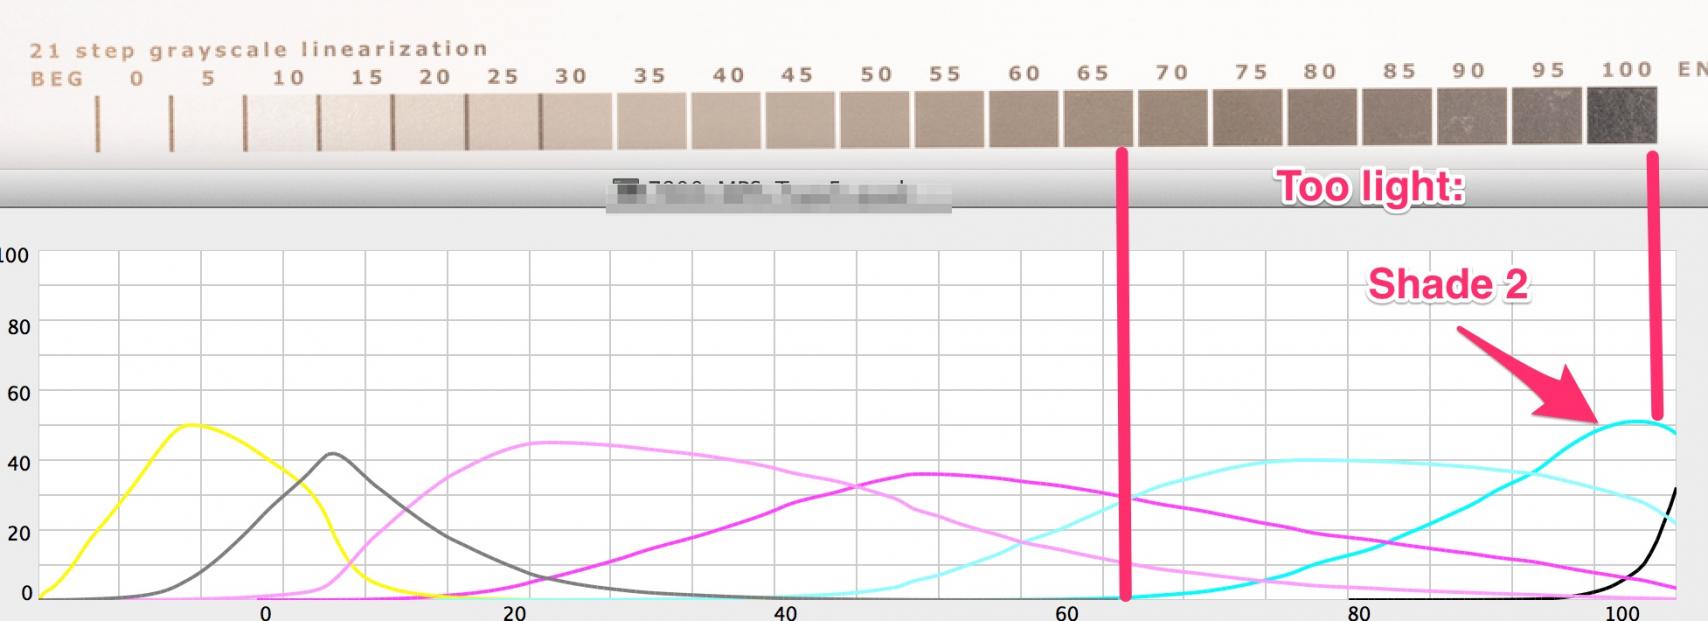
have run several power cleaning and the cyan is out of #2 ink. this has also helped over all. sending screen shot of new linearization.
Hi Will,
Originally you said the system was printing darker than your display. I thought it may be a workflow or calibration issue. Your workflow was correct. Your calibration was correct.
Then I learned that the inks inside of your printer have been compromised. Judging by your new linearization and the several Power Cleanings you have now done, the inks inside of your printer are still compromised. The reasons for this may be due to contamination or aging or something that has not yet been mentioned. But, it is clear that the light shades are too dark, the dark shades are too light. If you have done 3-4 POWER CLEANS and you are still in this condition - then the inks themselves should be exchanged for fresh ink. Your linearization must be straight in order to produce prints that will match your display as well as produce high standard prints.
ok i have fresh bottles of ink that have not been opened. will dump inks in printer and put these in place. but i have a step wedge that i printed when first began using these inks and it looks like one just done.