Hiya, could you please help. I’m noticing some strange posterization in my digital negs. The file I’m printing looks fine, but the resulting print from the neg doesn’t have a smooth transition of tones. I’m outputting files as 16bit grayscale TIFFs with a gamma of 2.2 in Adobe 1998 colourspace. I’m not sure what is going wrong. I believe that all the inks are installed correctly. What else could be causing this? I have included a picture of the original file in Photoshop and a scan of the same section of the resulting print. The digital negative is for silver printing so I have only reversed the image without applying a correction curve. I’m using the 1.6 density curve in QTR. I hope this is enough information to help.
Did you try to print a 21 step-wedge with each of the curves to determine if your exposure and development time worked better with one or the other curves or if you needed to adjust your exposure and development to suit one of the curves better? Or did you just go straight to film and print? It looks to me that your film density is too high and possibly too thin the same time. Your exposure may be too long. And the film too dense.
The tonal range of the film you are making (in other words) has a density range that is not calibrated to your exposure and development. You should first start with a step wedge so that you are satisfied you can print detail less than specular and detail just above dMax. If you can not - you need to adjust either the exposure or and the curve in QTR.
I responded to your first post before reading the second about the neck. You are posterized due either to the inks in the wrong position or using the wrong digital negative curves for your ink layout. There are several generations of process. I do not know which one you are using. I would need to know what shades are in what color positions - and what is the name of the curve you used. Finally - if you are on Mac OSX and not using the Print Tool - Apple is silently converting your grayscale for you prior to QTR getting ahold of it to print. Possibly all of these… I’m online through the holidays so get back to me…
I was under the impression that no correction curve is needed for silver gelatin printing. Development is the standard 2 minutes for resin coated paper. I’m on a PC, printing directly from QTR. I’m printing with a density of 1.6
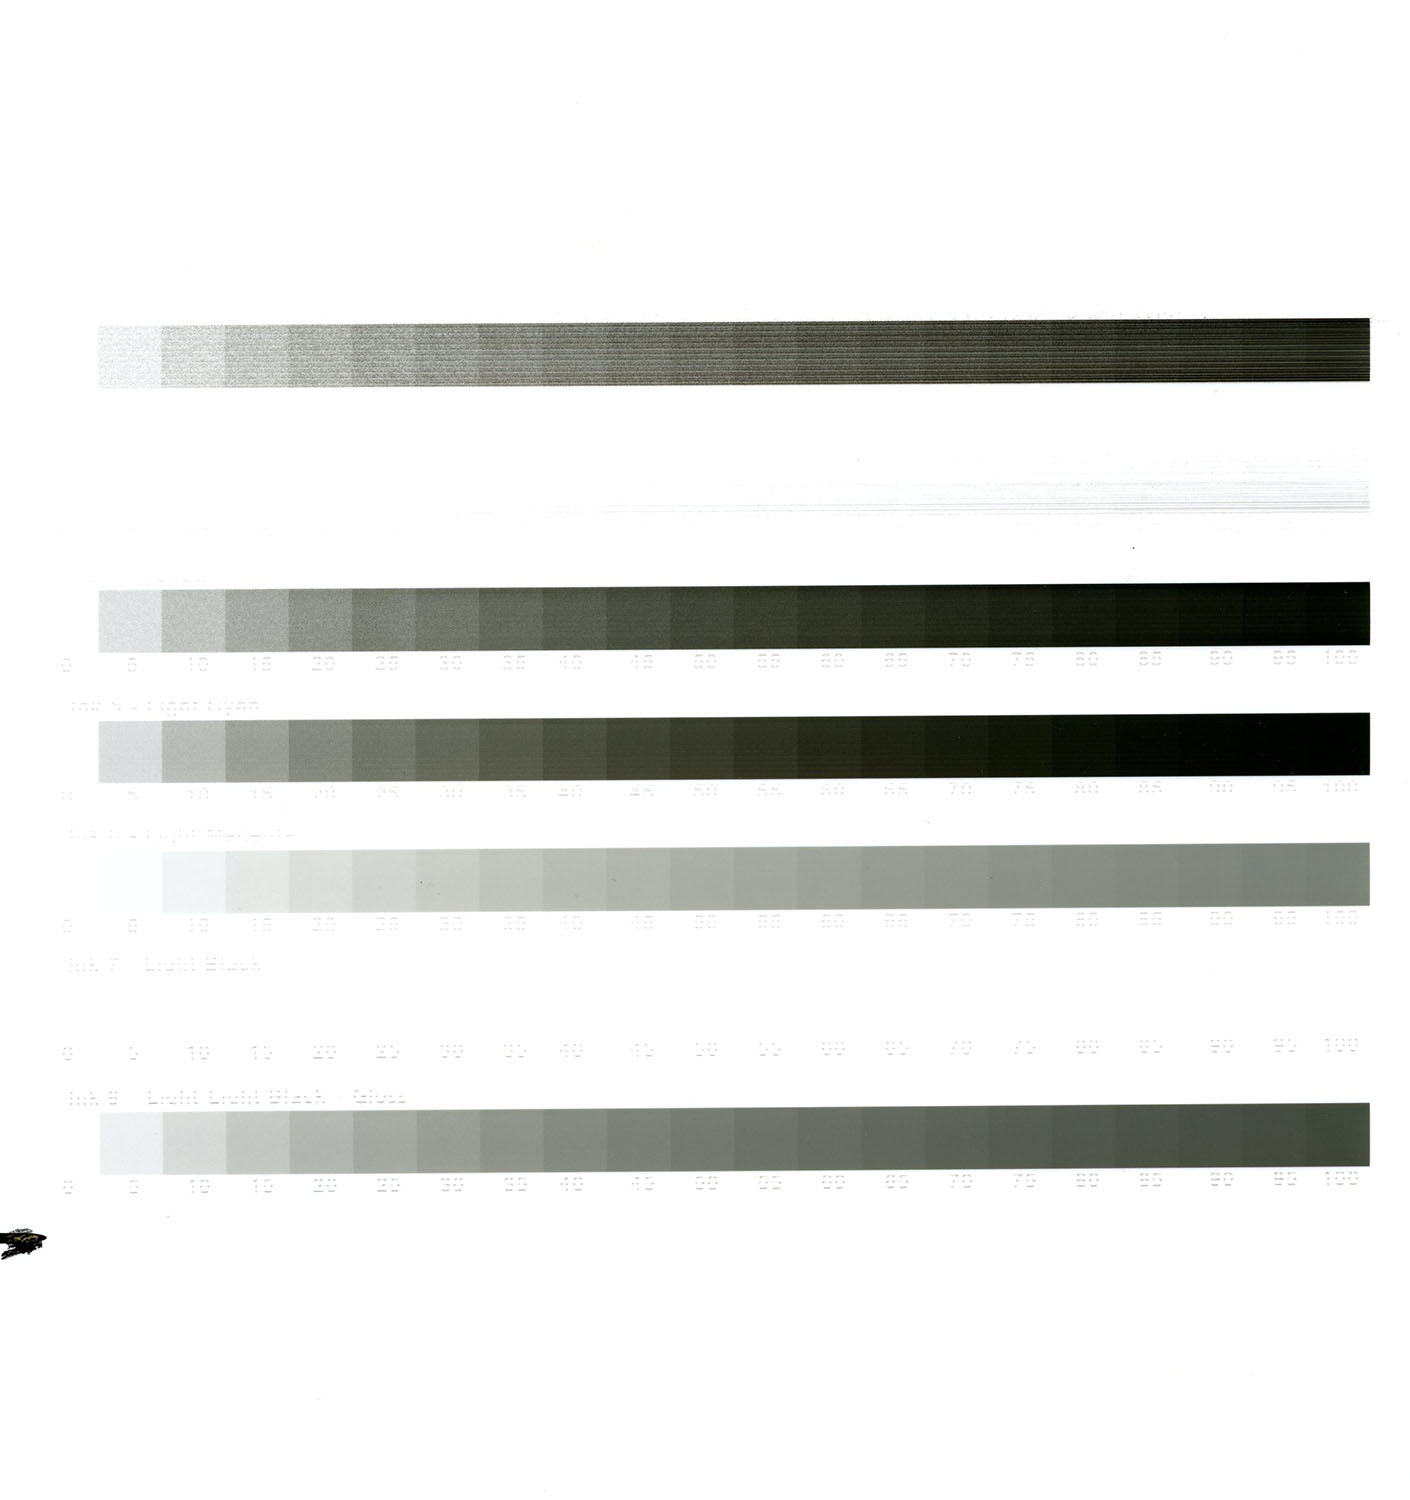
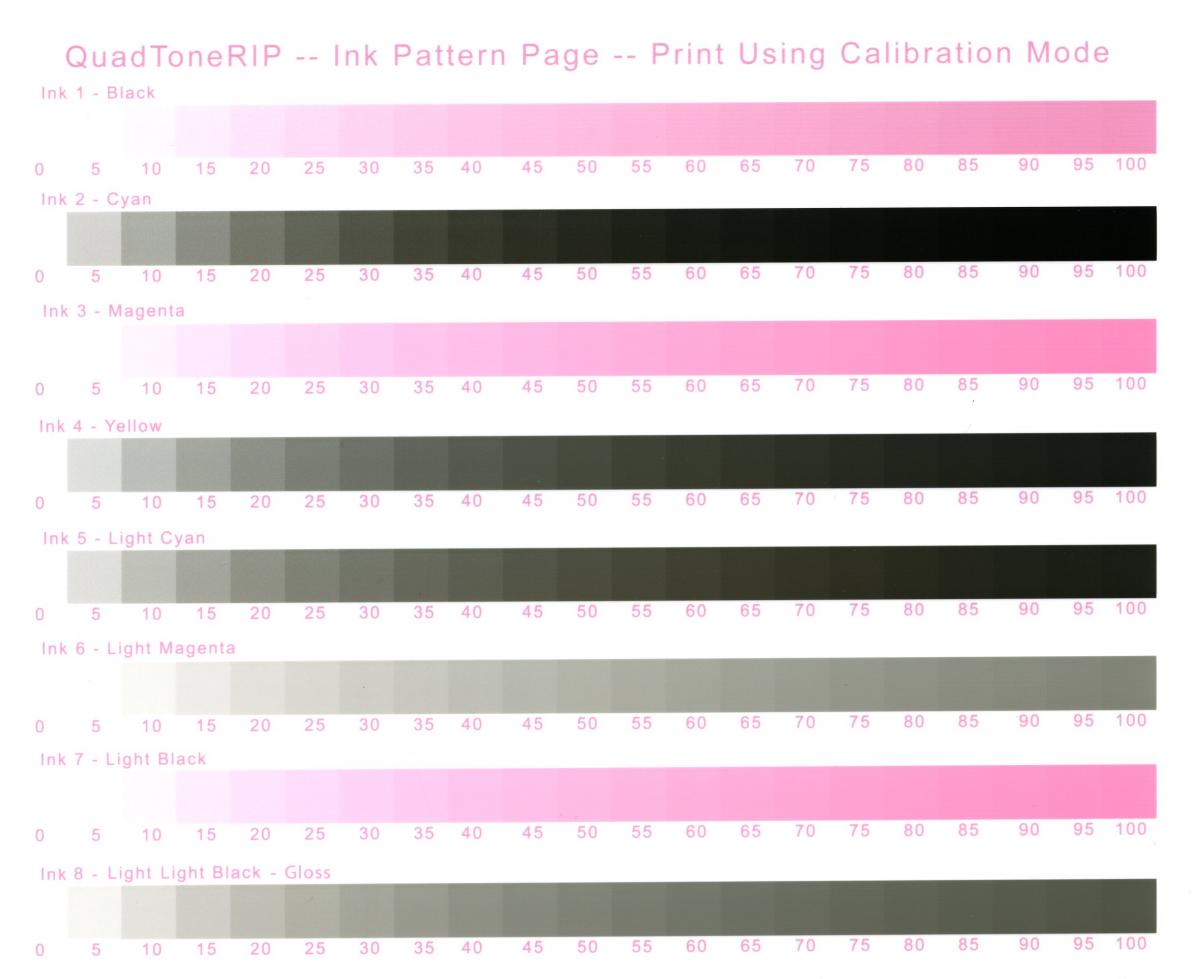
Ok. Run a nozzle check to make sure that the five ink positions are printing perfectly. If you are missing - you can have posterization. If there is some cross-contamination of the inks or the inks are not exactly in the positions you think - then you can have posterization. You can print the ink separation file in Calibration mode onto some inkjet paper and upload a scan of it so we can confirm. I think that that is important to know as there is definitely what looks like a hard break.
lets confirm that first before proceeding on the other issue which is too much density - scan a nozzle check followed by the calibration mode print out of inkseperation file
[QUOTE=jon;5492]Ok. Run a nozzle check to make sure that the five ink positions are printing perfectly. If you are missing - you can have posterization. If there is some cross-contamination of the inks or the inks are not exactly in the positions you think - then you can have posterization. You can print the ink separation file in Calibration mode onto some inkjet paper and upload a scan of it so we can confirm. I think that that is important to know as there is definitely what looks like a hard break.
lets confirm that first before proceeding on the other issue which is too much density - scan a nozzle check followed by the calibration mode print out of inkseperation file
I am suspecting something is these two tests…[/QUOTE]
My nozzle check is totally clean, How do i print an ink separation test?
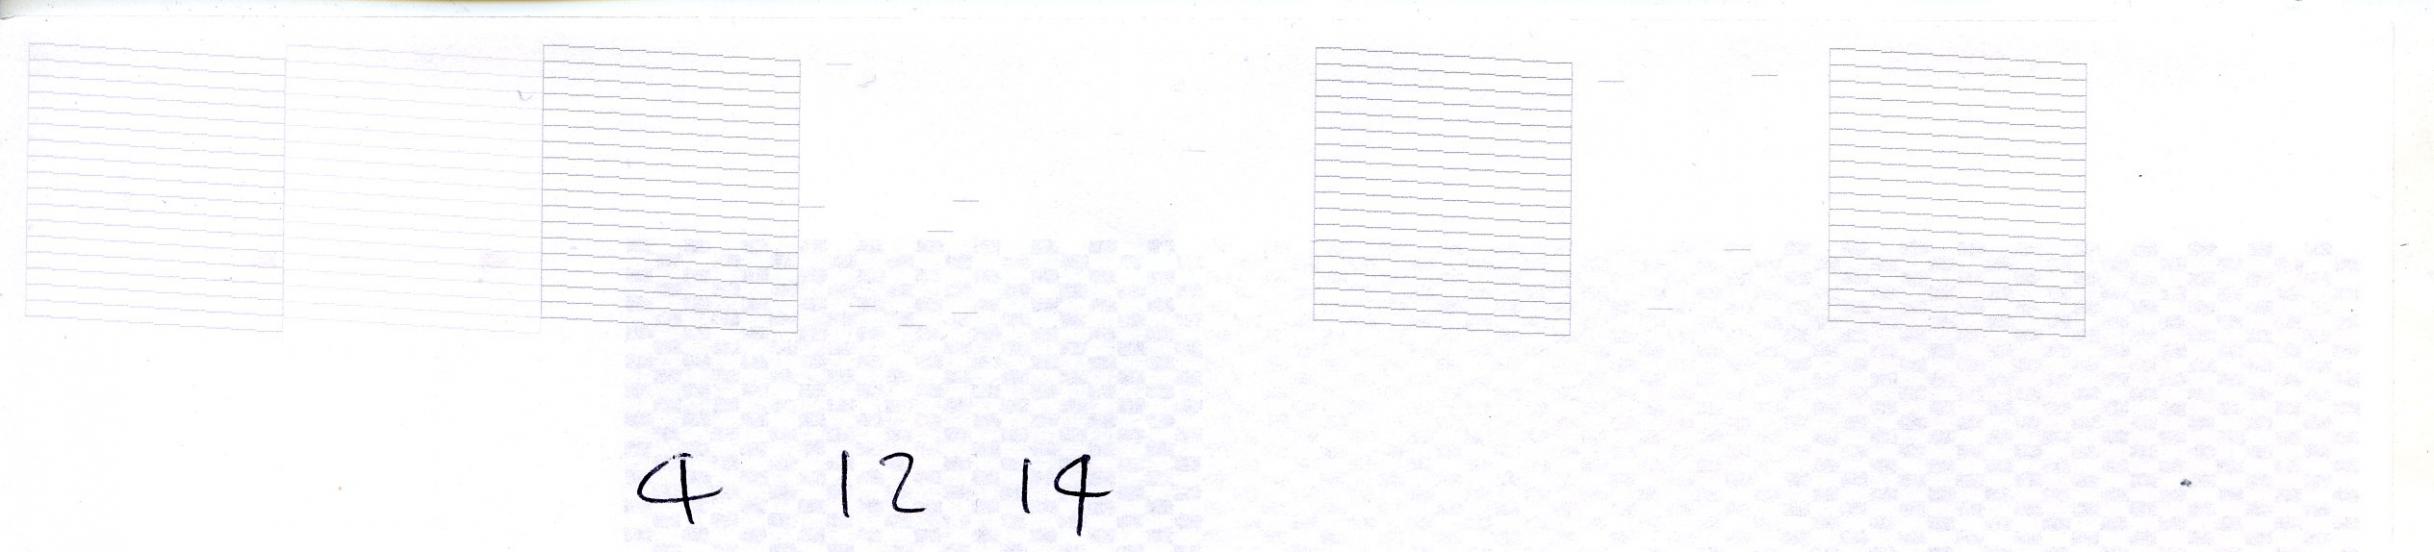
Here’s the results of my autonozzle and nozzle checks. You can see from the nozzle check that all five ink posuitions are printing fine, it’s only the piezoflush channels that seem to be clogged which seems odd to me
Here’s the results of my autonozzle and nozzle checks. You can see from the nozzle check that all five ink posuitions are printing fine, it’s only the piezoflush channels that seem to be clogged which seems odd to me
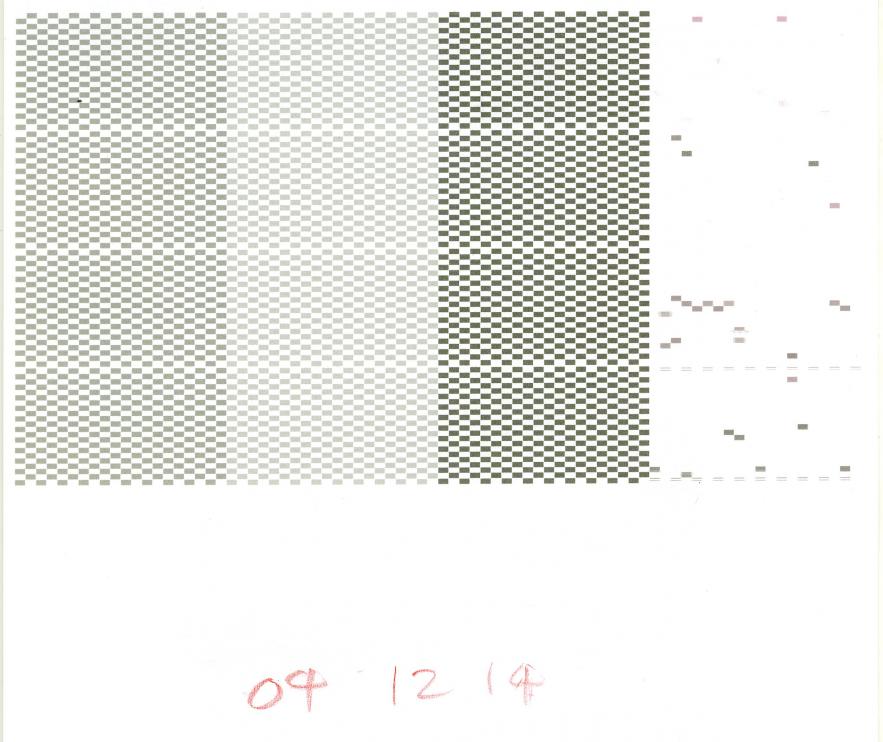
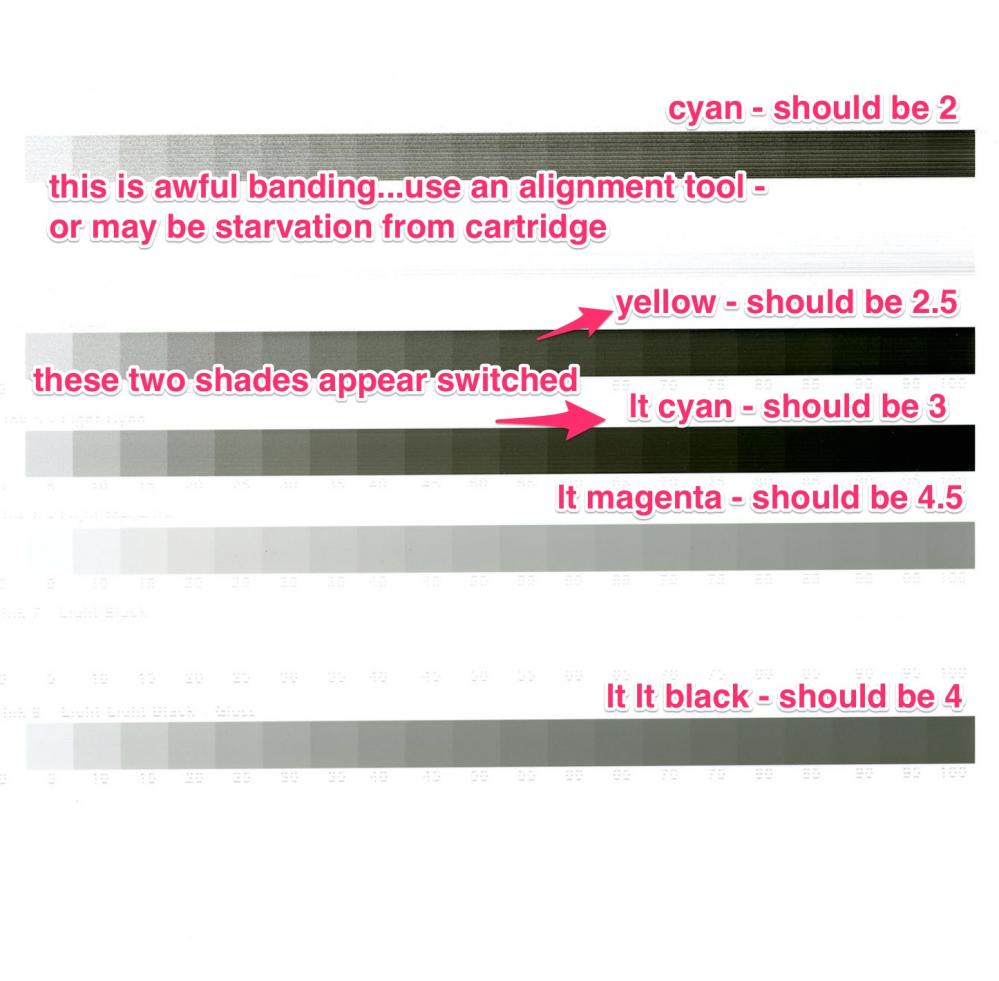
wondering if you have the carts vented properly or have misfilled them through the vent hole?? something is wrong in your ink delivery. Your shade 2 is banding because of venting possibly… its not useable for printing. Also I believe that your shades 2.5 and 3 are switched.
[QUOTE=jon;5531]wondering if you have the carts vented properly or have misfilled them through the vent hole?? something is wrong in your ink delivery. Your shade 2 is banding because of venting possibly… its not useable for printing. Also I believe that your shades 2.5 and 3 are switched.
[/QUOTE]
What do you mean by a venting problem? I’ve removed the rubber stopper from the vent when printing. I accidentally filled my yellow cart wrongly before but have since recified this by using a new cartridge. It’s definitely shade 2.5 in the Yellow channel.
i meant head alignment - but I think that you have cartridge issues and it may be overall. There is no PiezoFlush flowing out of the carts into the print head. Either the print head is dead or becoming dead, or no ink can flow out of the cart to fill the head. The latter is usually a venting issue. But, the carts may be improperly filled or the vents closed. Something is causing the starvation if it is not the print head. So the system is not at high enough a standard to use Piezography. Did you by chance fill the ink into the vent hole by accident? Or did you use the vacuum method to fill these? Can you double check to see if the tab that is pulled is the vent tab or fill tab?
Am I right in thinking that the vent stopper is the one closest to you when opening the print head cover? In that case then yes, the right one is open. I haven’t been venting the piezoflush however. I thought that the PF cartridges were just there to keep the print heads moist. I didn’t know they needed a throughput of solution.
I’ve been filling the catridges through the correct hole but with the vent hole open, was that wrong to do? I have had ink come out of the vent hole by doing this on occasion.
Ok, here’s where I’m at after unstoppering the piezoflush and running a head clean…
It does seem that Yellow and Light Cyan are almost identical in tone though, which makes me confused as I’m sure i’ve been filling them with the right inks
The vent must be opened for ink to flow. Otherwise the print heads only are filled with air and the heat caused by this can ruin the print head. So no flush can get to the print head. If ink come out the vent hole when filling - then the foam there is degraded and venting is compromised. You should be using the syringe with blunt needle to fill rather than the tip of the syringe being forced into the fill hole (otherwise I do not know how ink would come out of the vent hole). I am wondering if you have a compromised Cyan cartridge because of the banding at this point. The second issue is if shades 2.5 and 3 are switched. According to your calibration mode they are and that would result in posterization.