Initial Fill Procedures for Epson Pro Model Printers

An Initial Fill Cycle is necessary for flushing all channels simultaneously when changing inks, or when installing PiezoFlush for cleaning or long-term storage.

Before doing an Initial Fill Cycle, make sure 1. all cartridges contain enough ink or flush to avoid running empty, and 2. you have a spare waste tank on hand (or, even better: reuse and reset your waste tank). Note: the R3000 doesn’t have a removable waste ink tank (all other printers listed on this page do), but an external waste ink bottle can be attached to divert waste ink to a bottle, which can be emptied as needed (instead of waste ink going into the bottom of the printer, which requires the pads be replaced by a service tech), and waste tank sensor reset using the Adjustment Program or Waste Pad Reset Program.

NOTE: Adjustment Programs are ONLY Windows compatible, so Mac users will need to borrow a PC, or install Parallels and Windows on their Mac to use the Adjustment Program.

Epson SC-P600:

  1. Purchase and download the Adjustment/Service Program specific for your printer model from www.2manuals.com
    (NOTE: Adjustment Programs are only PC compatible)
  2. Open the Adjustment/Service Program, and select “Ink Charge” or “Ink Eject and Initial Charge”.
  3. When complete, close the program.

Epson R3000:

  1. Purchase and download the Adjustment/Service Program specific for your printer model from www.2manuals.com
    (NOTE: Adjustment Programs are only PC compatible)
  2. Open the Adjustment/Service Program, and select “Ink Charge” or “Ink Eject and Initial Charge”.
  3. When complete, close the program.

Epson 3800/3880:
NOTE: 3-4 Power Clean Cycles can be done thru the printer’s control panel, which is the equivalent of doing 1 Initial Fill Cycle
To do a Power Clean Cycle, push the Menu button on the printer, scroll down to select Maintenance, then scroll down to select Power Clean, then push the center circle button to start the cycle. NOTE: Power Clean Cycles will only flush the black ink channel that the printer is currently in the mode of (where as the Initial Fill will purge ALL channels at once, including both blacks)

  1. Purchase and download the Adjustment/Service Program specific for your printer model from www.2manuals.com
    (NOTE: Adjustment Programs are only PC compatible)
  2. Open the Adjustment/Service Program, and select “Ink Charge” or “Ink Eject and Initial Charge”.
  3. When complete, close the program.

Epson pro 4000:

  1. Start with the printer power OFF
  2. Hold the Left, Down and Up buttons while turning the printer on. The printer will start in “Self Testing Mode”.
  3. Scroll to and select CLEANING.
  4. Scroll and select INIT FILL.
  5. When finished, exit Self Testing Mode by turning the printer off, then back on regularly.

Epson pro 4800/4880:
NOTE: 3-4 Power Clean Cycles can be done thru the printer’s control panel, which is the equivalent of doing 1 Initial Fill Cycle
To do a Power Clean Cycle, push the Menu button on the printer, scroll down to select Maintenance, then scroll down to select Power Clean, then push the Menu button to start the cycle.
Hold down the PAUSE, RIGHT, DOWN buttons while turning the printer back on to start it up in “Self Testing Mode”.
Press the MENU button.
Select CLEANING.
Select INIT FILL.
When finished, exit Maintenance Mode by turning the printer off, then back on regularly.

Epson 4900:

  1. Purchase and download the Adjustment/Service Program specific for your printer model from www.2manuals.com
    (NOTE: Adjustment Programs are only PC compatible)
  2. Open the Adjustment/Service Program, and select “Ink Charge” or “Ink Eject and Initial Charge”.
  3. When complete, close the program.

Epson pro 7600/9600:

  1. Start with the printer power OFF
  2. Hold the Down, Up and Cut/Eject buttons while turning the printer on. The printer will start in “Diagnostics Mode”.
  3. Push the Menu button, scroll to and select CLEANING.
  4. Scroll and select INIT FILL.
  5. When finished, exit Serviceman Mode by turning the printer off, then back on regularly.

Epson pro 7800/9800 and 7880/9880:
To do a Power Clean Cycle, push the Menu button on the printer, scroll down to select Maintenance, then scroll down to select Power Clean, then push the Menu button to start the cycle.
*The printer MUST be started in regular mode to accept the “NON-OEM” cartridge message FIRST, then turned off and follow the instructions below:

  1. Start with the printer power OFF
  2. Hold the Down, Right/Menu and Center Cut/Eject buttons while turning the printer on. The printer will start in “Self Testing Mode”.
  3. Scroll up to CLEANING, and select by pushing the right/Menu button.
  4. Scroll and select INIT FILL.
  5. When finished, exit Self Testing Mode by turning the printer off, then back on regularly.

Epson pro 7890/9890 or 7900/9900 or 7700/9700:

  1. Start with the printer power OFF
  2. Hold the Menu/Right, Paper Feed/Down and OK buttons while turning the printer on. The printer will start in “Serviceman Mode”.
  3. Push the Menu button, scroll to and select CLEANING.
  4. Scroll and select INIT FILL.
  5. When finished, exit Serviceman Mode by turning the printer off, then back on regularly.

We have published an article about how to Cancel the Initial Fill Process here.
Can I do a equivalent initial charge of the 4900 by doing 3~4 power clean cycles? Thanks!!

No, power clean cycles on the x900 model printers are very weak compared to other models, so three do not equal one Initial Fill, and you can actually burn out the print head by doing too many power clean cycles in a row, so doing one Initial Fill is best.

Thanks, so the 4900 adjustment programs are not available for free? Is that the only way do do a initial charge?

No, the Adjustment Programs are not free, and that’s the only way to do an Initial Charge Cycle with the Epson 4900 printer.

Why is this info buried and not supplied with the cleaning fluid? Why are you putting refillable inkjet cart info with the cleaning kit? You have instructions to initialize the entire set of inks. Isn’t that being just a little negligent? I really expected a little more from you guys. Ink is not cheap and you are having people just guess their way around a 9900 (and others) while throwing money right down the drain. This is just poor customer service.

Swamphox. The only printer that currently allows channel-pair purges is the 4900. Every other one will pull ink from all the lines.

You don’t want to do Purge sheet printing because this could permanently kill a clogged head.

You can do power-cleaning on channel pairs with the updated x900 firmware as well.

We are working hard on getting a more central location for all of our documentation and instruction downloads. If we gave out general instructions with the cleaning fluid it could not change from the time of print so some people would be buying it for newer printers not documented in the printed instructions. Therefore, we do most of our instructions online where we can update them. That said, our placement of said information is not always correct right now because we launched a new website last week and are going through about 1000 products and their attendant documentation.

For example, the 4900 flush kit did not have the warning about needing to download software from 2manuals until yesterday. These details are very very important too us but it will take a bit of time to hunt them all down.

regards.
Walker
R&D and Support

Is the channel pair purge of the 4900 (the ink charge selection) the same as the initial fill of one side in terms of pushing the ink through the lines and not cleaning or frying the head? in the past the ink charge on the right side with piezo flush has worked wonders for my 4900. This time I did it for the black and Light black in pairs, and it seemed to take longer to get the piezo flush to the head to show the pink color instead of black. Perhaps it was just really clogged lines or the head, but it probably took 5 or 6 channel paired purges over a two to three week period to get to the “pink”. The nozzle check prints did better even when they were part black, but now are fully there. I am thinking of doing the same for the VLM and LC, which have a couple of missing nozzles on the top, but aren’t bad.

Thanks.

Yes. Channel pair purges are safe.

This is the correct approach.

best,
Walker

When indicating a “Channel Pair Purge is Safe” is what you are referring to actually an “initial charge” which is done through the Stylus Pro 4900 Service Program or just a “Pairs Cleaning” available in the standard printer panel menu.
for reference, my 4900 has firmware M102F7_Q.
Thanks for you help hear. Have stubborn clog in the Cyan channel regular cleaning can’t dislodge. (I expect I’ll need to do a right side initial fill again unless there is a less wasteful method I am not seeing here.

Just to clarify my question, It is my understanding that “Powerful Cleaning” (pairs, e.g. C/VM) create heat and are bad for the print heads.

You can do a channel pair purge (just 2 channels say VM and C) that purges just those lines fully without doing a classic “init-fill” that does EVERY line.

You do this with the Epson service utility

Best,
Walker

Power cleaning does not damage the heads. SSCL cleanings do.

Walker


[QUOTE=walkerblackwell;11145]Power cleaning does not damage the heads. SSCL cleanings do.

Walker[/QUOTE]

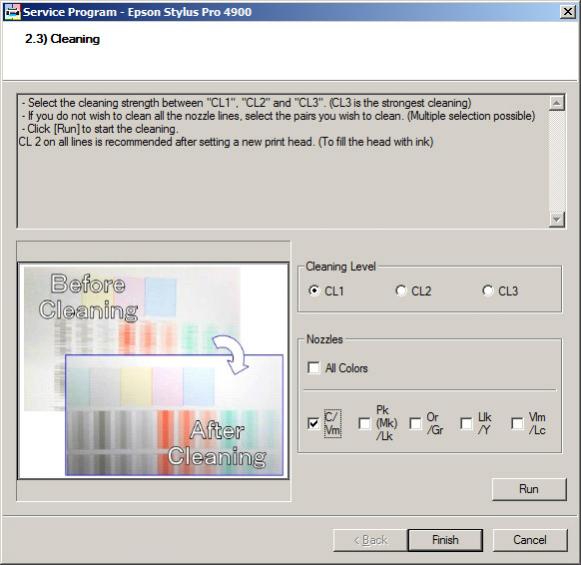
Walker, sorry to beleaguer the point, but just making sure. From the Service Program for Windows Under the Adjustments header, the cleaning window appears with options of CL1, CL2, CL3 for either all color or pairs (5 sets).
So, rather than running an initial fill cycle on one or both sides of the 4900, I should run on the cleaning cycles 4 or more times to get the Piezo Flush into the dampers and head. (Please see the attached image from the Service Program.) Any recommendation which of the three options above to use?

Sorry, but I just don’t have a handle on where one finds an SS Cleaning or an SSCL (Super Sonic? I presume.)

Thank you.

CL3 3 to 4 times

No need for SSCL.

best,
Walker

My Epson R2400 appears to be clogged - I’m not seeing instructions for the R2400 here. Does Piezoflush work with the R2400 or is there another solution?

Piezoflush works with the R2400, yes.

Get the “small format flush kit” at shop.inkjetmall.com

best,
Walker

performing initial fill on R300 with clogged head. Cartridges are not recognized by printer.

attempting to do an initial fill for an R 3000 with a clogged head. IJM cartridges with P flush are initialy recognized by the printer, but when I attempt to run the ink charge, I get an “ink out” error and the printer then reports cartridges as not recognized. Additional, although the cartridges are recognized by the printer at startup, they register as nearly empty in spite of being completely filled.
Can anyone assist?

http://www.inkjetmall.com/tech/showthread.php?2497-R3000-Auto-reset-carts-not-reseting

Epson 9900
Help! I have just filled new empty cartridges with Piezo Flush, reset the maintanance tanks and when I try and start up in “Serviceman mode” I get a “1537” warning, telling me to power off and on and if that does not work to call a repairman. This on the 9900. I cleaned the head and did the other maintenence things first and after that it started fine