3880/Piezography Pro "ghosting" issue

New Piezography Pro user, 1st post on the forum. Bear with me – describing this problem is a little involved. I’m setting up a used 3880 I acquired with a page count of 67. I followed the set-up instructions prior to installing the Piezo inks and the printer was functioning correctly (although I can’t find the head alignment print-out and I’m now questioning whether I did one before installing the inks.)

During my initial printing of test targets for linearization using Hot Press Natural, I encountered marked blotchiness in the dark greys, a problem I’ve now established as an Epson paper coating issue and one hopefully resolved by some replacement shipments. But in the process of working through that issue, I printed a black and white test image from Northlight Images (Entrada Rag, neutral curve) and discovered the problem I’m posting here.

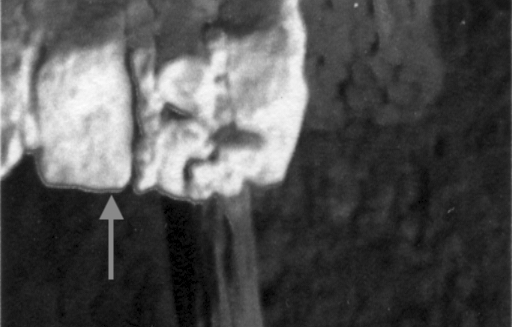
I’m calling this “ghosting”, though I’m not sure that’s the correct term. As you can see, in areas where a clear boundary exists between dark grays and lighter tones, there is a lighter, sort of duplicate edge created. The top line of the peninsula is where this is most prominent, though it doesn’t show very clearly on screen in the post. This is a crop from a 100% view of a 600 dpi scan:

NorthlightTestPrint_Crop1
NorthlightTestPrint_Crop1.tif (1.7 MB)

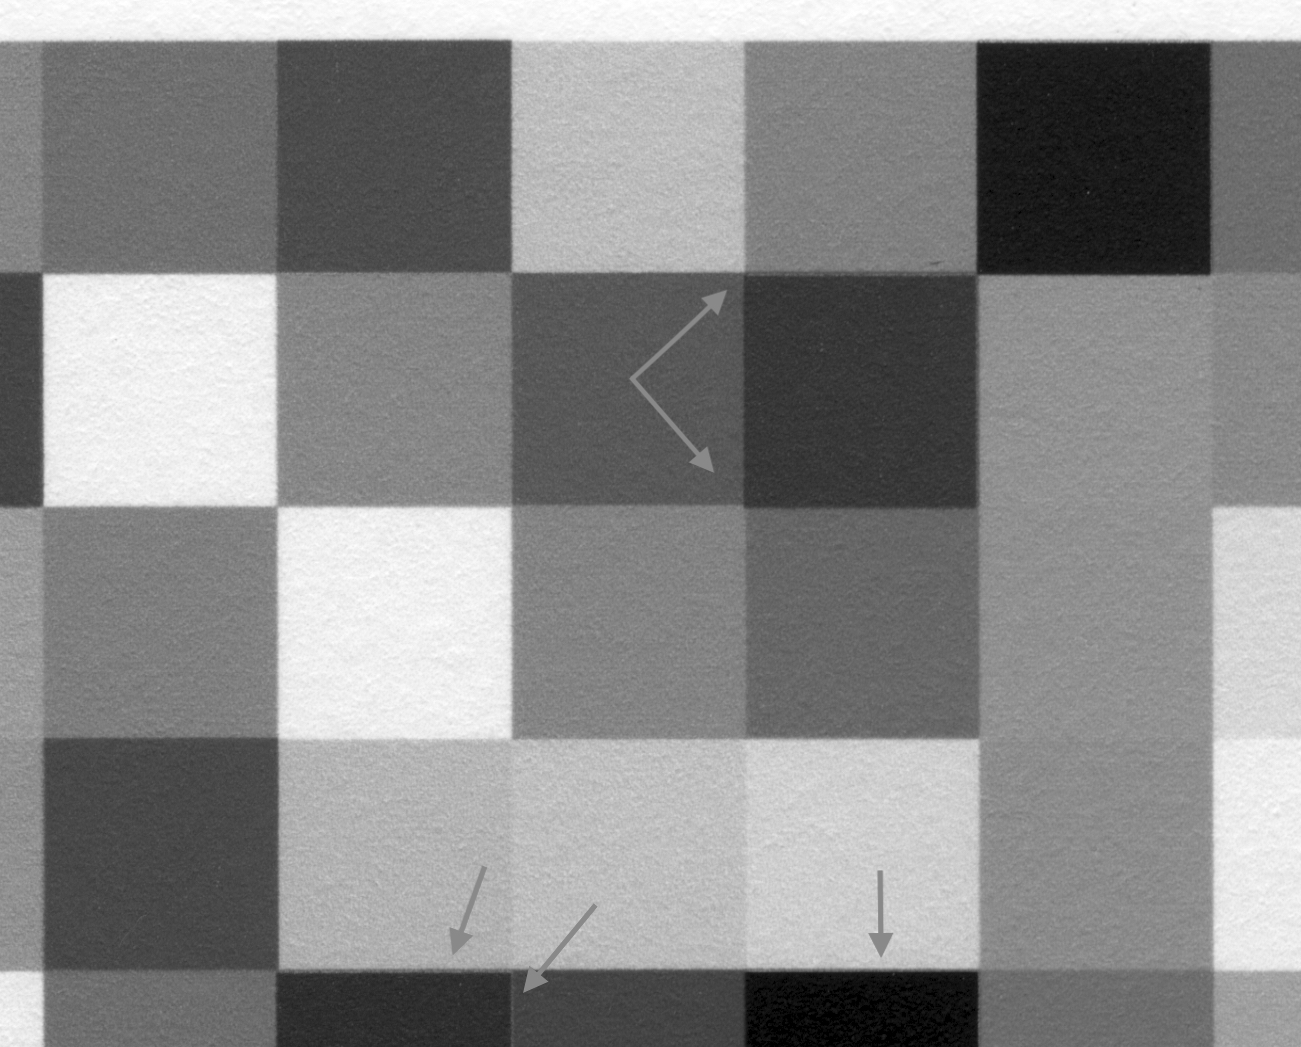
Here is another example from the same test print:

NorthlightTestPrint_Crop2
NorthlightTestPrint_Crop2.tif (398.2 KB)

(I’ve wondered if this is somehow within normal tolerances [though how?], but in practice, certain prints in landscape mode show a lack of acuity to the naked eye, especially where there are vertical divisions between light and dark tones, e.g., trees against sky or light grass against dark ground. I confirmed that my other 3880, set up with Cone Color inks, does not have this issue in ABW mode.)

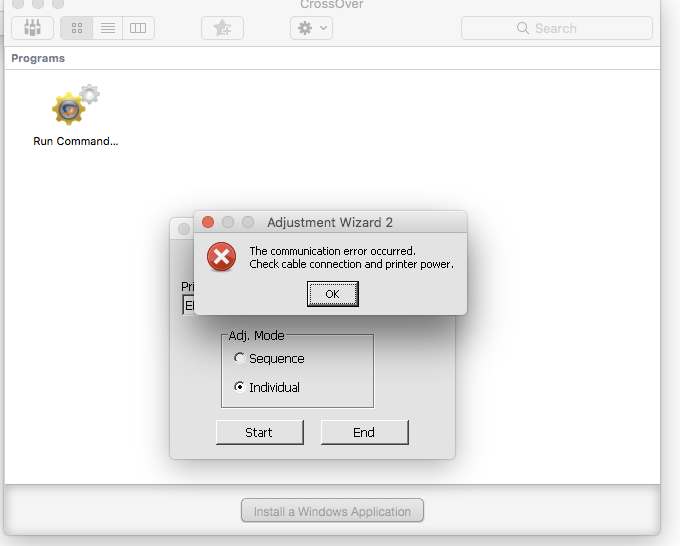
I did an automatic printhead alignment and another nozzle check. (I can post those if they would be useful for diagnosing this problem, but I don’t want to unnecessarily overload the post.)

Then I printed a Piezography 512 step DTP70 Colorport target, which I chose because of the way the different tonalities are scattered across the grid. I thought this might give some indication if all the channels are printing where they’re supposed to. Areas of poor registration are indicated, as well as what looks like ink bleed (?) in the black “Piezo”. (Printed on Entrada Rag, neutral curve, two crops):

Piezo512Target_Scan_Crop
Piezo512Target_Scan_Crop.tif (3.3 MB)

Piezo512Target_Scan_Crop2
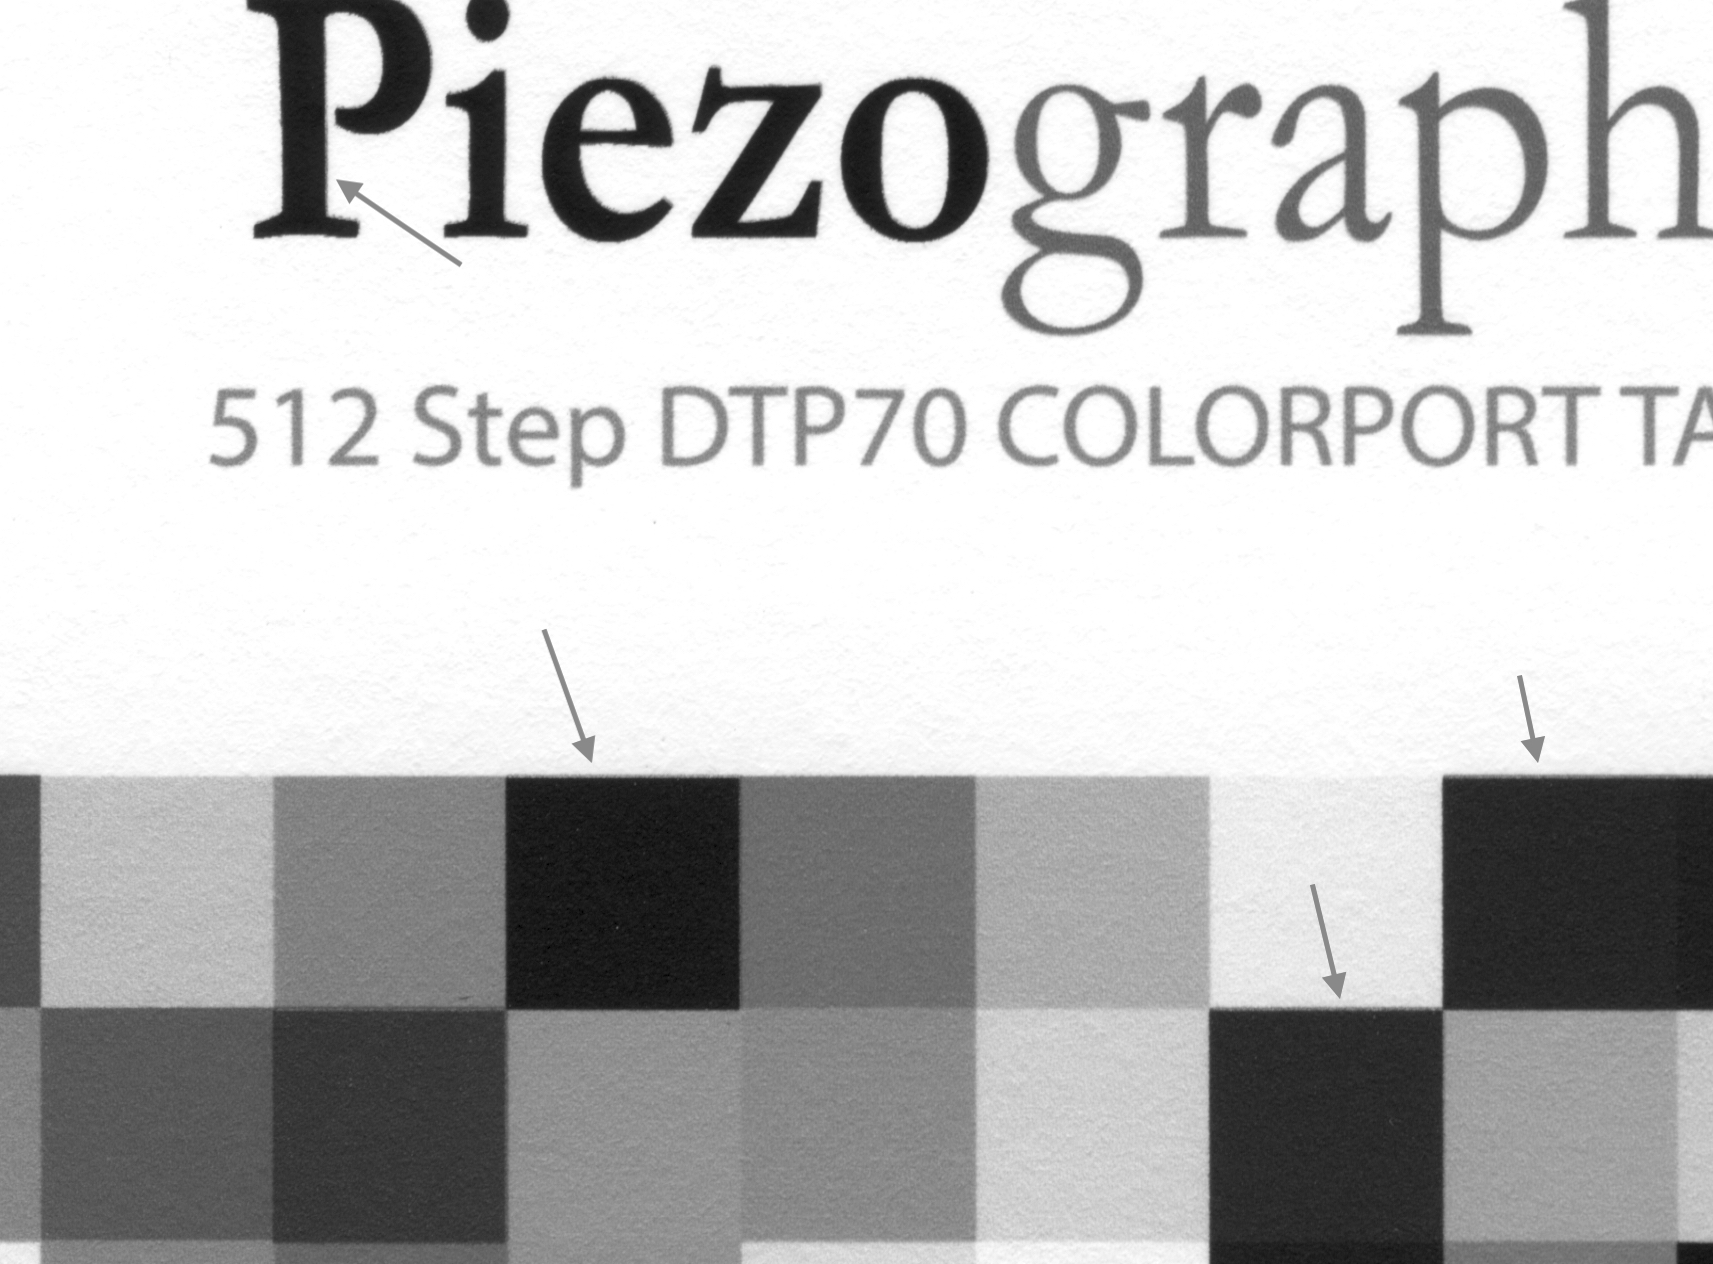
Piezo512Target_Scan_Crop2.tif (3.9 MB)

I’m hopeful someone has bumped into this problem, can shed some light on a possible cause(s), and maybe even suggest a fix. My fantasy is both a simple and cheap solution, but not being totally delusional, I have my doubts about that!

Thanks,
Jeff

This indicates that you head is actually rotated slightly (skewed) in the CR (print carriage) direction. Some of your nozzle channels are printing lower than others.

You’ll need to get the maintenance software for this printer and run a CR skew check. It may be possible to do it through maintenance mode on the printer itself too: Maintenance Mode - Epson Stylus Pro 3800 Service Manual [Page 28] | ManualsLib

best,
Walker

To add to what Walker has already mentioned:

I had a similar issue on one of my 3880s a couple years ago except the problem only appeared when making digital negatives, not with prints on paper. Print Head Slant was slightly out of adjustment, CR and/or PF, though it didn’t help my particular problem which I think was unrelated. It still makes beautiful Piezo K6-Carbon prints on paper, but I use a different 3880 for PiezoDN negatives.

I’m not positive but I don’t think you can access the necessary tools through Maintenance Mode. You need the Adjustment Wizard which is a Windows app available from 2manuals.com, or I would be happy to share my copy. I think I was able to run it on CrossOver from my Mac, but I also have an old WIndows laptop and may have used that.

You will also need the Service Manual and Field Repair Guide for your printer. I have both and will gladly share them as well. Both are useful since they show slightly different but complimentary approaches to the procedure, and the illustrations are slightly different as well.

You do need to remove the outer case of the printer which is a somewhat delicate operation, and the printhead cover in order to access the head slant adjustment levers.

Let me know if you need any of the above mentioned resources and I will put them on dropbox and post a link.

Good luck …
Keith

1 Like

Thanks Walker & Keith –

Very helpful info. I do have the Service Manual and it would appear that’s an internal adjustment, not one that can be done via the Maintenance Mode.

Keith – thanks for the offer on your stuff and I’ll happily take you up on the Field Repair Guide and the Adjustment Program. Much appreciated – I’ll post further developments –

Best,
Jeff

Try this: Dropbox - 3880 - Simplify your life

Please let me know if the link works.

Keith

PS - “Simplify your life” was added by Dropbox, not me!

Worked perfectly – many thanks again. I’ll leave updates as I have them –

Jeff

So, I’m disassembled (well, the printer is…I still seem to be more or less intact…) and ready to start the head slant adjustment. I’m running the adjustment program on CrossOver from my MacBook Pro (High Sierra) – it seems to have installed and opened properly. When I start the individual adjustment mode, I get the following error message:
02%20AM
If I hit OK, it gets me to the Individual Adjustment screen and I can select the adjustment, but get the same error message when I try to print the pattern. The printer shows READY, the cable is connected properly. I uninstalled and reinstalled the Epson driver. No change in the error message. Any insights anyone?

Thanks,
Jeff

Maybe you do need to run it from a native Windows machine.

Keith

That occurred to me this evening, so I’ll explore along those lines tomorrow —

Thanks,
Jeff

Update/resolution: I was able to run the adjustment program in Bootcamp, though I initially had the same printer issue I did with CrossOver, so I’m not sure that problem was a CrossOver issue. Anyway, had to work through re-installing the printer in Windows and then all was fine.

Changing the Head Slant (CR) adjustment lever on my 3880 appeared to have no affect on the head orientation (defective? broken? perhaps I inadvertently broke it somehow?), so I determined I would try to manually adjust the print head bracket. This involved some trial and error, but I was eventually able to bring the head into the correct alignment.

The result has been noticeably cleaner looking output, certainly worth the time and effort (not to mention the bonus of now having a much deeper understanding of how the 3880 works.)

And an FYI for anyone needing to make this adjustment in the future – after reassembling the printer, I realized that it doesn’t appear necessary to remove all the covers/panels as indicated in the manuals in order to perform the two head slant adjustments. All that needs to be removed is the actual print head cover (2 screws), which become accessible when you pull the power plug as the head moves off the capping station during start-up (à la the 3880 cleaning procedure video). The head can then be moved manually along the rail. Once the head cover is off, the PF adjustment lever is accessible, as are all the 3 screws holding the bracket to the carriage, which are loosened for the CR adjustment.

Thanks again to Walker and Keith for pointing me in the right direction!

Jeff

2 Likes

Jeff,

I am having a similar issue with my 3880, but I wondered if you could describe in a little more detail what you did beyond adjusting the levers to “bring the head into correct alignment.” Also, how has your adjustment stood up over the last few months?

Bruce

Hi Bruce –

Re: the CR adjustment, I rotated the head manually ever-so-slightly after just barely loosening the third screw. I then tightened the screw and printed a test per the Adjustment Program, evaluated, then either went a little further in the same direction or, if I’d over-adjusted the alignment, eased it back a notch. It was a fussy deal. Really just a matter of trying to manually do what the lever is designed to do. Is your lever functioning? Are you using the Adjustment Program?

After using the printer a fair amount following these adjustments, I found I was increasingly aware of the original problem. I’m not sure if the adjustment slipped a little, or if I just noticed it more having become aware of it. It bugged me. This is a printer I bought on eBay, and I’ve become a little suspect of how it was handled before I got it. I wasn’t sure I wanted to put more time into trying to get the alignments right on and then maybe never really get there. At any rate, I recently saw a factory refurbished P800 online and decided to make the upgrade. The P800 is right on and prints more cleanly than my 3880, which I plan to use now for photopolymer plates. Hope this helps –

Jeff

Thanks Jeff,

These things tend to get complicated and I have been proceeding slowly. The 3880 I am testing just got returned from repair (freight damage) at the Epson facility near Atlanta, hence my surprise at the offsetting/ghosting/double printing going on because my assumption was that they would have run all the adjustment routines. I may take it back over there after the “cornteen."

I do have the adjustment program, but I haven’t decided which adjustments are necessary, Uni-D, Bi-D, PF, CR Slant or PF Slant. The lever status is unknown. Before I disassemble this machine though, I disassembled a clogged 3880 someone gave to me. Not too bad as it turns out and it has been a good learning exercise. So, the saga goes on…

I have a P800 also, but the process of attaching a separate and expensive board (and then only to have 30 resets) intimidates me.

Bruce

Bruce –

Are you aware there’s now firmware available that makes the P800 a chipless printer? It’s $60. and it installed very easily for me – no issues. Very straightforward. Walker posted about it in mid-February, here:


He also includes a link for his instructions to set up a P800 with this firmware.

You can download and install the firmware before you pay for the activation key, so you can be sure the install works with your printer. Don’t think I would have sprung for the $400. board on top of a new printer – very happy to see this solution. No reset limits, and the waste tank also becomes chipless. So far, so good. Best of luck with your printer adventures.

Jeff

I’m letting this chipless solution sort itself out for now. Meanwhile I’m working with these two newly acquired 3880s.