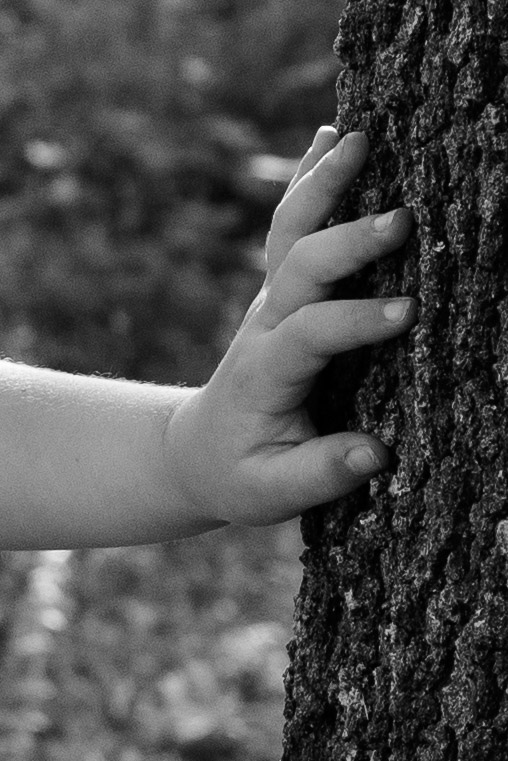
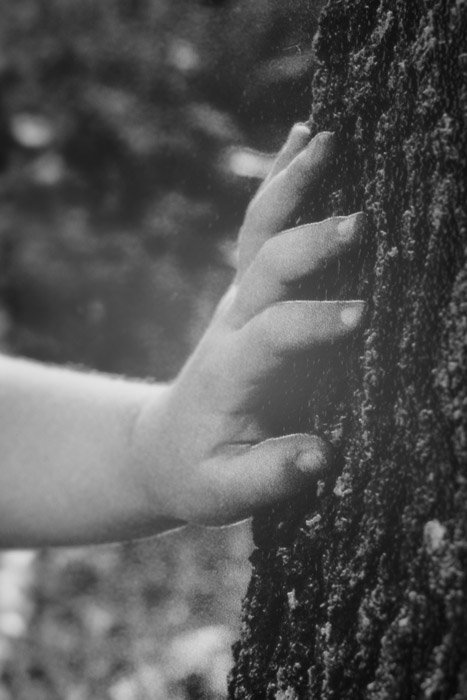
I can’t tell what is causing white and dark edges on high contrast areas on my newly converted R3000.They look like over sharpening artifacts, but I do not apply any additional sharpening out of camera. No sharpening adjustments in Lightroom and no sharpening is applied on TIFF output. Here is an example print along with the original file. This is at 100% and you can see the white highlights on the thumb.
I looked back at my images and do not see this effect on ABW prints before the conversion. The printer has been cleaned with piezoflush and there are no gaps in the nozzle pattern. Solid patches print fine, all channels are working. When printing in portrait orientation, the highlights mostly appear on the top side. When printing in landscape, the artifacts rotate with the image and appear on the left side. I can reproduce this on all prints, but can’t figure out the cause. The print head alignment has been done several times and I get solid boxes without stripes in the 5-7 boxes. Has anyone seen this before? Is it a hardware problem?
This looks like classic head slant issue. Some inks (LLK) are higher than others (K) because one side of the head is slanted above the other. A search for head slant on this forum or forums.piezography.com will show posts about this.
-Walker
Thanks. I’ll look into the head slant issue. This morning I printed a 100% K resolution test.
-
Epson AWB - perfect print @ 360 dpi. A two pixel wide (180 dpi) line is very tight
-
QuadTone RIP canned profile - not as good as the AWB, lines have a little shadowing. The shadow line is about the width of a nozzle check line. the line is also a little fuzzy
-
QuadTone with Piezography profile - not as good as the QuadTone RIP canned profile. A stronger shadow appears. about the width or two nozzle check lines and the line is fuzzier than QuadTone RIP w/ canned R3000 profile.
Seems to be a print driver issue and not a hardware problem.
Regards,
Andrew
Piezography uses a very tight nozzle density so any miss-alignment of the head slant will show with piezo (less so with QTR, even less so with ABW).
I’ve seen this very thing and fixed it by fixing the head slant. There are two dials on the head carriage (unit that holds the head) for this very reason.
-Walker
I ran the Epson service program’s (AdjProg) head angular adjustment tool. The printout has:
- Band Pass Incline 0>>80 - My best one is between 6 and NG
- Band Pass Incline 0<<80 - My best one is 6
- Inclined Print Head-Vartical (what’s a vartical?) - my best one is a -2
Inputting the values to the EEPROM doesn’t seem to do anything. I’ve also made test prints after manually adjusting the little lever on the print carriage. It looks like it drops the head to -6 or lifts the head to +6. I tried: +6, +3, 0 (default), -3, -6. All prints show the ghosting/shadowing. The all look the same to me under a lupe.
This post seems similar to my issue/ 3880/Piezography Pro "ghosting" issue
I pulled the print head five or six times try to get a better head angular adjustment print. All that did was pull it even farther out. It’s not clear to me how a CR adjustment can be made on this printer. Three screws tighten down the print head to the carriage. Is the skew height issue where one side is higher than the other, or is rotational where it is not exactly parallel with the print bar thing it runs on?
You need to look at the manual (available at Epson Wide Format forum at groups.io) because this tells you exactly what to do and how to read the head slant test print.
-Walker
I have the service manual (Revision A) and the directions are cryptic: “When the adjustment instruction in the PF direction appears, reinstall the Printhead and perform the adjustment from the beginning.” I reinstalled the printhead several times. It didn’t change anything, but make it worse. the service manual does not indicate any other adjustments are available other than the Head angular adjustment lever (page 54, figure 2-23) or re-seating the print head in the CR.
I’ve reached out the the Wide Format group. Maybe they can provide some insight.
Thanks for your help, I’ve closed thousands of IT help tickets myself, so I know how it goes.
1 Like
I did not get a reply from anyone in the Wide Format Epson group at groups.io and am at a loss. It looks like I will not be able to use my beloved R3000 for piezography due to this issue. I have about $500 invested into the system and am trying to decide a next step. I may just walk away from the printer altogether. I don’t think it will be worth flushing the system and reverting to OEM ink. The chances of finding a local used R3000 in good condition is close to none and I’m not going to take a chance on Ebay. The printer is no longer available, but it does looks like the R3000 reusable carts may be compatible with a P600, but I’ll need to verify that. If I get a new printer, I might was well go back to ABW and regular QTR.
I tired one more time and found the required print head adjustment. I shimmed the right side of the print head (as you look at it from the front) with six layers of masking tape. I also found you can adjust the skew of the print head if you tighten the right hand print head screw and push or pull the head forward or backwards on the left side. I pushed it all the way back on the left hand side. One way or the other, this fixed the problem. The AdjProg print head test print shows all zeros and my prints look 100% better. After flushing 40-50ml of ink, I am finally ready to start printing.
1 Like
I forgot to mention that I also tried to adjust the height of the carriage bar. The print carriage runs along a silver bar that can be raised or lowered. I tested dropping each side, but it didn’t fix the issue.
