Using QTR for glossy and matte printing & other issues

Dana - I am using an Epson 7900, using windows and the ink set that includes both matte and glossy.

Question 1 - I downloaded QTR 2.7.2 as directed. When I opened the QTR program it showed that I was using version 2.7.0. Why is that? Is it Ok to use 2.7.0 with with a 7900 and the 7900 profiles? If it is not, how should I override the newest version over the older version?

Question 2 - I happened to notice that the QTR program now has version 2.7.5 available. Should I update, why or why not?

Question 3 - A glossy profile for the 7900 is entitled 7900-MPS-K7- CansonBarytaSatin. Is this the same paper as Baryta Photographique? If it is not, what is the Canson paper to be used with this profile?

Question 4 - Assume the following: Printing an image on Type 5 paper using a 7900. In the media box under Type, should I choose Photo or Matte paper? Under black ink, do I choose photo black ink or is it automatically selected? The 7900 printer has series of paper types that show up before printing. Which type of paper should I choose?

Question 5 - Assume I am printing on Type 2 paper. In the media box under Type, should I choose Photo or Matte paper? Under black ink, do I choose photo black ink or is it automatically selected? The 7900 printer has series of paper types that show up before printing. Which type of paper should I choose?

Question 5 - It’s a question based upon a lament. I was having a difficult time removing the yellow tinge in ink 7. I then moved the head and inserted a piece of folded paper towel with a wetting of flushing solution. When I was moving the head back and forth the paper towel got stuck. Fortunately, I was able to remove it and the yellow ink tinge has disappeared. The unfortunate thing is the light cyan nozzles. which worked fine before, are mostly clogged. Subsequent cleanings have done nothing to correct the problem? Approximately 50% of the nozzles continue to remain lost. I have done the extra powerful cleanings for the light cyan channel and have had no luck correcting the problem. In fact, I don’t see any change in the problem nozzles. Can it be corrected? If so, how? Or do we need to be in contact to change one of the flushing channels into a light 7 channel?

Thank you for your assistance.

Steve

Hi Steve~

1. I had the same question for Roy recently. He explained that there are many places for the version #, and he didn’t update them all. This is what he told me:
“There are so many places that have a version number. I don’t usually go through them all just for number changes i.e. I update only the things that are actually changed.
You can see “2.7.4” a couple places – in SysPrefs>Print&Scan shows the driver # under “Kind”. Also in Page Setup --> under the format for selection. There doesn’t seem to be a universal place to show this.”

2. I just noticed 2.7.5 today. From the release notes, it looks like it’s mainly a paper feed update. I don’t see any reason not to update, though haven’t used this version yet myself.

3.Yes, I believe that’s the only Baryta paper Canson makes. Some glossy curves are named a bit different, because they were all originally custom curves made for customers over the years, and curves were names however they labeled the targets.

4. In the QTR window, I don’t believe the Matte/Gloss paper setting makes any difference. For black ink, you can just select -installed- to use the black ink your printer is currently set for. If your printer is in MK mode for example, and you have Photo Black selected in the QTR window, it will do a black ink change before printing. I’m not completely sure about the media setting on the printer, and have always left ours on the same setting, then selected different media settings in the print driver (when printing color), or just selected the paper curve when printing thru QTR.

5. When printing on any type of gloss, semi-gloss, baryta, satin, pearl, etc… papers, you want your printer in Photo Black mode. For any non-gloss papers such as matte, rag, uncoated, Japanese, etc… the printer should be in Matte Black mode.

6. Hmmm… I wonder if a piece of paper paper towel got stuck on the print head, or if fibers from the paper towel got lodged in the LC print head nozzles. If it was my printer, I would try carefully manually cleaning the wiper blade, capping stations, flushing box and bottom of the print head by following our cleaning procedures, which can be found here: http://www.inkjetmall.com/tech/content.php?133-Printer-Cleaning-and-Preventative-Maintenance. After manually cleaning, do 1-2 regular cleaning cycles before printing a nozzle check, and if it’s not significantly better, try one power clean cycle. If you are unable to get the LC channel printing well again after cleaning, then yes- we can make you some customized curves to move the shade 3 ink to one of the unused channels.

I hope this helps. Please keep me posted, and let me know if you have questions or there’s anything else I can help you with.
Best regards~ Dana :slight_smile:

Dana - I have had no success unclogging the LC nozzles. There continues to be at least 50 to 60% of the nozzles that don’t fire.

Does it make any sense to do an initial refill one more time in the vain hope it might unclog the nozzle? I don’t want to waste the ink, though, if that will be futile.

Should we proceed to plan B and use another color space for shade 3? If so, let me know what I need to do.

Thanks.

Steve

Thanks for the update Steve. I’m sorry to hear you’r LC channel still isn’t cooperating.

I have read some success stories of people that were fighting with stubborn clogs, and had good results after doing an Initial Fill Cycle, so I certainly think it’s worth a try before changing ink placement and modifying curves.

I wish you the best and am sending you positive vibes!! :slight_smile:

Please keep me posted~ Dana

Dana - I did another initial fill this evening and the clogs in the LC color channel have made absolutely no improvement. I think that we are going to need an LC bypass operation. Steve

Thanks for the update Steve. I’m sorry to hear your LC channel is being stubborn. Are all your other channels working well? We can make you custom re-mapped curves to move the shade 3 ink to the GR channel. To do this, you can simply remove and switch the GR and LC cartridge chips, the install the LC/shade 3 cart into the GR slot, and PiezoFlush/GR cart into your LC channel, then preform an Initial Fill cycle to switch ink in the lines. Before doing the Init Fill, make sure all other carts contain enough ink, then gently agitate carts to ensure pigment is in full suspension. We will get working on remapping the curves, and email them to you shortly.

Please let me know if you have questions, or there’s anything else we can help you with.
Best regards~ Dana :slight_smile:

Steve~

I just wanted to check with you before proceeding. Do you want me to tell you how to remap the curves yourself, or pay the $100 fee to have us remap them for you?

Please let me know, thanks~ Dana

Dana - First, tell me how to “remap”. I will take a stab at it. Second, since my computer skills are marginal, I probably will request that you do a remap for me. Switching the chips will be challenging enough. Thanks. Steve

Hi Steve~

Open a curve in TextEdit or a similar program.
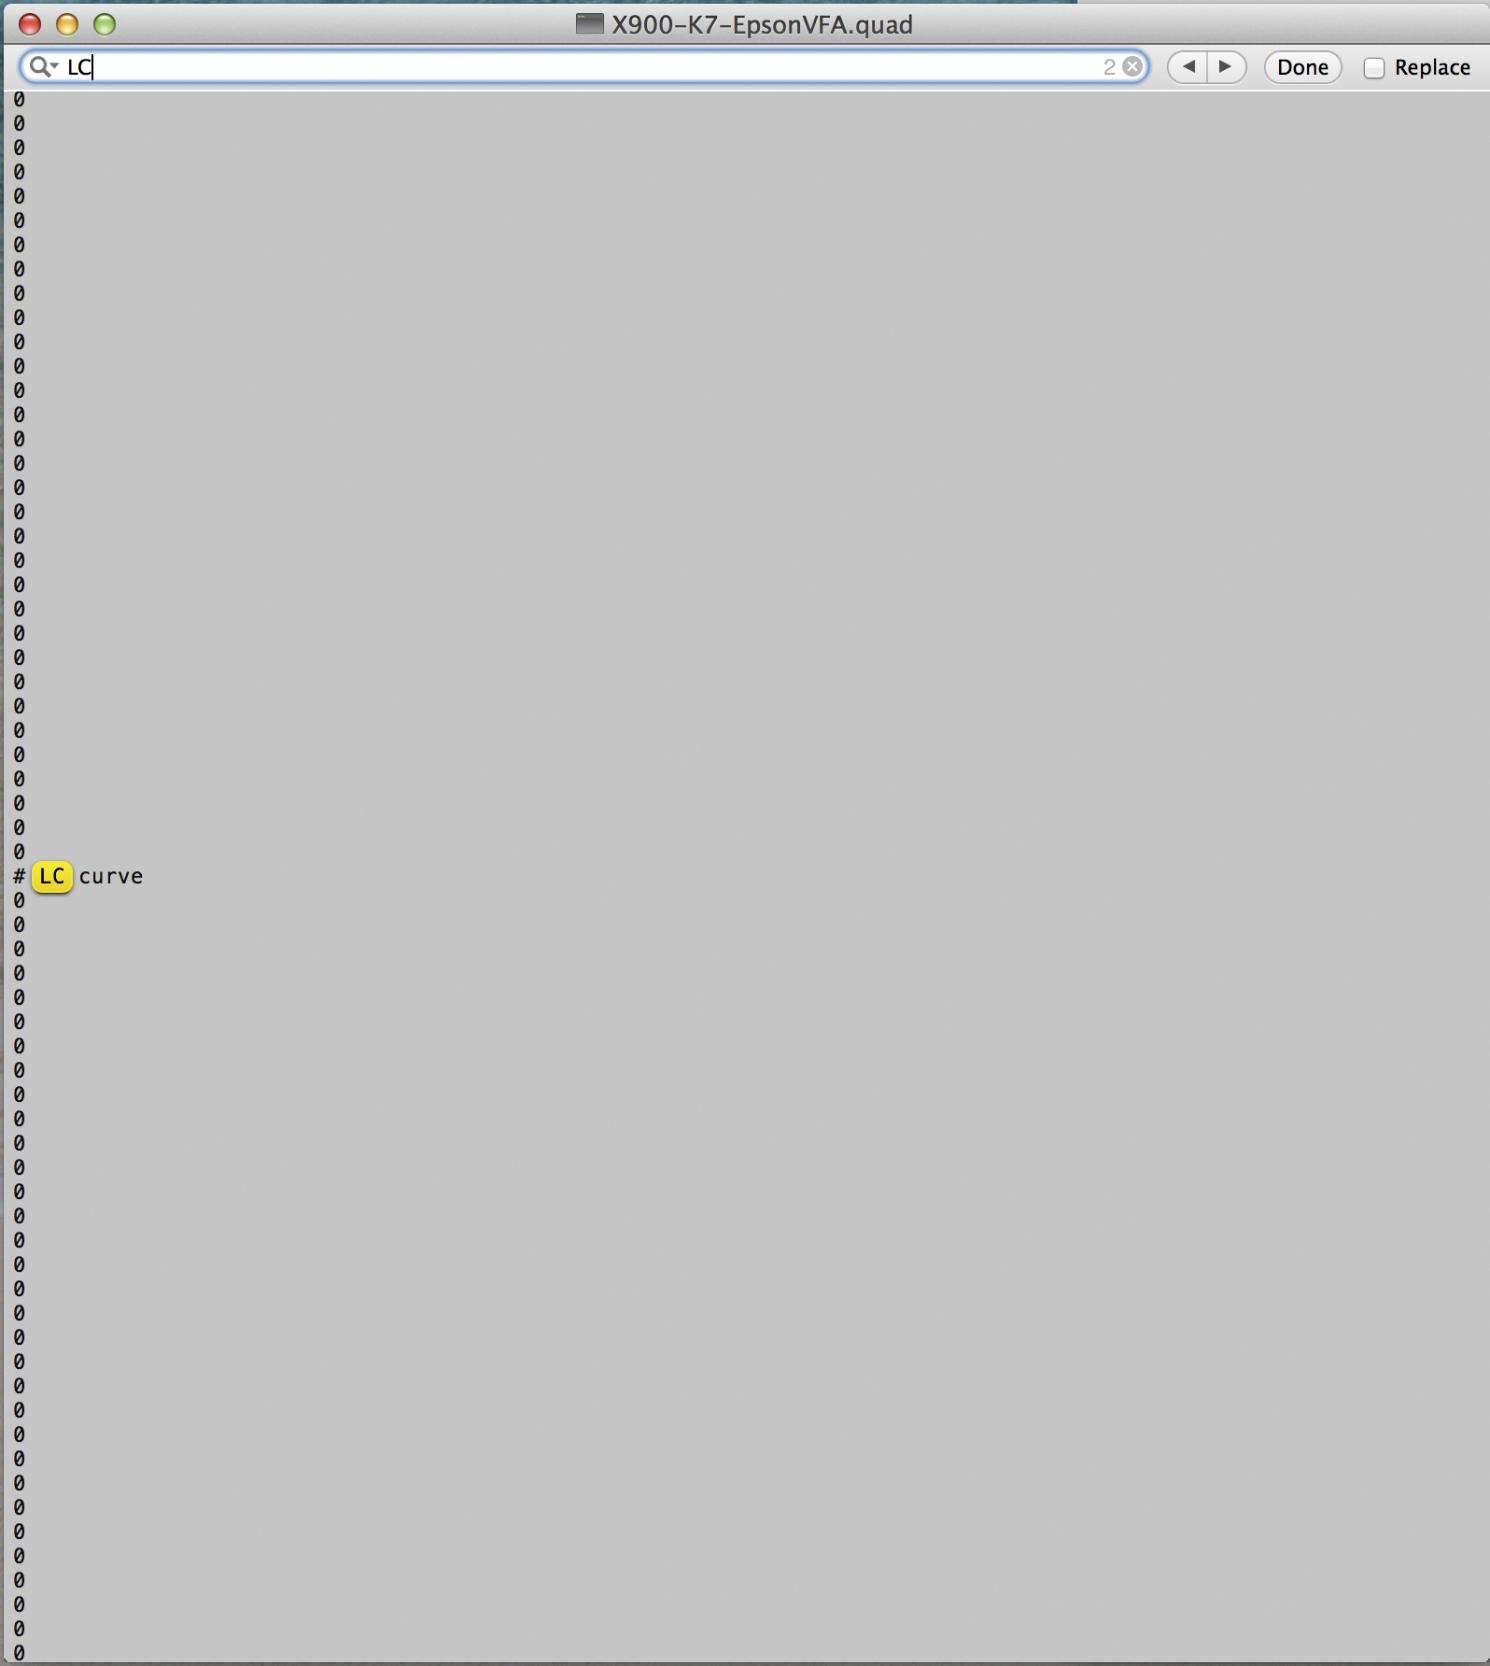
Each color channel is listed on the top row, then are listed in a single column below, each with 256 numerical values. Each color channel “curve” starts with “#” and the abbreviation for that color channel- as shown below.


You can do “command F” to open the search field at the top, to type in the channel abbreviation you’re looking for (it’s faster/easier than scrolling thru the whole list).

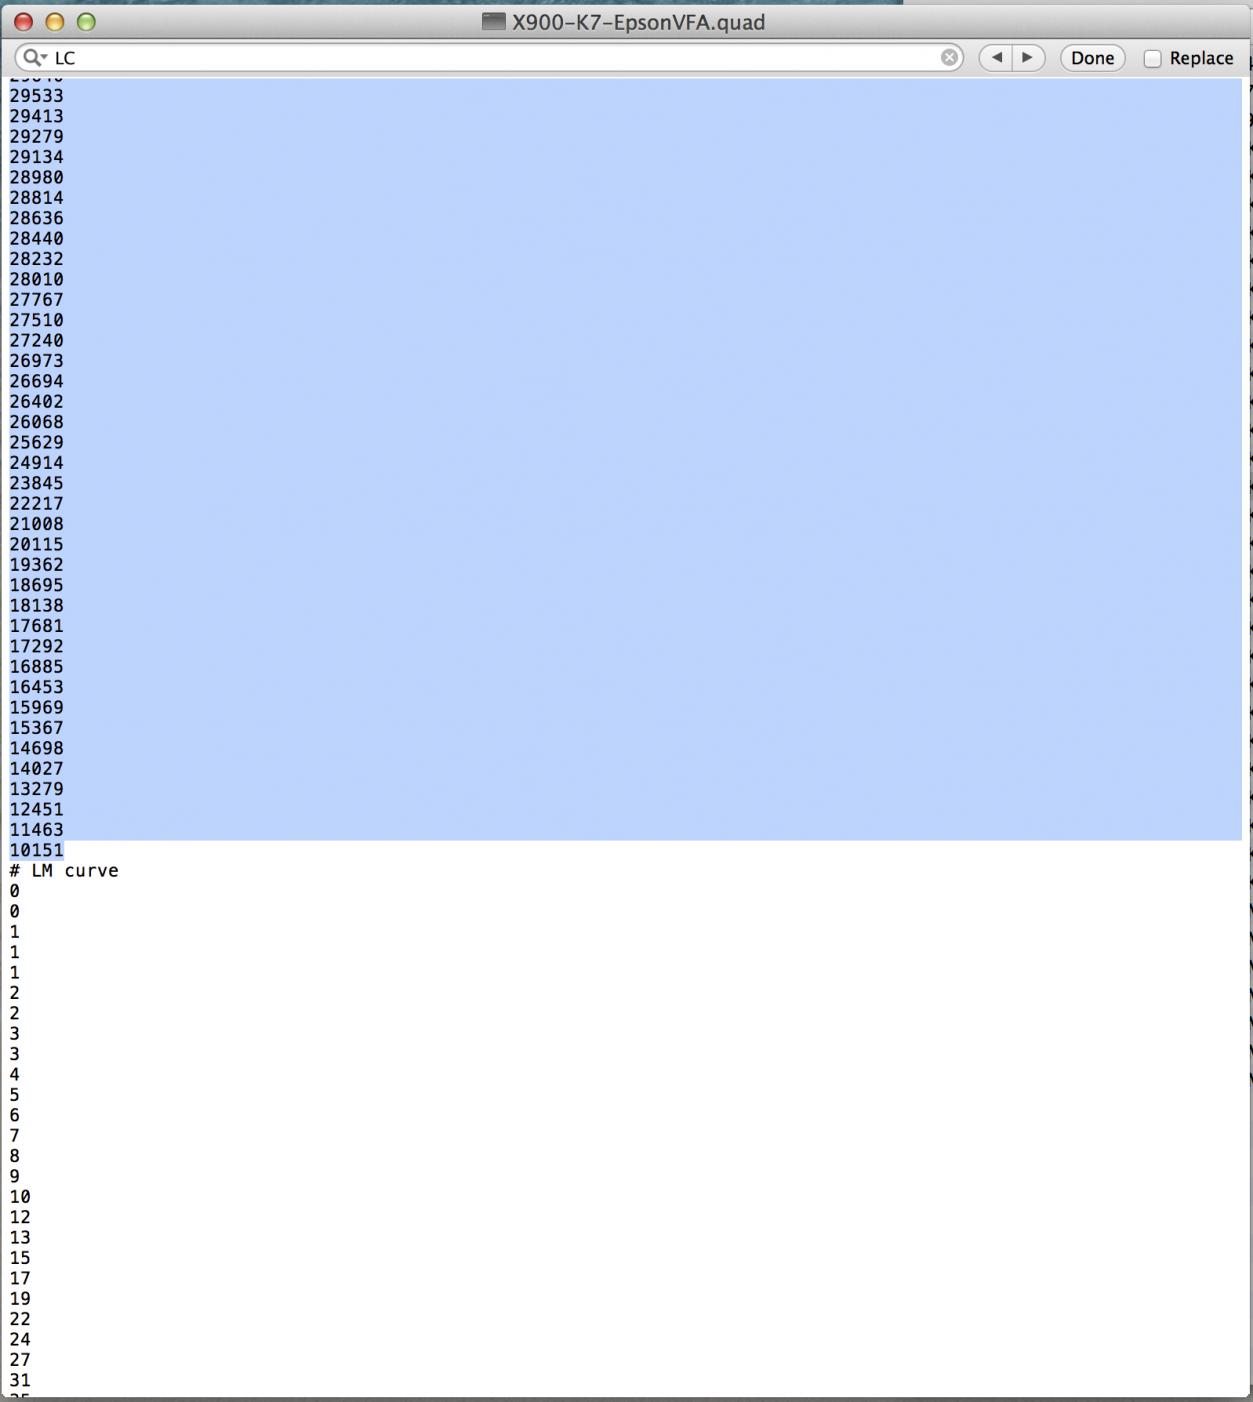
Select all 256 numbers following the #LC channel to the beginning of the next channel, and copy/delete, then paste into a new document.

Then, select the 256 numbers for a channel that isn’t used (channels with 256 0s’ aren’t used for Piezography printing), such as the LLK, GR or OR channels.
Paste the 256 0s’ below the LC channel (which turns that channel “off” so it won’t be used when printing thru this curve), then recopy the 256 numbers you previously copied from the LC channel and pasted into the other document, and paste this below the #GR to transfer the LC curve to the GR channel.

I hope this makes sense, I’ve never explained it before, so tried making it as clear as possible.

Keep me posted~ Dana :slight_smile:

NOTE: there can not be any spaces in the column of color channels and 256 numbers following each channel.

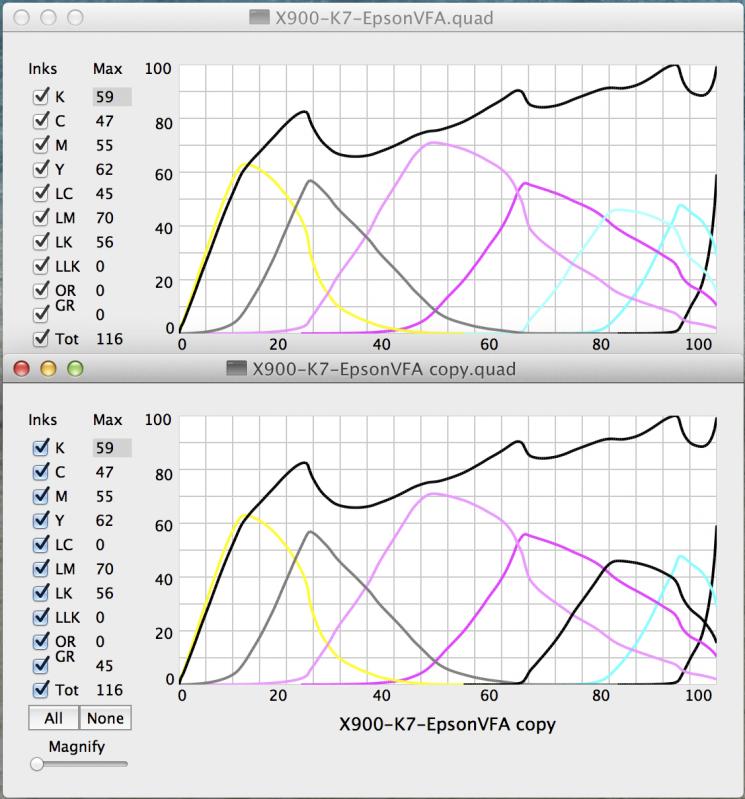
Here is an example of a remapped curve, before and after- showing the LC curve info moved to the GR channel, and LC channel turned off.

Dana - When I have a health issue, I see my doctor for his/her skills and training instead of trying to figure it out myself. The graphs point out why I should go to the expert that has all the training to make things happen smoothly. I will happily pay for your skills and training so I can get back to B&W printing which I am far behind.

Will your billing department email me an invoice? Should I call? Let me know and I will pay ASAP.

I should add when I made the chip swap last night, I had a tough time removing the LC chip. While I ended up scratching the chip a lot, it still works. The other one came out easily. When I did the initial fill cycle with the flushing solution in the LC channel I was hoping the fluid would miraculously clear the LC channel. Alas, the miracle did not happen.

Many thanks.

Steve

Hi Steve~

I will adjust the curves for you, and request Cathy send you an invoice for the remapping service.

Please let me know if you have questions, or there’s anything else I can help you with.
Best regards~ Dana :slight_smile: