I’ve been following this thread out of interest, since your problem and initial linearisation plot intrigued me. Now that the issue is solved, can I clarify what the cause was? Even though you were sure that you put the right inks in the correct carts, somehow there was ink contamination of some sort, presumably because one or two shades were in the wrong spot. Is that right? Unlucky. I’m not trying to rub salt into the wound, but to understand, in case I ever make the same mistake.
Also, you’re using Special Edition, are you not? How do you feel about it now on gloss? (Yes, I know that Pura Smooth is matte.)
Finally, I’ve not sure if you’re read of the issues that JeffG53 had with his 3880, but I’d recommend that you take note of the recently revamped printer maintenance instructions, and especially the bit about regular MK/PK swaps in order to prevent ink sedimentation. The R3000 would be the same.
[QUOTE=Brian_S;8764]I’ve been following this thread out of interest, since your problem and initial linearisation plot intrigued me. Now that the issue is solved, can I clarify what the cause was? Even though you were sure that you put the right inks in the correct carts, somehow there was ink contamination of some sort, presumably because one or two shades were in the wrong spot. Is that right? Unlucky. I’m not trying to rub salt into the wound, but to understand, in case I ever make the same mistake.
Also, you’re using Special Edition, are you not? How do you feel about it now on gloss? (Yes, I know that Pura Smooth is matte.)
Finally, I’ve not sure if you’re read of the issues that JeffG53 had with his 3880, but I’d recommend that you take note of the recently revamped printer maintenance instructions, and especially the bit about regular MK/PK swaps in order to prevent ink sedimentation. The R3000 would be the same.[/QUOTE]
Hi Brian,
I honestly don’t know what the cause was. I flushed the problem ink line through with Piezoflush and then installed a new cartridge through with the new ink. There was definitely only a problem with one ink though. That sorted it - that’s as much as I can tell you.
I am using special edition. I haven’t printed any on gloss recently. I’m mostly interested in matte prints anyway so I’m not too fussed about the performance on gloss papers. That said, I have taken quite a liking to Canson Infinity Baryta Photographique and would be curious to see how prints look on that.
Thanks for the tip re: the 3880 maintenance instructions.
Dana - do you have curves for either Canson Infinity Baryta Photographique or Canson Infinity Rag Photographique?
I’m printing some work for a show in less than two weeks and it’s been going well. I’d printed so much recently that the carts ran out but I refilled yesterday and all seemed ok.
However, I reprinted a couple of the images and now I’m losing detail in the highlights. It’s as if one of the inks isn’t printing. However, when I print the ‘8-channel printer’ image from Photoshop, I’m seeing all 7 inks.
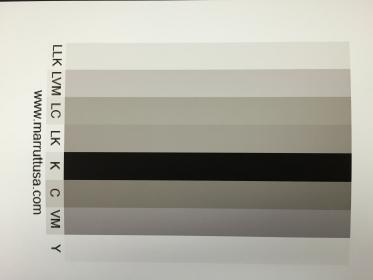
I’ve just printed the ink separation chart and it looks like the yellow isn’t printing. Strange that the 8-channel print looks ok.
So, what’s the best way to get the yellow ink to print again?
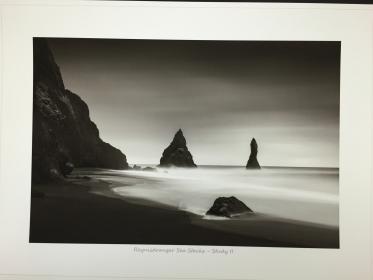
This image is the OK one…
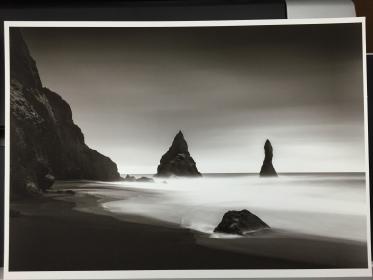
This image I printed today and lacks detail in the sea.
This is printed from Photoshop (PS Manages Colors)
Ink Separation chart I printed a few minutes ago - no yellow by the looks of it.
I decided to try using the Adjustment Utility to run the Ink Charge to see if that helps. However, every time I try, i receive an error ‘Ink out error’ from the utility. On the printer LCD, the VLM cartridge is showing as not recognised.
That is the replacement cartridge I was sent when I order the replacement ink and cartridge to fix the last problem.
I have no idea what to do now - and very little time to get this resolved!
OK, so I took out all the cartridges and used the suction method to slightly top up and get ink into the exit chambers. I noticed that the MK was empty again. I then put them all back in and have run about 5-6 head cleans.
Yellow is back. MK is barely printing. A nozzle check prints about 3 tiny bars.
What is the best way to encourage more black into through to the head without wasting so much ink with head cleans?
When you run the printer cartridges out of ink two things happen.
The exit valves lose their prime. After you refill them - you must re-prime the cartridges as per our instructions or ink will not exit the cart.
The ink lines fill with air and often the air pressure that forces ink from the carts (see above) can not push ink from the exit valves into the ink lines.
The best way to eliminate all this is reprime the carts and run 2-3 Power Cleans.
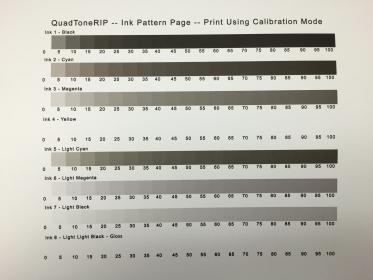
This comment won’t help you solve your problem (best of luck), but will help you understand in part what you’re seeing. That marruttusa page that you printed may work as a flush image, although this way is better, but it can’t be used as as a diagnostic. No matter how you print from PS, each of those bars is going to be a mix of the seven inks. The page I expect is an RGB image, and is going to be converted to CMYK at the final stage, so that each bar will be printed by mixing more than one of the available inks. You can’t even create a CMYK image and send it, as it’s going to be converted to RGB and then back to CMYK, with the same mixing effect. The only way you can print individual channels is using a RIP, QTR, in calibration mode with a special colour-coded page like the ink separation page, or one of the special flush images in the link I gave. (My comments are from experience on Windows, which you use, but I believe that they also apply to a Mac.)
Thanks Brian - I figured printing from Photoshop wasn’t telling me anything. I switched to using QTR and printed the Calibration chart - that’s how I confirmed the black was playing up.
Jon - I don’t know what your mean by re-prime. It’s not terminology you use in the refill instruction sheet. If you mean Ink Charge, forget it. The non-resettable cartridge in the LM position isn’t going to let me.
I opened QTR-K.tif to print, to focus on pusg=hing black in through, but the file it’s some weird purple color not black.
Confused and frustrated, again!
And it looks like I need to order more ink soon because I have to waste so much fixing the problems I encounter! $ plus import duties.
I love the results and have been spreading the word but this is painful.
5. Prime cartridge with ink: After filling a cartridge with ink and reinserting the fill hole plug, place the cartridge upright as shown below. With priming tip attached to the slip-tip syringe, insert the priming tip straight into the exit valve to depress the spring and open the valve (the priming tip must be pushed thru the plastic membrane covering the exit valve- do NOT remove the plastic membrane). Pull the syringe plunger to fill the exit channel & valve until a few drops of ink enter the syringe. When ink starts flowing into the syringe, pull the syringe and priming tip straight out of the cartridge, which will close and seal the exit valve. The cart is primed and ready to be installed into your printer. Syringes and blunt needles can be rinsed with water and air dried for future use. NOTE: If your cart has an orange plug over the air inlet point, REMOVE it before priming or installing the cartridge. NOTE: Unprimed cartridges will not have ink in the exit channel, indicated by arrows in the photo below/left. The photo below/ right shows a primed cartridge with ink in both chambers. The circle and rectangle chambers marked below MUST be at least 1/2 filled with ink for proper ink flow.
There are pictures on the instructions sheet that show you how to or you can watch the video on the product page itself:
Phil, depending on where in the SE your exhibition is to be, I’d like to send a couple of photography-loving friends in that broad area to take a look. Perhaps you could let us know when and where, either via a post or PM.
[I]5. Prime cartridge with ink: After filling a cartridge with ink and reinserting the fill hole plug, place the cartridge upright as shown below. With priming tip attached to the slip-tip syringe, insert the priming tip straight into the exit valve …[/QUOTE]#
Jon, I have an R3000 not a 3880. There are no instructions for priming the R3000 carts. I used the vacuum method to refill and there is ink in the exit chamber, so I assume that’s the equivalent.
I’ve opened QTR-k flush.tif in QTR and printed about 6 copies via QTR calibration mode. The sheets are blanks - no ink coming though. What can I try next?
Hi Brian. It’s not an exhibition. I was invited to have a stall at an annual village fair. It’s in Outwood (very near Gatwick Airport) http://www.outwood.org/show
Another update. This is really odd. I’ve just check that MK cart and it’s empty again! This is what happened yesterday and I refilled it completely. SInce then I haven’t printed anything with MK ink because it hasn’t been working.
Any ideas what can be happening. I don’t have much ink left now, maybe 10ml.
Don’t know what to do. Order more or give up. Perhaps that printer is faulty.
Sorry about that.
The only way we know to reprime the lines of an R3000 is using the initial ink charge. The carts on an R3000 are no pressurized and the tiny piezo crystals in the print head are not strong enough to pump ink. You would burn them out trying…
The initial ink charge is only available using the software for PC.
There is an instruction for doing this on this page here: http://www.inkjetmall.com/tech/content.php?151-Initial-Fill-Procedures-for-Epson-Pro-Model-Printers
[QUOTE=mpan66;8809]#
Jon, I have an R3000 not a 3880. There are no instructions for priming the R3000 carts. I used the vacuum method to refill and there is ink in the exit chamber, so I assume that’s the equivalent.
I’ve opened QTR-k flush.tif in QTR and printed about 6 copies via QTR calibration mode. The sheets are blanks - no ink coming though. What can I try next?
Do your carts have reset points or are they auto reset?
If auto reset - you should only refill them when they first read empty and you are alerted - as this triggers the auto-reset when they are removed. If you fill them before this - they will not reset correctly and the cartridge can run dry without your knowledge.
If they have reset points - you should only reset them after you fully fill them and then short the reset points.
The chips do not actually measure the amount of ink in the cart but what % they are from full. So when they are 100% full is when you reset them or allow the auto-reset. Any deviation from this will result in the ink levels and the chip being out of sync.
I do not know if these relate to how you are managing the ink levels or not - but this is the only way the cartridges work and how they are designed.
If you are using the auto-reset correctly (waiting for them to read empty and the printer alerting you that it is empty) and refilling only the one that has an empty alert - but it is emptying prematurely, you may have a different type of issue. However, if you are refilling all the carts or a cart that has not yet triggered the empty warning - then you will be unsyncing them - make sense? Does that apply to you?
If you are using the manual reset carts - are you remembering to reset them when you refill them? If you are - are you checking the LCD or status monitor to verify the reset to 100% full? And are you filling them 100% or are you filling them less (in which case you would also be un-syncing them)? Does that makes sense or does that apply to you?
[QUOTE=mpan66;8812]Hi Jon,
Another update. This is really odd. I’ve just check that MK cart and it’s empty again! This is what happened yesterday and I refilled it completely. SInce then I haven’t printed anything with MK ink because it hasn’t been working.
Any ideas what can be happening. I don’t have much ink left now, maybe 10ml.
Don’t know what to do. Order more or give up. Perhaps that printer is faulty.
All of my carts except LM are manual reset. I did manually reset them all when I refilled yesterday and the LCD reflected that. The LM cart is the new one I had to order to fix my last problem.
So, all carts went back in yesterday completely full. Since then I’ve run about 6 or so head cleans. All the other carts have ink in them; it’s only MK that has emptied completely.
The MK cart may have emptied itself by capillary action. That is the print head came into contact with the capping station which is too dirty or too wet and that touched the print head and wicked all of the ink out of the cartridge and ink lines.
If you did not print that ink out - and you are certain that you filled it 100% and its suddenly now empty and not reflecting the amount of ink on the LCD panel - then it had to go somewhere and the only way to get there is out of the print head (I do not think you have a leaking line or damper…). But, a dirty capping station is a real possibility.
The cover is off the printer on the above video so you can really see the capping station, etc and how to clean it. If yours is all gunky or excessively wet - there may be an issue further down in the draining lines. There may be another reason - but premature cartridge emptying that occurs fast usually is the result of the ink exiting the print head unexpectedly (or the cartridge springing a leak which you would definitely see and have a mess on your hands). So - I am just trying to get you to take a look - do some cleaning - and see if the MK cart behaves itself - as well as any other cart that may be emptying too fast. It could be an issue of maintenance rather than cartridge functionality. Certainly the MK running out in a day leads me to believe that.