Hi Dana- I have the Epson 4800 Stylus Pro into which I installed your reusable cartridges and inks last year. When I power up, I get a flashing notice to reset #6 cartridge.I did just that with your chip setter #ACC-RESETTER-LF. I got the blinking red light about 4 times and it then turned green. However, the display still says to reset #6. Yesterday, the display said to reset #7 and #8 and when I removed and reinserted each cartridge, the display said to reset #6 and#7 and each time I removed the cartridges and reinserted them #6 7 or 8 were said to be reset. I reset all three cartridges but a reset notice still comes on. I have the original set of Epson 110 cartridges which I inserted into 6,7,and 8 slots and the only notice that came on was that #6 was empty of ink. Now,is it possible that the chips on #6 7 and 8 are faulty although they are just a year old and I do not print that much? Also, should I try to remove and place the chips on the original Epson 110 cartridges and place them on your 220 cartridges? After I receive your response and solve this problem, I will then address my clogging problems.
After reviewing your order history, I see you purchased the 4800 refill carts and ConeColor 8oz bottles in July 2012. Based on your explanation, it does sound like one or all of the chips on your # 6, 7 and/or 8 carts are not working properly. If your printer correctly reads the Epson chips, then you can transfer the chips from your Epson carts to the refill carts, and reset the Epson chips to read full again. I included information below to be able to do this.
Attach Epson chips to refill cartridges:
Looking at the chip on the Epson cartridge, you will notice there are two small plastic points that hold the chip in place. Make a note as to which way the chip fits onto the cartridge so you can attach it to the refill cartridge in the same direction. Using a straight razor blade at an angle carefully cut the top of these two points off, which will release the chip so you can carefully pry it off the cartridge using the edge of the blade. You can also use a sharp knife or something similar to pry the chip off the refill cartridge. You will notice the same two points on the refill cartridge where the chip goes (pry the chip off the refill cartridge before attaching the Epson chip in it’s place)- gently line up the Epson chip with these points and attach it to the refill cartridge by using an adhesive such as double sided tape. Making sure your hands are nice and clean, press the chip to make sure it is tightly seated and flat on the cartridge. Now, using the chip resetter- reset the chip and insert the cartridge into your printer.
Please let me know if you have questions, your results, or if there’s anything else I can help you with.
Best regards~ Dana
Hi Dana- The chips remove easily but the two points you refer two are probably the slot on the bottom which matches the slot on the chip. I think this is for proper orientation of the chip. The other point is a projection which enters a hole on the chip. The hole on the Epson chip snaps right into the projection on the
Epson cartridge and this holds it in place. However, the projection on your cartridge is slightly larger than the Epson chip hole and it does not snap into place.No double sided tape is needed if the chip snaps into the hole.How should I proceed without ruining anything?
Dana-I guess you are very busy answering questions. Regarding my latest post, if I cut off the entire point on your cartridge so it does not interfere with the seating of the Epson chip (the point that goes thru the hole on the chip), I would then use the double sided tape to attach the chip securely. Will this damage your cartridge or am I relegated to buying a chip set? Will your chip set fit the hole on your cartridge-it should snap in place. If you look at the replacement cartridge for the 4800 Epson, you will see my concern.Please try to get back to me today so I can get back to printing. I appreciate your help.
Regards–FRANK
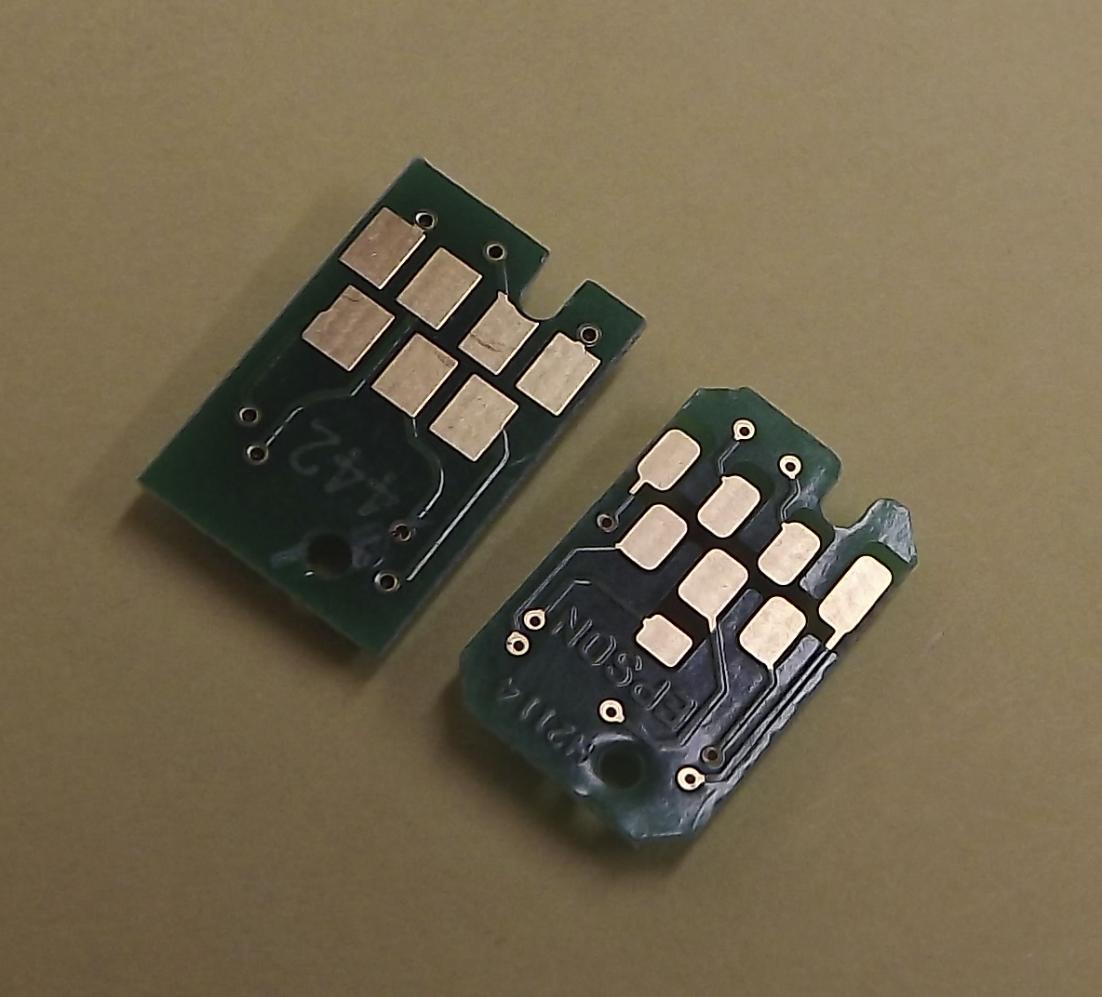
Hi Frank- Yes, I am very busy between answering support questions, production printing, and many other things I do every day, but I just took a few photos to help illustrate the chip transfer procedure I sent previously.
The Epson chip is the same size and has the same two holes that secure it to the cart, so it fits into the chip area on the refill cart very well. The top photo shows an original refill cartridge chip (square corners) and an Epson chip (rounded corners)- you will notice both chips have identical placement of the hole and notch used to secure chips to the carts. The bottom photo shows the Epson chip placed into the chip area of the refill cart- it fits very well, and I use a small piece of thin double sided tape to help keep it in place, since I cut off the end of the plastic points used to secure the original chip into place.
I hope this helps clarify the process.
Best regards~ Dana
HI DANA-That answers my concern- you removed the point that seemed too big for the Epson chip, and the tape serves the purpose of the two points.O.K. Iwill give it a try and let you know tomorrow how it went. I think two chips are defective but I will do one at a time.Thanks again for the photos which clarifies your procedure.
Excellent, I’m glad the photos are helpful to illustrate the written instructions. Please let me know if you have further questions, or there’s anything else I can help you with.