I purchased an Epson Stylus R3000 refurbished printer from Epson. I previously used this printer to print color images using its Epson inks. I am converting my printer for use with PiezoDN and have purchased PiezoDN Warm Neutral Inks. Before installing the piezography inks I am currently attempting to flush my printer of Epson inks using the Cartridge System and PiezoFlush and have installed the recommended program, 2manuals Adjustment Service Program, on an old PC laptop. I have however been unsuccessfully in my attempts to run the Ink Charge. I previously wrote about his issue last year.
I originally received error message " Communication error!: 10000010" and then "Communication error! Error Code: 20000010” when attempting to run Ink Charge when connected to printer via wifi. After switching to a USB cable connection I stopped receiving these error messages but the Ink Charge still failed.
I have attempted to run the Ink Charge again now after several months. Although when started the printer accepts the piezography cartridges, and reads the ink cover and printer cover as closed when the inkjet mall/ piezography switches are in place, as soon as I run the Ink Charge through the Adjustment Program I get an error message on printer saying the printer cover is open and then the printer gives me an error message saying that cartridges are not accepted.
What should be my next step? According to one of comments I received when I last posted, the Ink Charge can only be performed when the cartridges read full and by installing and removing them several times during my attempts to run Ink Charge on wifi the cartridges no longer read as full which is required to carry out the Ink Charge. The cartridges do now only read as partially full. Is this the problem? What should I do now? Should I purchase a new set of Auto-Reset Chips for the R3000 Cartridges and try running the Ink Charge again with these new chips installed? I am a bit worried however that after installing the new Auto-Reset Chips the Ink Charge still won’t work and I will have spent another $80 dollars for nothing. It was also suggested I could also do several cleanings in a row with the PiezoFlush cartridges installed. Should I do these cleaning through the Adjustment Program or just manually select Head Cleaning or Nozzle Check on my printer directly? How many times should I run one of these cleaning options? How do I know that I have cleared all the Epson Inks and PiezoFlush from the system? Is there way to print it out of system or print test print. I want to know my printer is clean before I install the Piezo inks so I am not contaminating/ruining them.
I suggest going the simple route and doing 4-7 cleanings in a row (same think has charge). Or print purge sheets (as long as the nozzles are no clogged).
Do you mean I should do Head Cleaning from the printer menu? Or do you mean I should do Head Cleaning from Adjustment Program or Cleaning from within the Ink Charge window of Adjustment Program?
I should mention that several months ago after failing numerous times to get the Ink Charge function in the Adjustment Program to work I left the printer unused for several month. One night not believing any of the Ink Charges had succeeded in releasing the PiezoFlush and I believe not having carried out any head cleanings yet at this point I took out the PiezoFlush filled Piezography cartridges out of machine and put the original Epson cartridges back in the printer and attempted to print a black and white image. The print came out with a strong pink cast so clearly at some point the PiezoFlush had been pulled into to head or one of ink lines (?). I tried printing several more times to see if PiezoFlush and pink cast would diminish after several prints but they appeared just as pink as the first print. At that point I gave up and reinstalled the Piezo Cartridges filled with PiezoFlush. Yesterday I again unsuccessfully attempted to perform Ink Charge with PiezoFlush installed and it would not work.
What should I do now? While I do want the PiezoFlush to clean out any of the Epson inks I don’t want the PiezoFlush to remain in printer head or line somewhere and cause all my future prints using Piezo inks to have pink stain/ cast. How do I make sure all the PiezoFlush has cleared the system? Will simple Head Cleanings directly from the printer achieve this? Should I do a Nozzle Check from printer menu? If I print a Cleaning Sheet from the printer menu, should I use normal 13 x 19" plain paper, photo paper or specially made Cleaning Sheets? Online I only see 8.5" x 11" Epson Cleaning Sheets although the R3000 prints up to 13" x 19". Could I just perform several Cleaning Sheet in row moving subsequent sheets from left to the right so that I covered the full width of the printer with two or three Cleaning Sheets? How do I know the nozzles aren’t clogged? I printed a number of prints and print tests using the original Epson inks so I know that the nozzles weren’t clogged before I installed the Piezo Cartridges and PiezoFlush but I don’t know if they got clogged at some point by the PiezoFlush.
Run 2 cleanings, do the nozzle check (PF is pink so you can see the nozzle check) and then run either more cleanings or normal purge sheets (letter paper, non photo is fine) per the instructions in the link above.
There is a lot of ink between the carts and head (about 8.5mLs) so there is a lot of PiezoFlush to get out before the Piezography Ink arrives.
I am a bit confused by your instructions. When you say “run 2 cleanings” do you mean run two Head Cleanings from R3000 Printer Menu? After running a Head Cleaning from the printer, it will prompt me to either Finish Cleaning or do a Nozzle Check. Should I select Nozzle Check? What will happen when Nozzle Check is carried out with Piezo Flush? Will it print out standard Nozzle Check bars with Piezo Flush? What am I looking for in the print out? Is it the same as standard Nozzle check that the bars are whole and there are no gaps? Should I do this at the end after more Head Cleanings to see if paper is blank and the Piezo Flush has left the system?
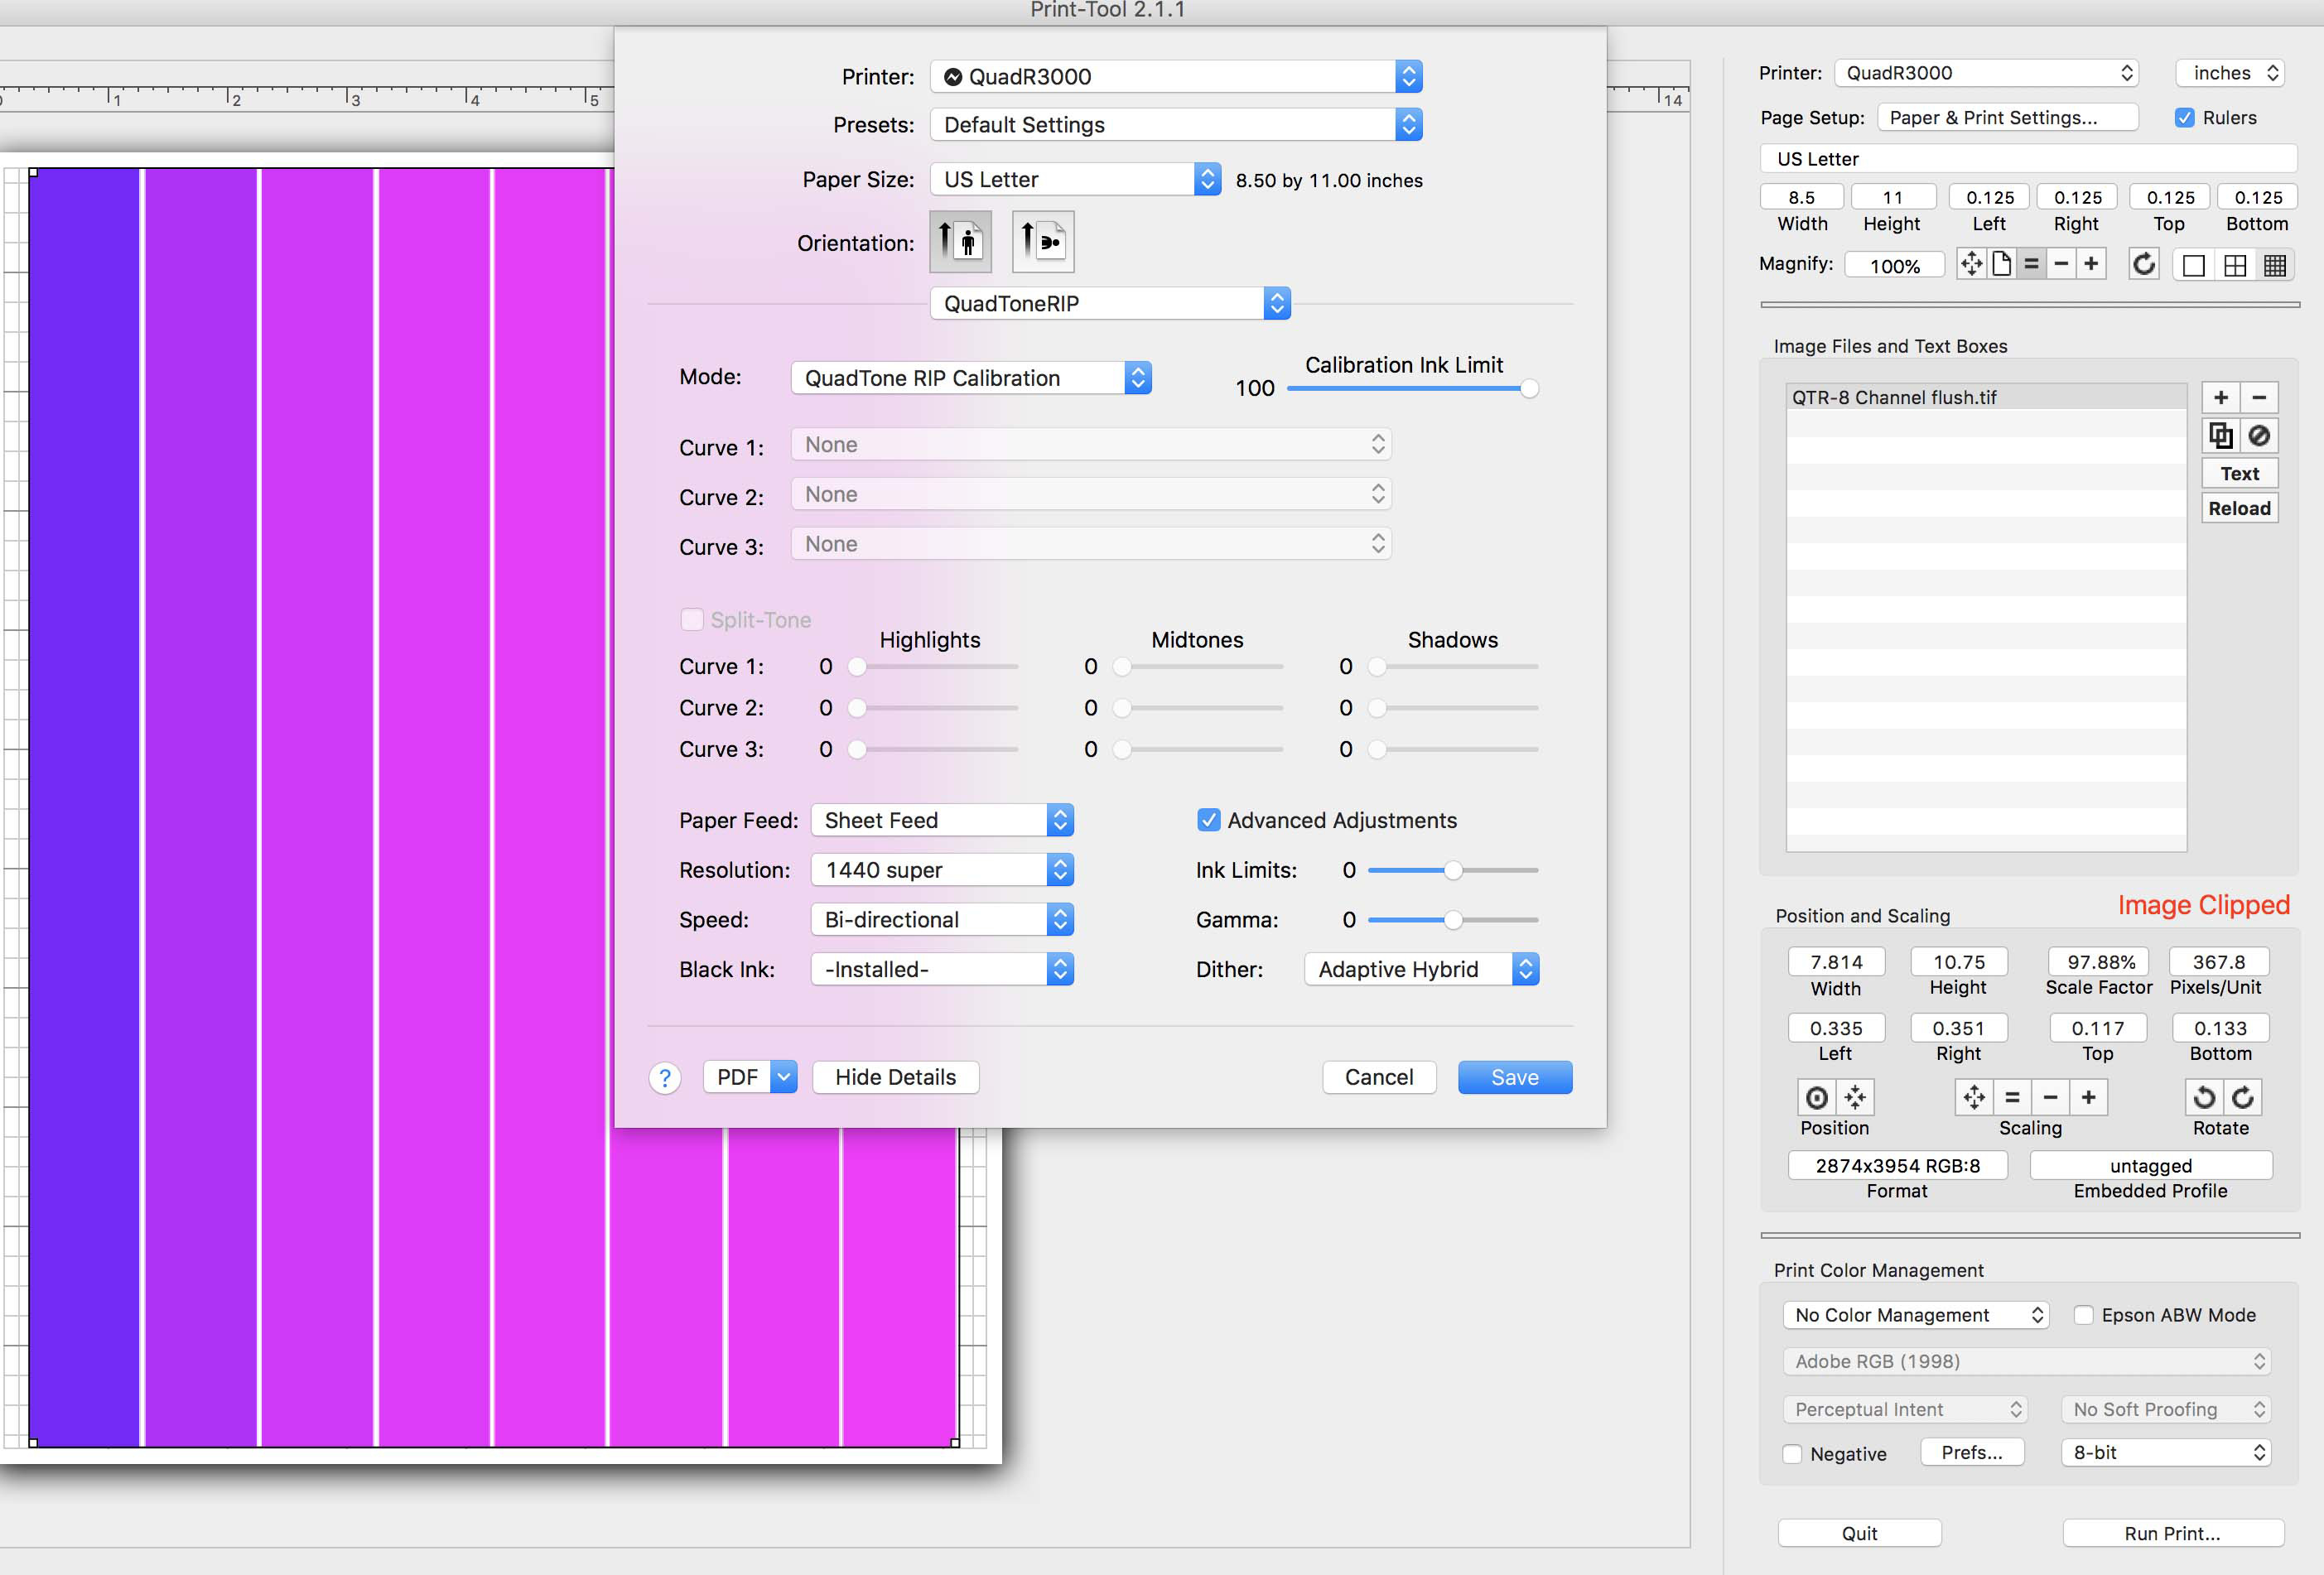
In regards to link above regarding “How to Flush Individual Channels using QTR Calibration Mode”, I have High Sierra 10.13.6 installed on my computer do you know if this should work with QTR? I have QTR 2.7.8 and Print Tool 2.1.1 but have not used them yet as I was waiting to install Piezography Inks before attempting to learn QTR. There are several Images in the download folder “QTR Cal Mode Flush Images”. Which Image do I open in Print Tool? There are 6, 8, 10 Channel options but R3000 has 9 cartridges (Photo and Matte Black). As shown in screen grab below, I opened the image QTR-8 Channel Flush.tif in the Print Tool and selected all of the listed options; however, I cannot find a place where I can select the Saturation (I should set it to 50% according to the instructions as I’m printing on standard paper). Where is Saturation control located? QTR menu has an option for Black Ink: (either Photo or Matte Black). Would I have to print this page twice as it will only print from one black cartridge at a time (either Photo or Matte Black)?
If I do print this image, QTR-8 Channel Flush.tif, in QTR Calibration Mode what should be the result? Do I just keep printing until no more pink Piezo Flush appears on the pages? Is there anything else I’m looking for to know that I have successfully cleared the Epson inks and Piezo Flush from the printer and I can install the new Piezography cartridges with Piezography ink?
I’m still a it confused would appreciate your feedback.
Could you kindly respond to me my last post questions. I want to finally clear out printer and install piezography inks as I have project I want to begin working on.
You are attempting to put Piezography ink through so it won’t be blank. The nozzle check will be monochrome lines after you have gone from PF to Piezography.
it will.
Generally I open the single channel full page ones 1 at a time and print 5x to 8x of each image using 720dpi, Bidirectional, and Calibration Mode in QuadtoneRIP (not 8bit or 16bit. use Calibration Mode).
You can ignore this bit.
Keep printing until you see the bars (or full page depending upon the image used) go Monochrome.
Thank you for getting back to me. I have a few follow up clarifications questions.
You responded to my question “When you say run 2 cleanings, what do mean” by answering “Finish Cleaning and then do another”. What I was trying to ask in that post and other previous posts is when you said “2 cleanings” if you meant to run Head Cleanings directly from the R3000 Menu or to run Head Cleaning from the 2Manuals Adjustment Program. While you didn’t answer this question, as you didn’t seem to take issue when I mentioned running the Head Cleaning from printer menu , I will assume you meant this method unless you’ll tell me otherwise.
I ran 2 consecutive Head Cleanings from the R3000 Menu buttons. Afterwards I printed a Nozzle Check which showed normal color bars with no gaps albeit a bit faint in color. The fact that they were still in color and not in pink showed me that there was still a fair amount of Epson Ink in Printer. I ran more Head Cleanings (around 12) until the Nozzle Check produced only pink lines from all 9 cartridges. What should I do now? At this point if I understand your instructions I should load my Piezography2/PiezoDN Warm Neutral Tone inks in the new cartridges?
After loading my Piezography2/PiezoDN Warm Neutral Inks into the new cartridges, should I go ahead and follow the instructions for How to Flush Individual Channels using QTR? So per your instructions I should “open the single channel full page ones 1 at a time and print 5x to 8x of each image using 720dpi, Bidirectional, and Calibration Mode in QuadtoneRIP (not 8bit or 16bit. use Calibration Mode).” So for example I would open the QTR-Y flush.tif image for the Yellow channel and print 5-8 copies, and then print 5-8 copies of other images for each of other channels? How do I select that I’m printing that QTR-Y flush.tif image from the yellow cartridge only? Or does it automatically print from the Yellow cartridge due to the density of that image? All the images appear to be very close in density. Would I use QTR-K flush.tif file for both Photo Black to Matte black cartridges?
You also previously mentioned doing a Purge Sheets using the inkpurge.psd file as another option. Should I do this instead of doing single channel flush? The instructions for Purge Sheets for R3000 on Piezography site: ( Install procedures for Epson® Photo R3000 | Piezography )tell you to print Purge Sheets through Photoshop. Should I print through Photoshop or Print Tool?
Thanks for your help. I succeed with the last steps you suggested but unfortunately I have few new issues.
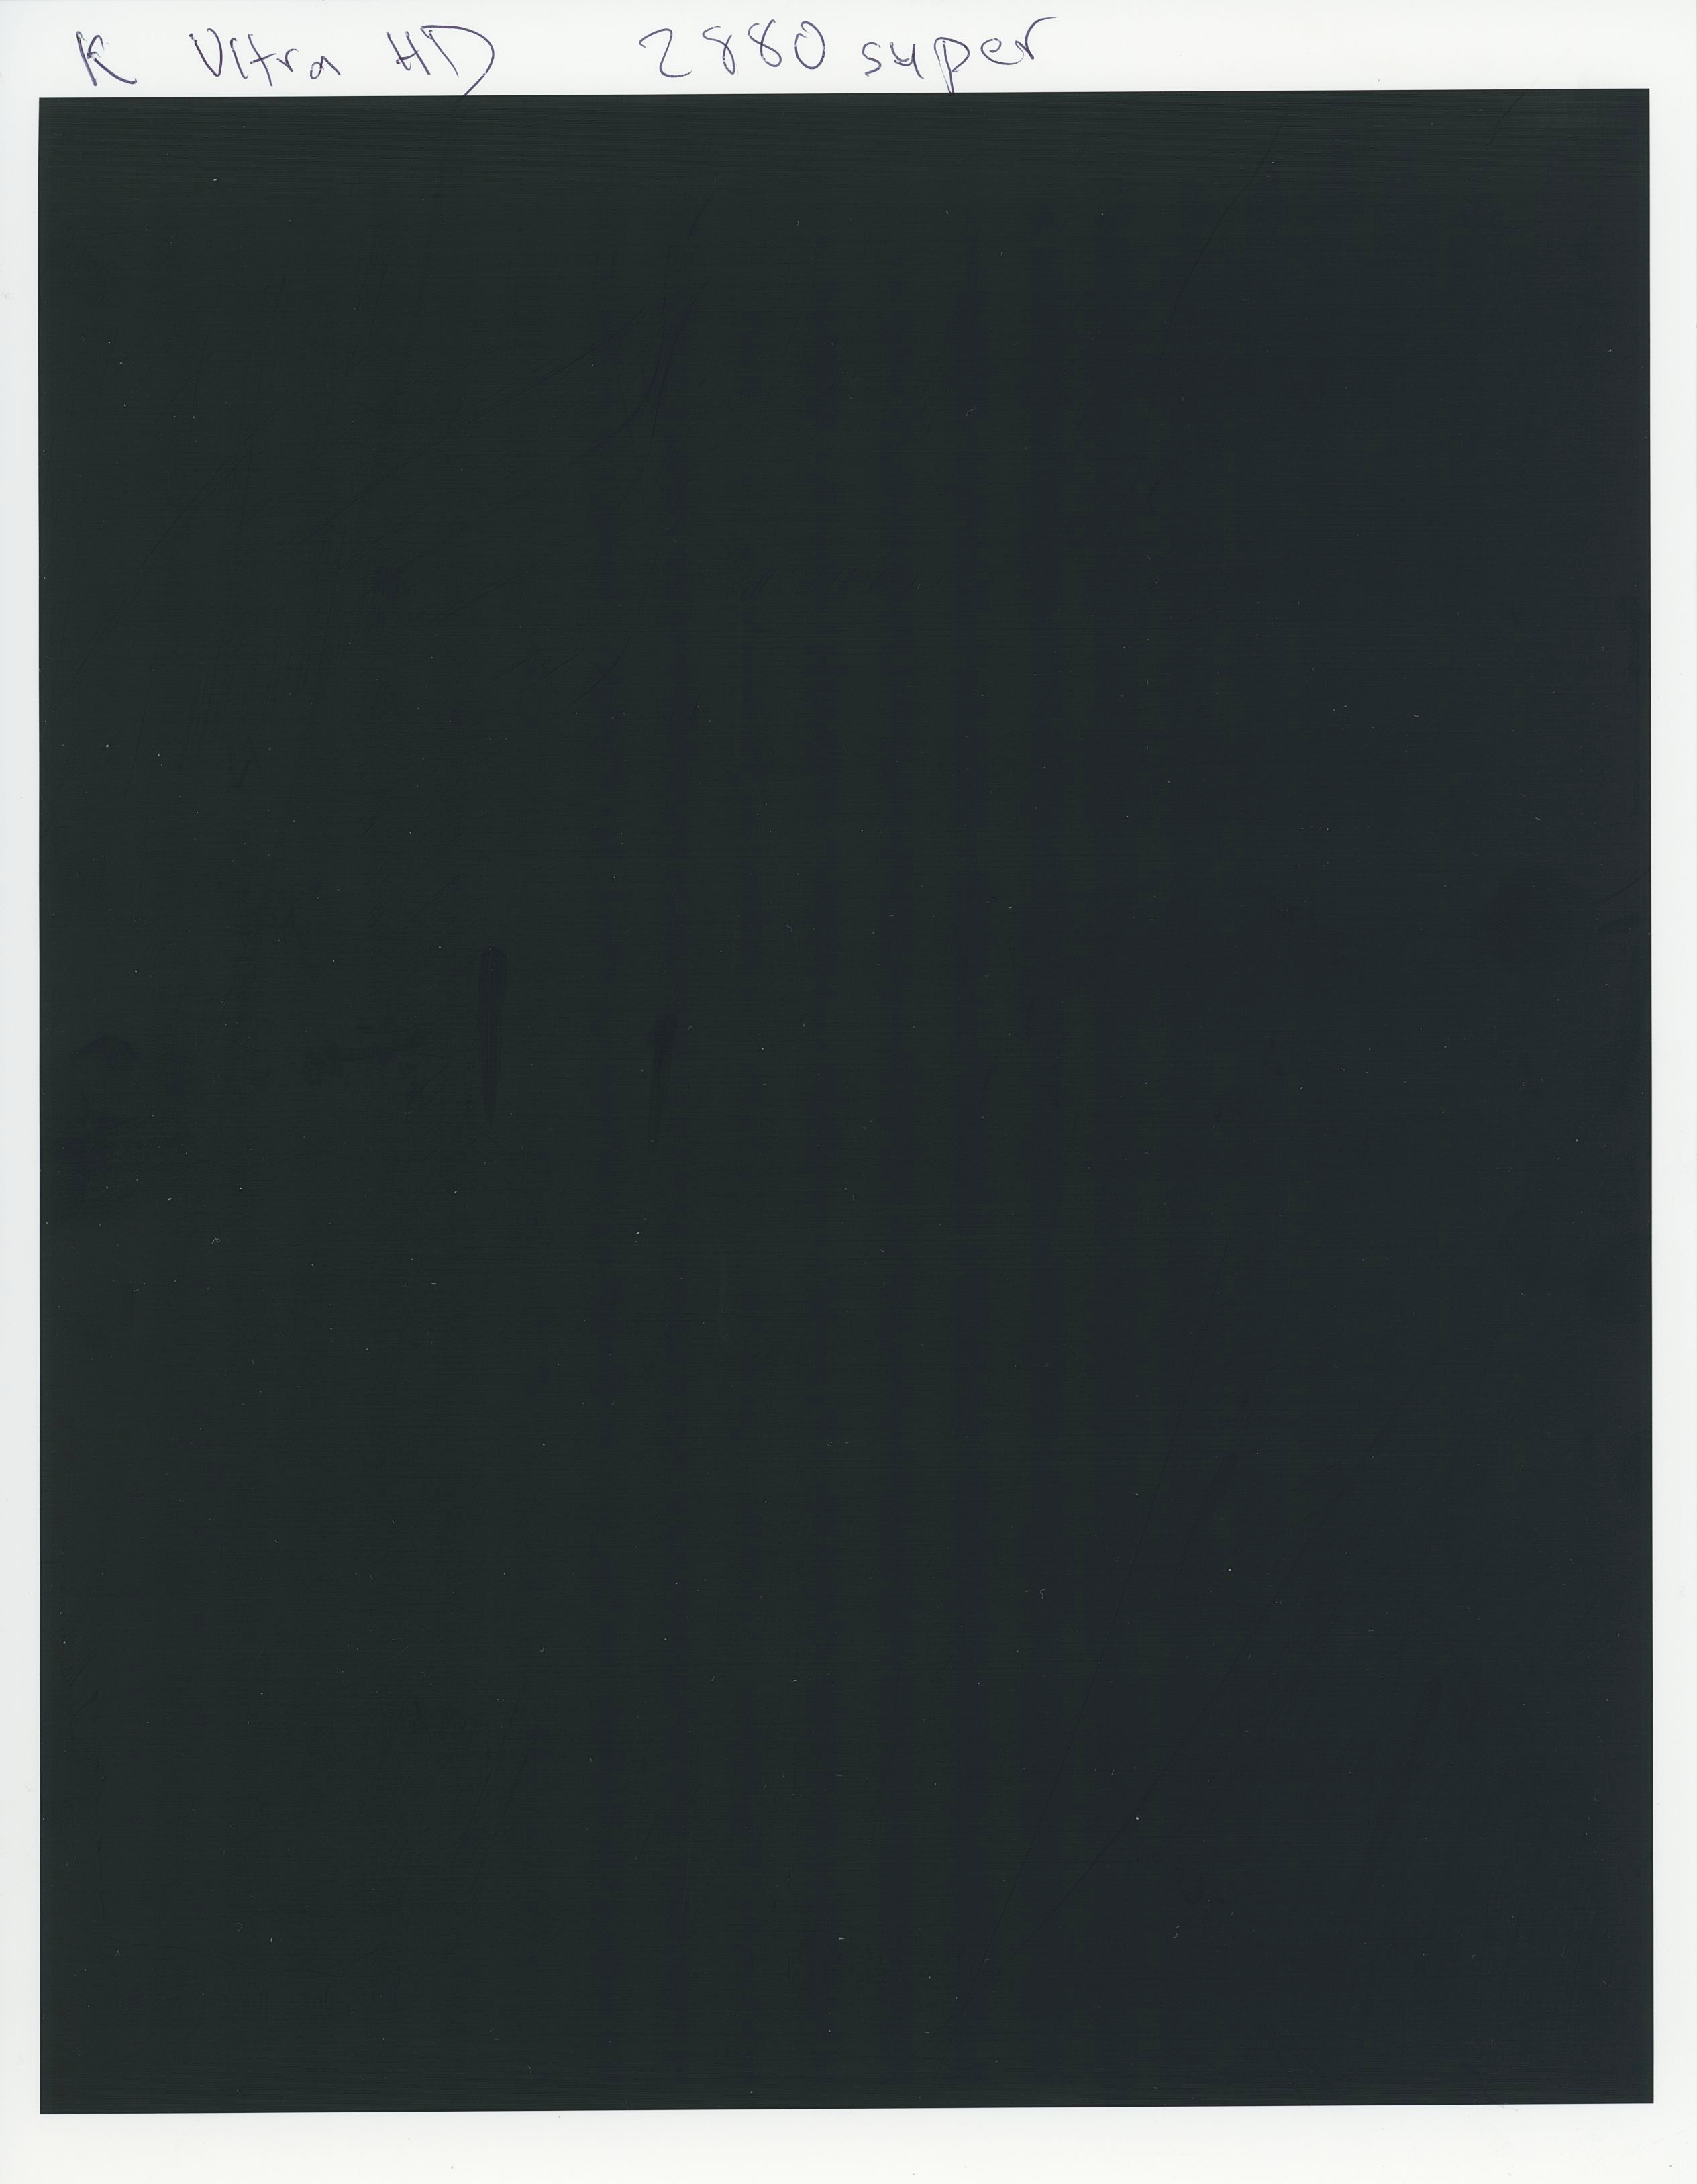
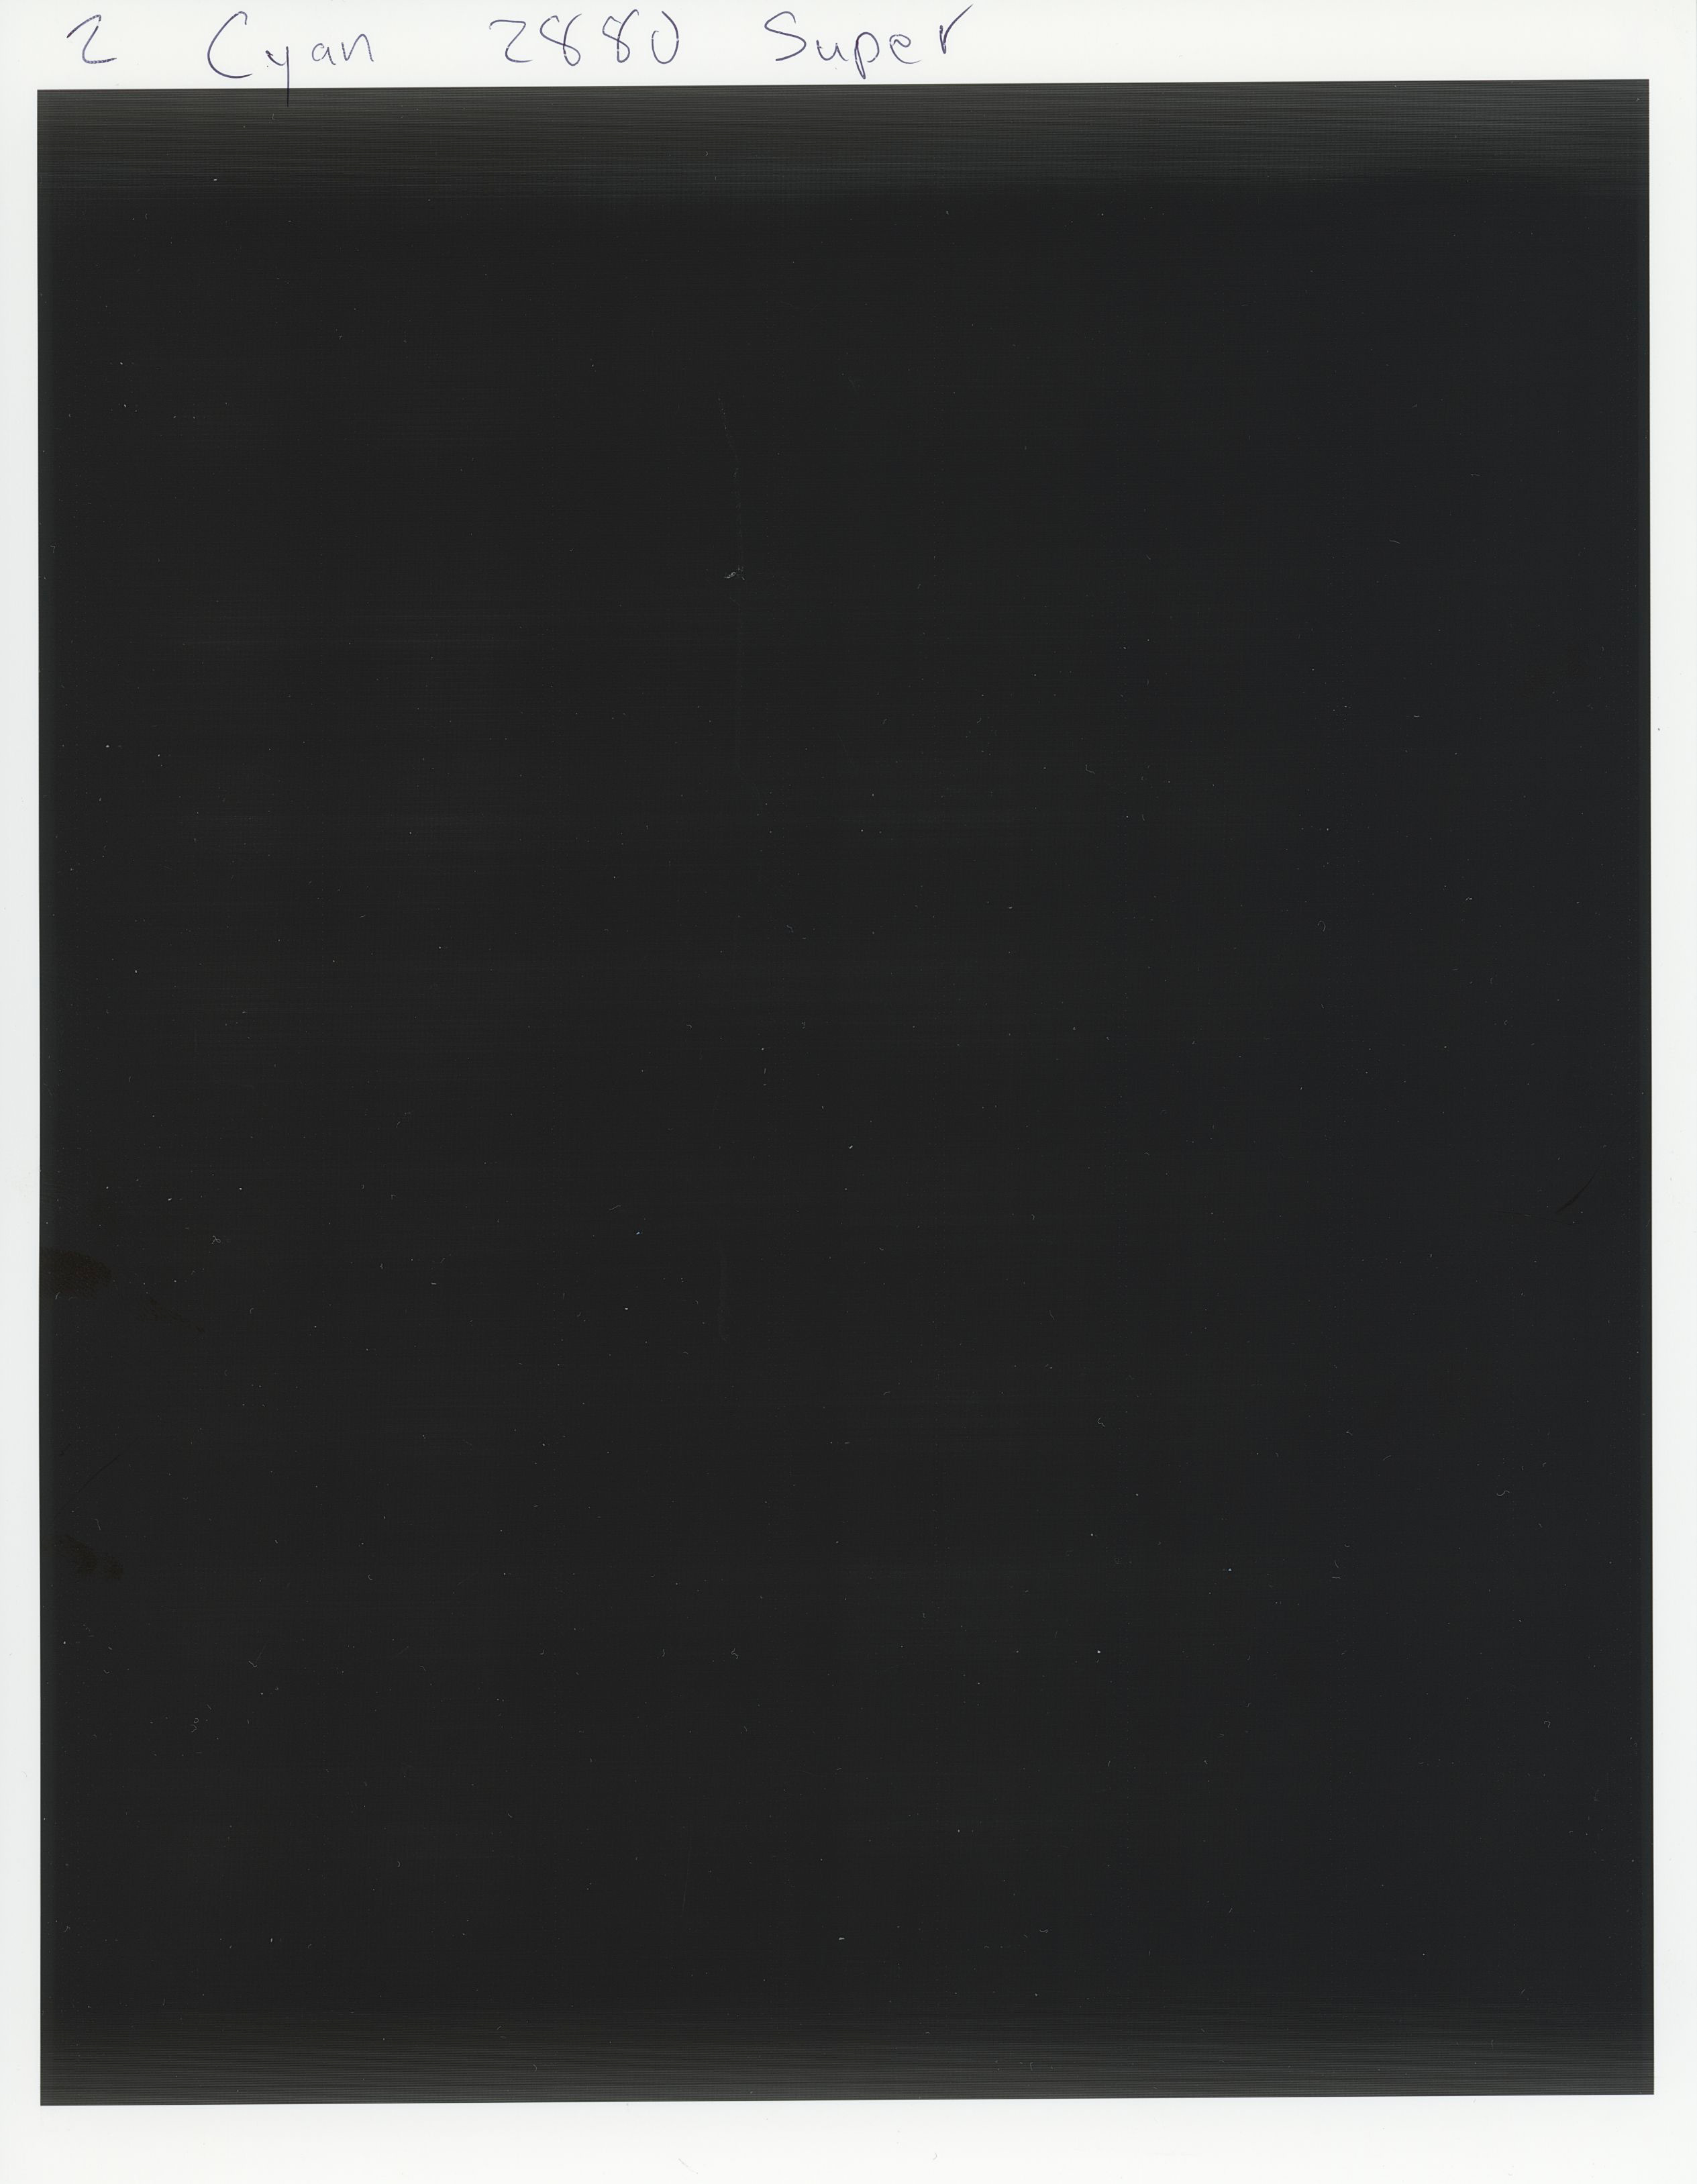
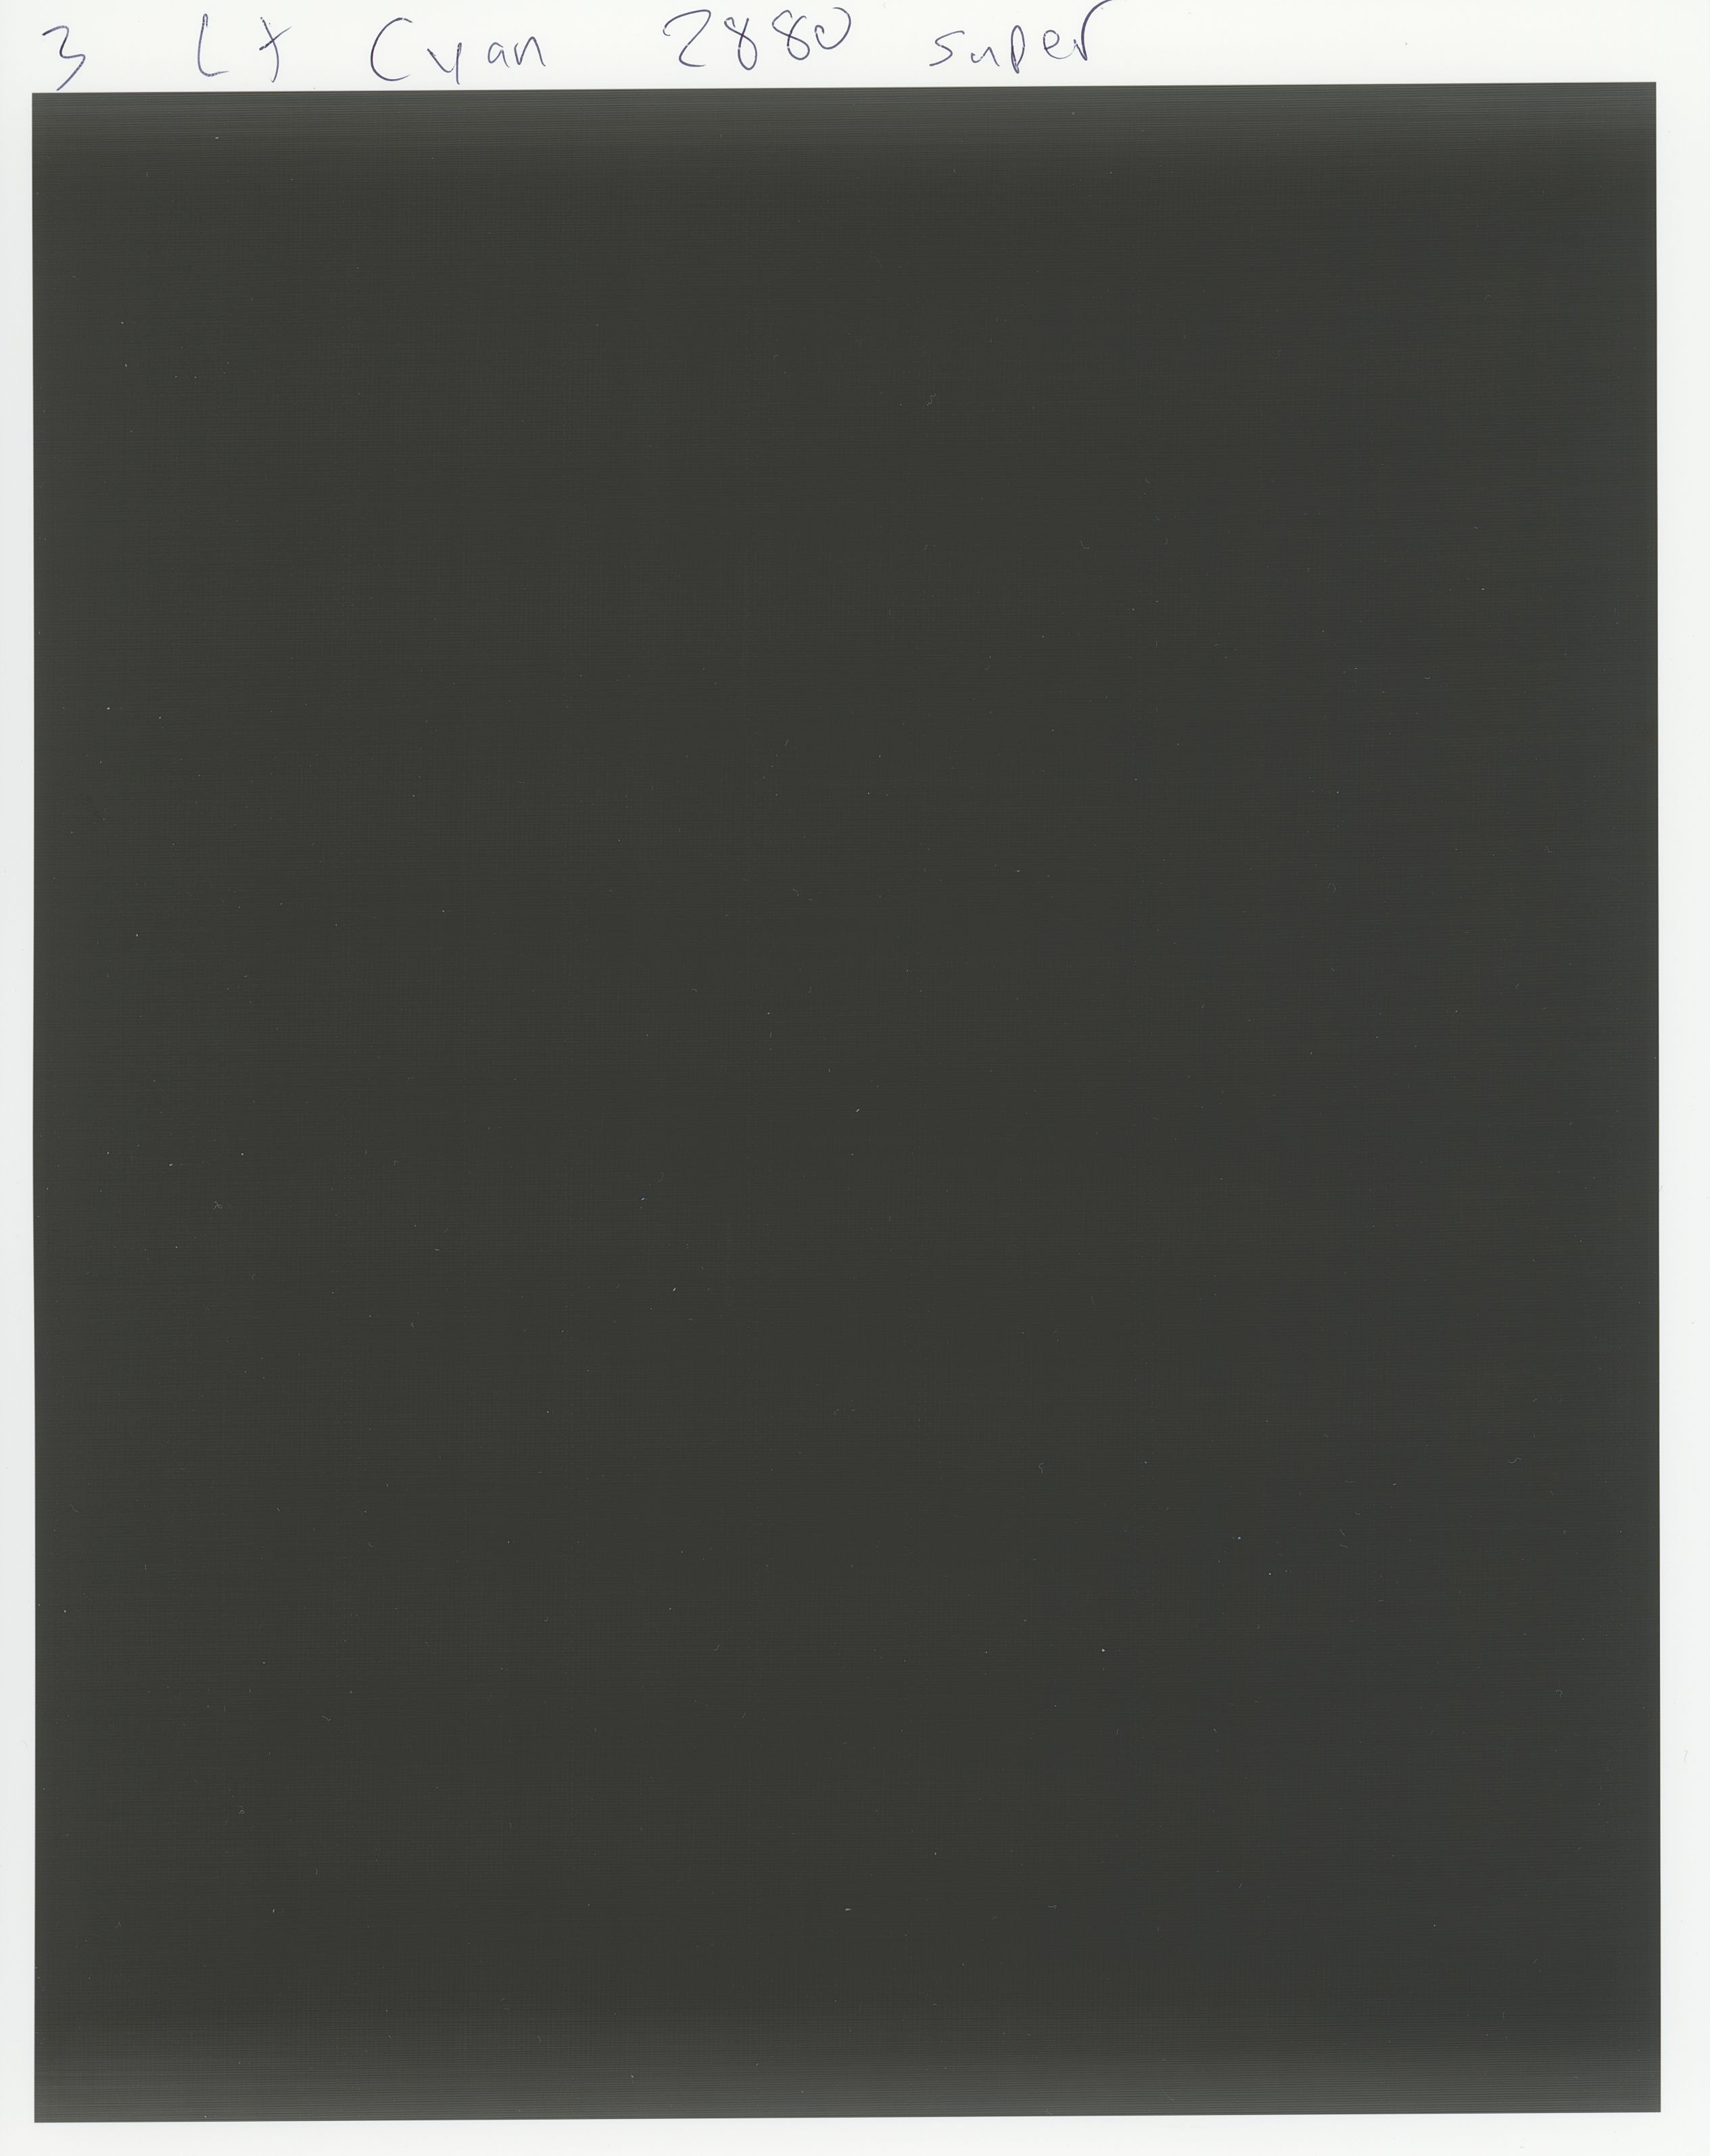
I loaded piezography inks and I got clean nozzle checks after numerous cleaningings and did 5 prints of each individual channel using QTR Calibration Mode. I had no more epson ink or Piezo flush stains however I got some horizontal banding in inks 2,3,4 in particular. After updating QTR and using 2880 Super (as you suggested in another posting) I got better results. Please let me know what you think of these samples printed on Epson Ultra Premium Glossy Photo Paper. I’m still getting banding on the edges of some images. I saw in a past post that some people had this 1" from edge of paper. Do I have to leave 1" border on all prints? Or is there another way to solve this problem?
The Ultra HD / K Print shows vertical ending which i think is from scanner or at least not so evident to the eye.
Now the printer gives me a warning saying “ink pads need maintenance”. Do I need to follow the “Waste Ink Bottle Installation” . If so, the instructions are for the R2400 printer. Does the R3000 have one or two tubes? Should I run 2manuals reset utility? Here:
You have said to use Windows versions but as I previously had problems carrying out Ink Charge with the windows version of the 2manuals Adjustment Program, I would prefer to do it through Mac where haven’t had any computer problems.
Once I get this issue with banding and the ink pads sorted out I hope to start printing transparencies. While I primarily hope to use this system for making digital negatives for platinum prints, I would also like to use it to make halftone positives for screen printing. I know that screen printers normally use different inks but I do not want to buy a whole new printer and inks just for screen printing. I will only be printing a few positive transparencies for fine art screen printing unlike many screen printers who are printing transparencies daily for their clothing businesses. How do I print positive halftone transparencies using only the Ultra HD Black ink?
The banding is just a factor of low resolution and quadtonerip. It’s not going to be a problem when your print for real.
Looks like everything is good. I advice getting the waste ink bottle so you don’t fill your ink pads. Resetting the ink pads (when they final register as full) costs $10 but will last you a long long time next.
I want to print a halftone positive transparency using only the darkest black (Ultra HD Matte Black). What is best way to accomplish this using Quadtone Tone Rip or PiezoDN digital negative software? I suppose I could give my haltones the same color as the QTR-K flush.tiff and print in calibration mode. Is there another simpler way to accomplish this?
I previously had some banding on the edge of my images when I printed single channel flush in QTR Calibration mode. You that was “just a factor of low resolution and quadtone rip. It’s not going to be when you print for real.” I was printing at 2880 super dpi in Quadtone Rip. When I print negatives for platinum printing, I will also be printing with Print Tool and Quadtone Rip. Won’t I have the same problems?
PiezoDN is not built for half-tone. QTR is not optimized for it either exactly. If this is a “screenprint” half-tone type film you want to make, the PrintFab rip is really good and has a 30 day trial.
Alternatively you can use Gutenprint in only black ink mode and half-tone your image in Photoshop.
I have recently installed P2 inks on my R3000 primarily for printing digital negatives for pt/pd digital negatives. I will also be occasionally printing transparencies for screen printing. I previously asked for any suggestions regarding printing halftone transparencies. Thus far I have gotten the darkest test prints by adding the same color as QTR-K flush.tif to my image file and printing in QTR calibration mode so that I’m only printing using ink from the Ultra HD Matte Black Channel. Is there any easier way to accomplish this same effect through PiezoDN so I can select to print from only one printer ink channel (the darkest)? Which channel should I use for printing the blackest positive transparencies? I got the darkest results on test paper by printing with the Ultra HD Matte Black channel but it seems like in the descriptions for PiezoDN you recommend using Photo Black. Should I print screen printing transparencies using the HD Photo Black from the yellow channel instead?
You recommended using other software such as PrintFab for printing halftones. I tried printing with the demo version of PrintFab but didn’t get better results than QTR. Yes it will convert files to halftone for you but I can do that in Photoshop as well I didn’t notice any difference in the quality of the halftones (although I know that AccuRip at least is supposed to produce better halftones). With Printfab there is a way to select “Single Black” in halftone settings that is supposed to print with only the assigned black (Ultra HD Matte Black). The black when printed through QTR calibration mode was still slightly darker than through Printfab so it must be combining inks somehow. I was able to set higher print resolution through PrintFab but I didn’t notice any real resolution differences but it’s hard to tell with my test images. How much of border do I need to leave on transparencies to avoid streaking or banding?
Any thoughts suggestions?
Also when I purchased I thought P2 was best system for printing digital negatives and some occasional prints; but I now see that K7 ink set is also listed compatible with my printer. Am I fine with current p2 setup or would I be better off with that K7 ink set and configuration? If so it seems I would just need to purchase a shade #7 for the Yellow cartridge and move the HD Photo Black Ink into my still boxed Piezography Photo Black cartridge to adopt the K7 ink placement configuration.