I have a used but well functioning 9900 that will be converted to Piezography Pro. I’m new to this machine but have had Piezography printers installed in a number of 9800s and 7800s. I want to get the 9900 into the best operating shape before the conversion. So…
Which head alignments are necessary? Uni-D, Bi-D, both? Is there an advantage to using gloss paper over the recommended Enhanced Matte? (With our Canon printers, it was recommended by Canon tech support to use glossy paper for head alignments).
I was thinking to replace the dampers while doing the 9900 conversion. (To my knowledge the previous owner hasn’t ever replaced the dampers). With our last 9800, installing new dampers when converting to Piezo seemed to keep the 9800 happy and clog free. With the 9900 installation, what is the optimal time to replace the dampers? Would it be after flushing the Epson ink out and letting the Piezoflush sit 24-48 hours, and before doing the init fill with Piezo Pro ink?
Starting with your last question - Epson thinks a year is optimal to replace the ink exchanger. If everyone did this annually, their printers would last longer. So no time like now. But if you are going to flush the printer, flush all the scaling pigment into the dampers - then replace them. You should perform the perfect nozzle test prior to replacing the dampers, and use damper replacement to verify that they are not the cause of any jets that will not clear. Always be verifying step by step.
Uni D is best because Uni D printing is best. I think that we use glossy paper too. It is just easier to read.
If you find that 9900 is hopeless - we can convert it to a 9 ink system instead of 11 and map out up to two bad channels!
hope this answered your question. Ask away if not!
I read through the 9900 service manual about changing the ink selector unit. It says you should do an “ink discharge” and install drain cartridges to drain the lines of ink. I can’t find the drain carts for sale and Compass Micro hasn’t heard of them (or stocks them). Are the carts/draining the ink step totally needed, or is there a workaround?
You can definitely change your Ink Selector Unit without using the special carts for draining ink. You don’t need to drain the ink. In fact, the Epson Field Service Guide says that ink draining is “optional” when replacing the Ink Selector Unit and/or printhead. The main reason for this (in my opinion) is that the Ink Selector and print head are at the highest point in the ink system. All you need to do is wrap some paper towels around the tubes when you remove them and use a rubber band to wrap around the paper towels. I recommend you review the Field Service Guide (rather than the Service Manual) as your main guide for doing the procedure. When I did it on my 7900 there was really no ink coming out of the tubes at all.
Oh, I didn’t realize the FSM had different procedures than the Service Manual. I’ll proceed with the FSM procedure. Thanks Dave!
[QUOTE=datro;12537]You can definitely change your Ink Selector Unit without using the special carts for draining ink. You don’t need to drain the ink. In fact, the Epson Field Service Guide says that ink draining is “optional” when replacing the Ink Selector Unit and/or printhead. The main reason for this (in my opinion) is that the Ink Selector and print head are at the highest point in the ink system. All you need to do is wrap some paper towels around the tubes when you remove them and use a rubber band to wrap around the paper towels. I recommend you review the Field Service Guide (rather than the Service Manual) as your main guide for doing the procedure. When I did it on my 7900 there was really no ink coming out of the tubes at all.
Is it normal than more than one INIT FILL cycle required to move the Piezoflush and (and ultimately the Piezo ink, when I get to that stage) through the head?
I ran one INIT FILL with Piezoflush, but the lines still have colored ink in them. Also the nozzle check is showing diluted colors of the OEM ink.
I also referenced this page http://piezography.com/epson-pro-4900-7900-9900-installation/ to see if more than one INIT FILL is needed - there’s no mention of needing to do more than one init fill. I also ran a cleaning cycle to see if it was residual color ink in the dampers, but the nozzle check came back with color inks.
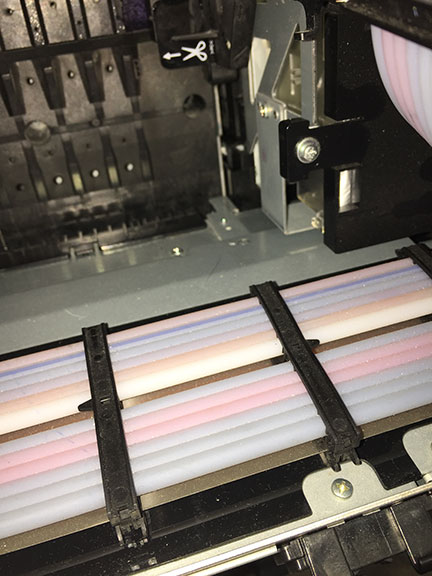
Are the ink lines clear or frosted, or are they tinted to be blue or magenta? If the lines are clear or frosted, it seems like the ink lines look have color ink still in them. (Attached is a picture of the ink lines after one INIT FILL). Maybe the 9900s require more than one INIT FILL since the ink lines are so long?
[QUOTE=candela;12578]Is it normal than more than one INIT FILL cycle required to move the Piezoflush and (and ultimately the Piezo ink, when I get to that stage) through the head?
I ran one INIT FILL with Piezoflush, but the lines still have colored ink in them. Also the nozzle check is showing diluted colors of the OEM ink.
I also referenced this page http://piezography.com/epson-pro-4900-7900-9900-installation/ to see if more than one INIT FILL is needed - there’s no mention of needing to do more than one init fill. I also ran a cleaning cycle to see if it was residual color ink in the dampers, but the nozzle check came back with color inks.
Are the ink lines clear or frosted, or are they tinted to be blue or magenta? If the lines are clear or frosted, it seems like the ink lines look have color ink still in them. (Attached is a picture of the ink lines after one INIT FILL). Maybe the 9900s require more than one INIT FILL since the ink lines are so long?
[QUOTE=candela;12578]Is it normal than more than one INIT FILL cycle required to move the Piezoflush and (and ultimately the Piezo ink, when I get to that stage) through the head?
I ran one INIT FILL with Piezoflush, but the lines still have colored ink in them. Also the nozzle check is showing diluted colors of the OEM ink.
I have a 7900 that I have recently converted to Piezography and it took three INIT FILLs with PiezoFlush to finally get all the color out of my test prints. After the first INIT FILL you should see PF printing from the Nozzles but probably with a lot of color tinting from the color ink stains still in the system.
In my experience, it is normal for some of the ink tubes to look like they still have color ink in them after the first INIT FILL, especially the Cyan, Photo Black and Matte Black lines. The Yellow line may also still appear yellow. The tubes actually have PF in them after the INIT FILL, but the color ink leaves strong stains on the walls of the tubes and it makes it look like the color ink is still there.
After the 2nd INIT FILL, you should see the tubes start to look pink, and by the 3rd INIT FILL I believe you will see all pink. So my recommendation is to do at least one more INIT FILL, and maybe two. Just be sure you have enough PF in the carts and keep track of your maintenance tank. In my 7900, the PF level in each cart went down about 1/2 inch for each INIT FILL; for your 9900 it would probably go down even more since your tubes are longer.
One additional comment: Let the printer sit for 48 hours before you do the next INIT FILL. This will give the PF a chance to “loosen up” the ink stains in the tubes, dampers and head.
Thanks Datro for clarifying that. I had just started a 2nd init fill right before you posted your reply. I’ll be sure to let it sit 48 hours before the next one.
It would be great if the possibility of multiple init fills was documented somewhere on the IJM site, like with the installation instructions I linked to in previous posts. My PF carts had about 130ml of PF to when I started the OEM ink purge. I calculated only needing enough Piezoflush to run 1 or 2 init fills, not 3 or possibly 4, otherwise I would have bought a full gallon of it when I placed my initial order.
The other strange things that happened are:
Running 2 init fills made the VLM cartridge read very low, to the point it’s flashing low on the front LCD. On the LCD, all other carts show about 70% remaining.
When I removed the carts to compare them, the green cartridge was completely drained. All other carts (including the VLM) are at about the same level (well above the minimum use line).
[QUOTE=jon;12426]Starting with your last question - Epson thinks a year is optimal to replace the ink exchanger. If everyone did this annually, their printers would last longer. So no time like now. But if you are going to flush the printer, flush all the scaling pigment into the dampers - then replace them. You should perform the perfect nozzle test prior to replacing the dampers, and use damper replacement to verify that they are not the cause of any jets that will not clear. Always be verifying step by step.
…
hope this answered your question. Ask away if not![/QUOTE]
Thanks to the suggestions from Walker, Jon, & Datro, I’ve updated the firmware, received and installed a replacement cart for my faulty LK cartridge, performed another init fill with PF, and let PF sit in the heads for another 48 hours. I also replaced the wiper blade.
However, I can’t get a perfect nozzle check on the yellow channel. (The other channels are clear and perfect). I’ve tried 2-3 standard nozzle cleanings, 2 powerful paired nozzle cleanings for Y channel, and 1 CL3 cleaning. I was hoping to get perfect nozzle checks before replacing my ink selector unit and filling with Piezopro. The PF’s been sitting in the machine for a week now. Any suggestions on clearing the Y channel?