Hi Morris~
Thanks for the update and additional information, it is all very helpful.
Yes, if ink leaked from the internal bag, into the main plastic cartridge body and out the air inlet point, this cart has a defective bag and we will send you a replacement MK cart right away.
I will also have a set of priming tips included, and would like you to please use the new priming method as demonstrated in our video, using the small plastic priming tip on the syringes you already have.
What did you do after noticing the leaking bag in the MK cart while filling- did you install the cart into the printer anyway, or reinstall the Epson MK (or different) cart?
Before sending you the new MK cart and priming tips, I’d like to determine what’s causing your PK to not print, in case we need to send you something for that as well. I am concerned that the exit valve seal may be damaged, which a few customers have done by priming with the syringe tip, and pushing it in too hard, ripping the rubber seal. If the exit valve seal is damaged, the effects can range from ink leaking from the exit valve to limited or no ink flow from the cart.
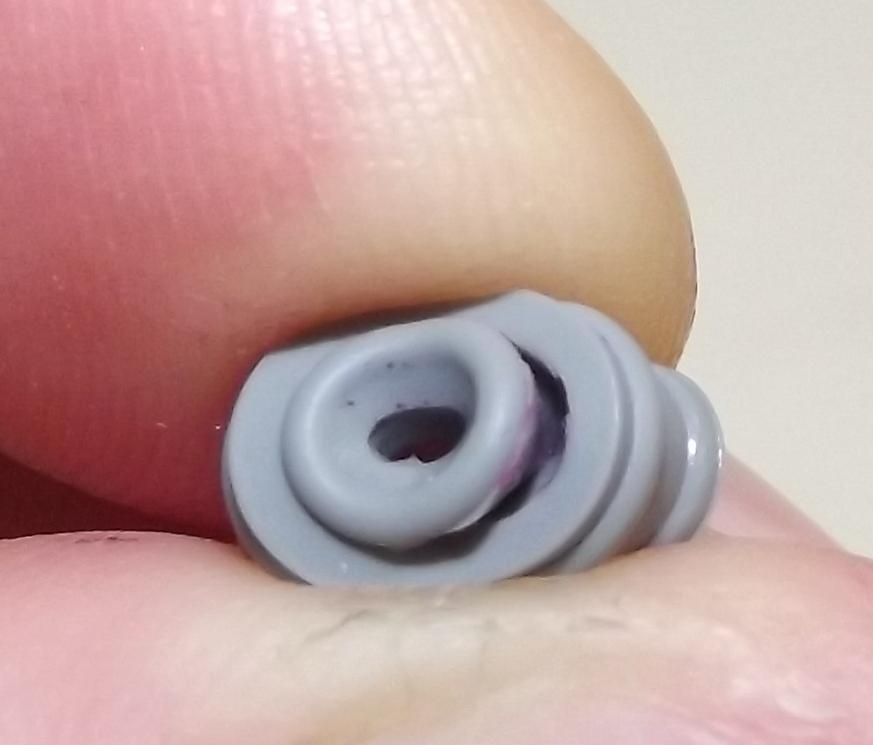
Below, I included info for removing, replacing and reinstalling the gray rubber exit valve seal, along with photos showing examples of both a good and bad/ripped seal. I would appreciate if you could please inspect the seals of your carts, especially the PK that you are experiencing flow issues with, and let me know if the seal is damaged or not.
Please let me know if you have questions, what you discover after examining your cartridge seals, or if there’s anything else I can help you with.
Best regards~ Dana 
Replace gray ruber exit valve seal with 7900 RCS:
With cartridge positioned exit valve UP on a work surface, carefully slide the clear plastic piece off the exit valve while holding over the valve opening with your finger or thumb to keep the parts from falling or shooting out. With the plastic top removed, you will see the circular gray rubber seal. Insert the tip of a straightened paperclip straight thru the hole in the center of the gray rubber piece and gently pry it out. Behind the gray rubber piece is a tiny metal ball sitting on top of a small spring. Take care not to lose any of these parts, as the cart won’t work correctly without them all properly installed. Make sure the gray rubber piece is not damaged and the only hole should be thru the center (the walls should be solid and not ripped).
To put the exit valve back together, insert the spring into the cartridge exit hole and place the metal ball on top of the spring, then press the gray rubber seal straight down to depress the spring. The rubber piece should be straight and the top should be flush with the hole opening. While holding the exit valve parts in place with your finer or thumb, carefully slide the plastic piece back to hold the exit valve parts in place. Make sure the gray piece is flat and evenly sealed under the clear plastic piece for a good seal.