There was a spate of R2800s with problems earlier this year. You’ve obviously done some reading - but there are a lot of threads to read. The problems varied from at best not being able to retain a good nozzle check for long, to having carts draining very quickly at worst. My summary is that IJM is convinced that the problems were caused by old and / or poorly maintained printers. They have a number of well maintained printers that did not exhibit these problems, and an (intentionally) poorly maintained one that did. As you may have read, not even replacing the capping station worked, hence the IJM view.
I am not so sure. I don’t consider that my printer was poorly maintained. I am not convinced that the poorly maintained IJM printer is indicative of all the possible causes. Even new printers can have this issue. JeffG had a new 1430 that had the same problem with several sets of new carts from a number of suppliers, and you can’t blame that on poor maintenance. But despite this, I don’t have a solution to how to get a printer to work when all the standard approaches don’t succeed. Replacing the capping station may work in some cases, but I suspect that a head replacement is what is really required in other cases, and that’s just not economic.
If you are having the exact same results after installing a new cartridge, then I agree it doesn’t sound like the problem is cartridge related.
When your cyan dropped out in post #15, was the channel clogged, or did the cartridge drain and was empty?
While there’s some improvement in your nozzle checks, I see some of the exact same nozzles missing in every check, so believe those are physical clogs in the print head, which would benefit from the PiezoFlush print head cleaning kit.
I remember that cyan drop! While I didn’t document the status of the cyan, I’m pretty sure it wasn’t empty. That was probably the reason I did a second head soak. I’m pretty sure it clogged.
I remember that wiper felt like it had goose bumps on it when I got it, so I can only imagine what the head looks like. I’ll wait for the piezoflush head cleaning kit.
By the way, is it normal for the print head to spray ink onto the pad at the opposite end from the capping station? During head cleaning cycles I see head move to the area, make a few noises, leaves some ink behind on the pad, then returns to the capping station.
Just curious, could this nozzle check be consistent with a piece of paper stuck underneath the printhead? My wife got a nasty paper jam the other day. The cyan went out completely, but after a 24 hour soak, ink charge, and multiple head cleans, it came back. I’m going out tonight to pick up my bigger bottle of piezoflush and the head flush kit. Apparently the previous owner had a flush kit, but didn’t give to me with the printer. Oh well.
If the printer turns out to be toast, I’m not that upset. I’ve had fun playing with it. Even with the poor nozzle checks, I’ve still gotten some fairly nice prints out of it. It’ll probably be fine for making home made greeting cards on matte paper, or prints on plain paper, so I’ll still use it for that purpose.
Yes, but it should only leave quite small amounts in that area each time. You should see a series of thin bands. If you see a large amount of ink left behind then you’ve probably got one or more leaking carts. Or perhaps something stuck under the print head, or …
Even for having missing segments in the nozzle check, I’ve gotten nice prints for personal use. I think you’re right, I’ve got some leaky carts, so I may bite the bullet and get new carts.
My cyan and matte black have had whole rows missing since my wife had that paper jam. This one issue I want to fix before throwing more money at the printer. I’ve thought of ordering two sets of carts, one to fill with piezoflush then leave for a week to see if that clears things up a bit.
Leaking carts can have many causes, only one of which is the carts themselves. It’s often stated here that printer cleanliness is the main cause, so that’s where I’d start. Flush cats are a useful part off that routine. A new set of carts would be the next step. After that it gets harder, and then the question becomes how much money does one throw at an older printer, which may be the real cause.
So very true. So far, the only money I’ve spent on this printer that cannot be used anywhere else is the 50 bucks for the printer itself and the 20 or so for the head flushing kit, which came with piezoflush.
The carts are old, as noted by Dana, and I’ve left the head to soak numerous times in piezoflush. The next logical step will be carts.
The reason I posted the last nozzle check is because they were pretty good (for my purposes) until my wife had the paper jam. Ever since, the cyan and matte black randomly lose about 2 rows, always in line with each other. I don’t know if that jam ruined the head or not.
In my experimenting to get the R2880 going, I tried using the head flushing hit in a slightly new way today with some success. I set up the process as usual, with the piezoflush moistened paper towel underneath the head. I loaded the syringe with the 2mL of piezoflush, carefully and gently injected about 1.5mL of it into a channel that has consistently been missing about 50 segments. I let it soak like that for about 6 hours. After reloading the cartridge and running a clean, for the first time I’ve had this printer the number of missing segments got down to 30. This may be a useful technique for someone with stubborn clogs.
I’m at a crossroads with my R2880, and I have a few questions that may help me decide which route to go.
Could a paper jam underneath the head cause permanent damage to the head?
I’m getting decent nozzle checks after I replaced the ink in the carts with piezoflush, even with some pigment remaining in the carts. Before this I had some terrible nozzle checks as in post #23. Now they are coming out perfect filled with piezoflush. Does this suggest that the head has a chance to work fine after some more cleaning?
The right side of my capping station takes about 3-4 seconds to drain during the pumping part of the cleaning cycle, whereas the left side drains almost instantly. There is ink all over the exterior of the capping station. I’m considering replacing it myself. How long does it take you guys to replace a capping station on such a printer? I would assume if it takes you a couple of hours, it would take me a couple of days, and I’m OK with that. However, if it takes you a couple of days of hard work, I know it’s probably not a job I should try.
The bottom line is that if the head still has a chance, and it’s not too crazy for me to consider changing the capping station, I’m willing to spend some money on it. But if you can tell that my head is toast, then it’s probably time to stop wasting my time.
The head cleaning instructions say to be very careful about cleaning under the head, to avoid scratching it, so I guess it’s possible that a jam could do something similar, although I’ve never read a first-hand report about either happening, just warnings.
This was a common feature for several of us with problematic R2880s. Flush carts were well behaved but not ink carts. Of course in your case it may mean that you have cleared something, but based on my experience and that of a few others, it’s not a guarantee.
There were some rough instructions that Kelly produced. I’m not sure if they were on the forum or whether she emailed them to some of us. If you haven’t seen them then it may have been in email.
I think you’re right that Dana and the gang at IJM are good at diagnosing and solving problems they’ve encountered, but both your and my R2880 have been lightly used which is bad for pigment ink.
I, too, am very aware of the warnings regarding cleaning the head. Personally, I think the head must be a little more robust than some say otherwise people would be complaining that their heads be ruined after a paper-head strike or jam. However, I could see paper towel fibres being a potential disaster.
I’m going to clean each channel like I described. You don’t seem to have head clogs, as Jon said. What Jon said made the most sense to me, that your capping station is responsible for your clogs. Some of my clogs are in the same place all the time indicating a clog in the head. My technique is the only thing that has cleared some of them which suggests it’s from the inside of the head.
If OEM carts are working for you, I may go that route if necessary. I’m going to use this printer for matte prints only so I don’t have to switch black inks on an R3000.
I’m not convinced that the capping station is the cause of my problems, but the listing the reasons why would derail this thread. That said, if I could get my hands on one, I may be prepared to give it replacing it a shot. I just need someone in the US to buy me one and ship it, since Compass won’t, and I can’t find a local source of parts.
[QUOTE=Brian_S;8329That said, if I could get my hands on one, I may be prepared to give it replacing it a shot. I just need someone in the US to buy me one and ship it, since Compass won’t, and I can’t find a local source of parts.[/QUOTE]
(Quoted from Brian’s thread. I don’t want to confuse issues with his printer compared to the issues I have…)
Larry,
To diagnose your Pump Assembly in the Capping Station (this is an entire unit made up of the Wiper Blade, the Capping Station and the Pump) you can inject Flush into the caps until they are full, taking care not to over fill, doing this with the print head moved off to the side with the printer OFF. Move the head back into position and plug the printer back in, take a flash light and watch for the pump to suck the flush out of the capping station, if it’s very clogged it won’t budge. If it’s semi clogged it will suck it out, just slowly. If it’s free and clear it will suck the flush away immediately, leaving nothing behind. If it’s still plugged up, you can inject more flush into the capping station while the head moves off to the left during the suction of the capping station by the pump. You need to do this rather quickly to avoid the head slamming into your syringe, I recommend only putting a few mls of flush in your syringe to avoid overflowing the capping station when you do this procedure.
This isn’t a procedure we have documented, this is something I personally have come up with to unclog a stubborn blockage in a capping station to avoid replacement. If you can get your head firing 100% and your Wiper blade cleaning effectively and your capping station sucking ink away/out of the head then you “should” have a workable printer. Good luck, let us know if it helped at all.
Kelly
Thanks Kelly,
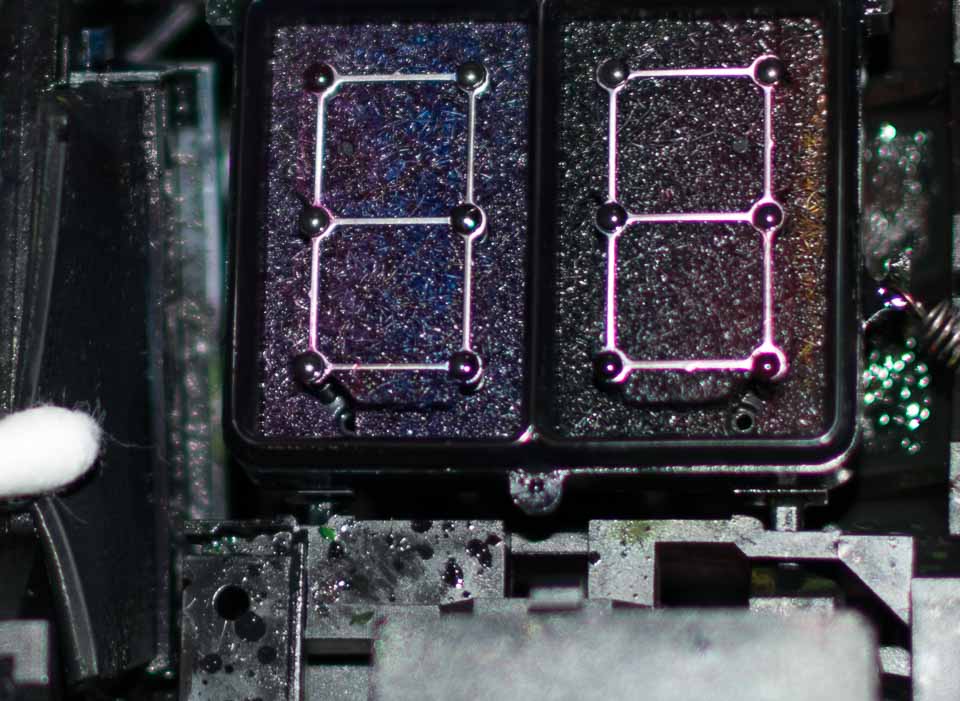
Here’s a picture of my capping station. It’s quite a mess now. I’m not sure how well you can see my wiper, but in spite of me heavily cleaning it, there still remain several clumps of pigment ink. I think I will probably get a new capping station anyway, although I may try your method to see if it helps with draining. I suspect something is leaking inside the capping station anyway, but I could be wrong. I don’t want to replace the capping station until I’ve got new carts in there. However, it’s good to know that it’s got hope.
I’ve got my old carts filled with piezoflush. (You guys are making a lot off of me for this stuff!) I almost wish you sold a stronger version meant for clearing clogs only, and the normal stuff for storage. The normal stuff seems fine for well maintained printers, but it seems to be taking a lot of stuff to clear these clogs.
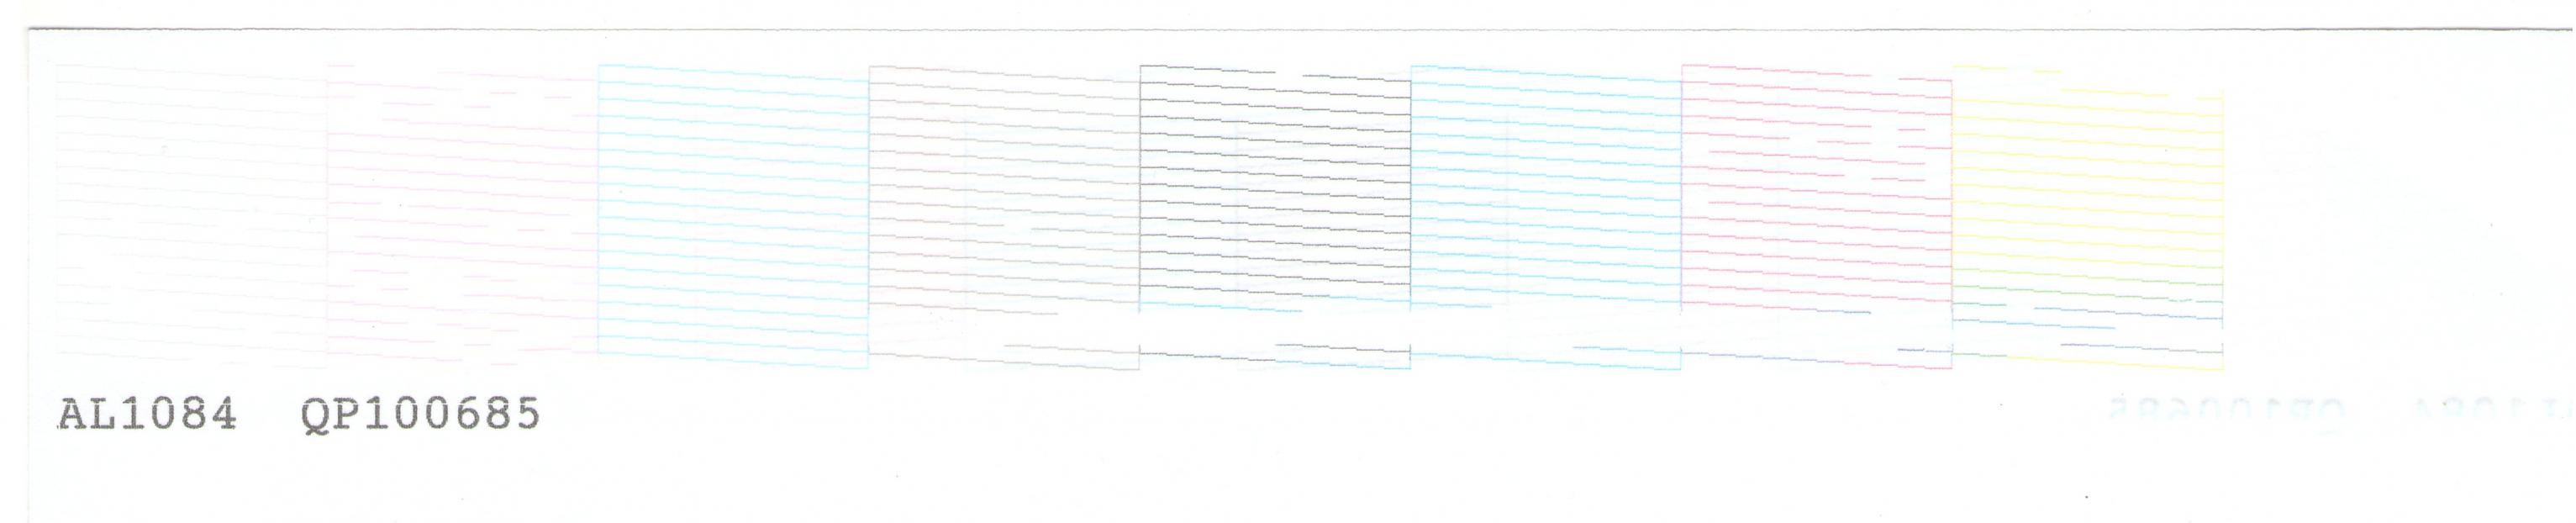
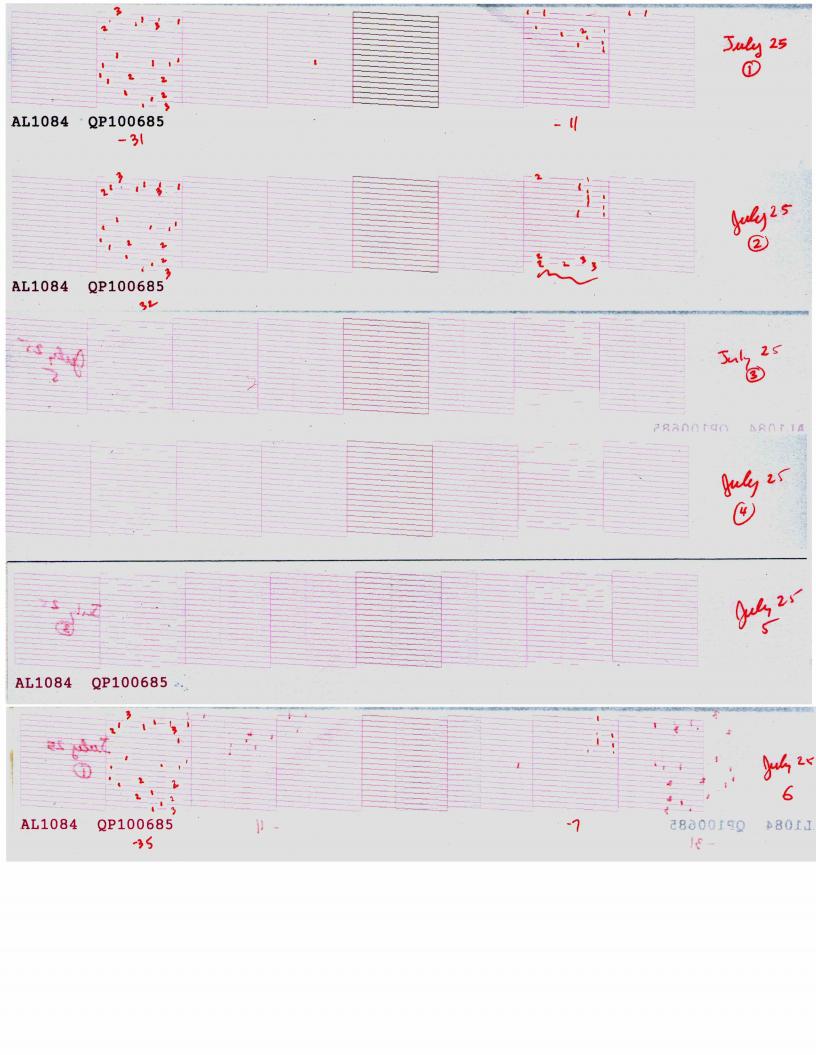
Anyway, onto an issue I’ve got. I’ve got the old carts filled with piezoflush and I’m basically letting it sit in piezoflush to see if I can break up the clogs in the VLM and the VM this way. Referring to the nozzle check July 25 (1), my VM channel was looking very promising, sitting at 11 missing segments. It had been up to 15 missing segments. The VLM has been stubborn, but shown improvement after the last head soak with the flushing kit installed over the channel. The VLM went from about 50 missing segments down to about 30 missing segments.
Then, after a regular head clean, I suddenly got entire rows on my VM channel (July 25 (2-4). I immediately checked the cart and it was not empty, probably about 80% full (visual inspection). A cleaning cycle didn’t improve it, so I did a couple of ink charges with the WIC reset tool. This followed by another couple of cleaning cycles cleared up the missing nozzles (July 25 (6). Suddenly, the VM is better than I’ve ever seen it.
Do you have any idea what may have caused so many nozzles to drop out so suddenly with piezoflush?
The current carts do not seem to empty when filled with piezoflush, although they will empty if I soak the head with the piezoflush underneath with the papertowel/piezoflush method.
Magenta, including the Vivid version, is the channel that has the reputation for being the one that clogs first and most readily. So it explains why it would be the most problematic. Perhaps you’ve been making progress in clearing it.
I sure hope you’ve got a waste ink tank fitted, because that’s a lot of fluid that you’re putting into those waste ink pads. I’m not sure of the value of more than one ink charge in quick succession.
How long did you let the head sit on the paper towel moistened with flush? Did you leave the carts in place when you did this?
The symptoms you describe are typical of what happens with this technique. Even if you only leave the head on the wet paper for a short time then you will get random gaps across all channels immediately after.
Anything wet in contact with the bottom of the head will wick the ink or flush solution out of the cartridges. So if you leave the wet paper towel there long enough that’s what’s going to happen. Similarly, if you manage to fill the capping station with flush and park the head there without triggering the pump (can be done on some printers) then you’ll drain the carts. I thought I was being clever when I did this once, only to discover that I had been rather stupid. So I generally remove the carts when I try any of these techniques, even if only for a short time.
Not every nozzle gap is a clog. A gap that is always in the same spot probably is, but any that move around are more likely to be air. My own approach is that patience and purge patterns are better than multiple head cleanings in quick succession and definitely better than multiple ink charges. Air is best dealt with this this way. The gaps that you got after the paper towel routine are air rather than clogs, and that’s the one situation when air can be dealt with by a head clean or two, but after that I’d use a combination of patience and purge patterns.
If after all this you do seem to have clogs, because the gaps are always in the same position, then I’d let it set with flush carts for an extended period. Perhaps a week or two. Stubborn clogs need to be dissolved using this technique, the paper towel (with carts removed) and the head cleaning kit.
Use cleaning cycles sparingly. You will probably need one or two after a paper towel routine, but I have found that if you’re dealing with air in the head somewhere they can make matters worse.
My nine lessons (link provided above) still apply.
Good luck.
p.s. If it really looks like a clog, and you really want to get this printer working, then there is an last ditch approach that I’ve seen describe just once, somewhere on this forum. Someone with a large format printer removed the print head from the printer and soaked it flush for an extended period. This worked. Not a technique for the faint hearted, but not all that hard once you’ve seen how to remove the head, which I think is easier than replacing the capping station.
Air after a head soak makes a lot of sense. For some reason, the VM and VLM seem to be most affected by this.
I just tried the head cleaning kit again tonight. The nozzle check is back to what it was before except for the VM which is completely out. I’ll have to check on the purge pattern. This is new to me.
Oh, and yes, I have a waste bottle connected. As this printer has no warranty, I just got a bottle I had on hand, cut a tiny hole in the side and connected the waste lines directly to the bottle. I would never do this to a new printer!
Flushing instructions: http://www.inkjetmall.com/tech/content.php?166-Flush-individual-channel-using-QTR-Calibration-Mode
Note that although this says “individual channel” you can also flush all channels this way. There is an included chart for that. Note that this also says in red text not to use for clogs. I don’t necessarily agree with that, but in any case, not all nozzle gaps are clogs.
Not uncommon after using the head cleaning kit. My advice would be to use patience and purge patterns on that channel, at least initially, but the case where nothing at all is coming though is another instance when you may need a head clean or two. In my experience just printing isn’t enough on its own to pull the ink through when a nozzle check is completely empty on one channel.
I have drilled all my printers. However with a new one, depending on how long your bottle tube(s) is / are, you should be able to route them out the back venting slots without doing any warranty-invalidating damage, so long as you have been careful in the dismantling and not broken any tabs.
OK, VM is back. I used the cleaning kit to force air out, made sure some flushing liquid remained in the dummy cartridge before replacing it with a regular cartridge. Now black is out so I may try the same with it.
I’ve got true clogs in my VLM, so I’m leaving the head cleaning kit installed overnight.
It sounds like you’ve done the same as I with the waste ink. I bought IJM waste ink for my R3000 because it’s hard to find 1/8" ID tubing.