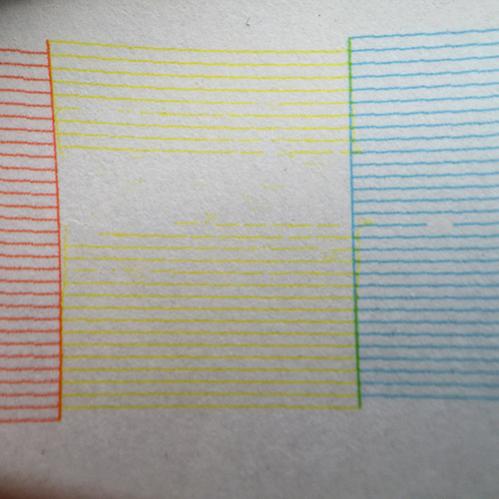
I’m a new member and I’ve recently started replacing my epson inks as they run out with yours. I have 4 inks now, but a couple of days ago, the yellow epson ink was clogged and I have tried everything to get it clean. Windex on towels, power cleans, even SSCL cleaning twice. Nothing is working. I’ve had this printer since it was first introduced and have had lots of clogs, but was always able to clear them with normal or power cleaning. I called epson and of course they want me to replace the print head. I spoke with Wells on the phone and he suggested I post a shot of the nozzle check for someone to look at. He thought doing a flush of the entire printer might help bring it back. I seem to have an 1/8th inch wide clear area that I can’t get clean. Every time I try a different approach such as the SSCL clean, and then do a small test print and then do another nozzle check, it is worse. I guess my question is can you tell from my description and the shots of the nozzle checks if it really might need a new print head? Or should I buy the flush system and try to clear it? I guess if it doesn’t work, I could always convert the printer to Piezography.
I can’t seem to upload the images. Not sure why, they are 500x500 as jpg’s. Can I email them to you?
Thanks
Michael Regnier
STOP doing SSCL cycles~ you could burn out your head! I have found http://myx900.com/ to be a helpful resource, and they explain different cleaning cycles, what “clogs” this model print head, etc…
Based on your description, the printer is several years old, and hasn’t had any service done- correct? If so, you likely need to replace the dampers (“Ink Selector Unit”) and wiper blade. You could try flushing the yellow channel, in hopes to clean and get it working well again, but depending on what is causing your missing nozzles/section of the yellow channel, it may or may not help. Yellow and magenta pigment inks are always thicker than other colors (this is true even with Epson inks), so they are usually the first channels to show signs of particle build up in the dampers. Generally, if a nozzle check looks worse after cleaning cycles, you’re likely dealing with a clogged damper- but could damage/destroy the print head by running SSCL with restricted flow- causing the print head to overheat and burn out.
If all other channels are working well, then you can set it up with a custom Piezography setup, making use of the good working channels, and map out the yellow channel (I’d leave PiezoFlush in the channel, to keep it moist, and hope it may come back over time). Keep in mind, if your printer is several years old, then you will likely need to replace the dampers and wiper blade no matter what inks you plan to use.
What a mess!! So it seems I need to do a flush either way, If it works, I can continue on with your color inks and if it doesn’t, I could possibly change it over to Piezography.
I am trying to avoid Epson sending someone out for a $1900 print head change. It seems running the flush will cost around $400 t0 $600 depending on how much solution I buy. Can I change out the dampers and wiper blade myself, or do I need epson for that? It is an old but little used printer, so I’m just not sure what is the best course. I would like to not have to buy another printer for a while.
cheers
Mike
Yes, flushing would be a good place to start. If you follow the instructions and don’t rush, you can probably replace these parts yourself without calling an Epson tech in. You can get the repair manual for instructions on replacing the ink selector unit and wiper blade, and myx900 has a quick video showing how to replace the wiper blade (VERY easy). The repair manual is available online, www.2manuals.com is one source. You can get replacement parts from compassmicro.com
Actually a old but little used printer is a recipe for settled pigment and clogged dampers, hopefully the head is ok, and you can get it working well again after replacing these parts.
Hi Dana,
I’ve started doing a yellow channel flush on my 9900 and it is taking forever. I have stretched the patch color so that I can print it on roll paper 36x10, and I bet I have made 25 prints so far. It is starting to turn orange, so the flush is getting in but there are a lot of gaps so I guess it is putting very little ink down. Do you have any suggestions, or do I just keep on printing? There is very little change between each print. I plan on letting it sit for 48hrs once I know that the flush is all in.
Thanks
MIchael
I see you purchased a 7900 Yellow refill cart and PiezoFlush, so assume you’ve installed the flush cart in your yellow channel to flush that line. Are you printing yellow images thru Photoshop and the Epson driver, or using QTR Calibration Mode following our instructions to flush an individual channel?
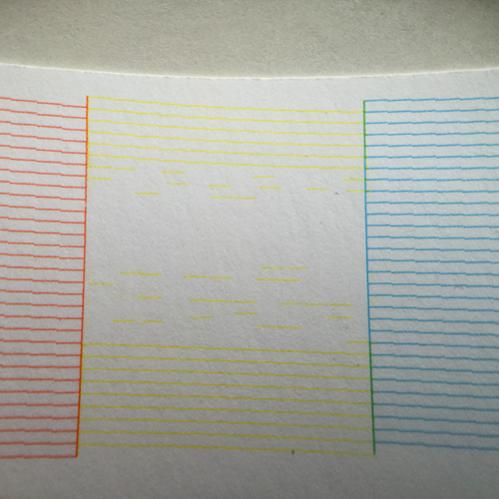
The pattern you attached above shows what looks to be a mixture of yellow ink and PiezoFlush, but has banding/missing nozzles.
I am using the QTR Calibration Mode, and have been following all instructions. The pattern is what concerns me. I think the flush has reached the print head, but I"m not sure why the yellow is still lingering on. I assumed it’s because it has a stubborn clogged yellow channel. Seems like I’m using a lot of paper, which is okay as long as I’m making progress. Do you recommend that I leave it sit for a while and then try again?
I believe you still have yellow pigment trapped in the damper, and possibly also the ink line. Yes, I think it would be good to let the printer sit for a while (until tomorrow would be great), to give PiezoFlush time to clean, before continuing.
Hi Dana,
So after working with the PiezoFlush off an on for a couple of days, I am still having issues. I let the printer sit with the fluid in it for 2 days and started printing again today. I still have a clogged head and when I first started printing this 36x36 patch of yellow, it was fairly pink, but then about half way down, it’s starts to turn more yellow. Do you think that maybe this is the head coming slowly unclogged? I still have gaps in the print. I’ll attach a photo.
It looks like you still have stubborn yellow pigment build up in the damper, which is slowly getting flushed out by the PiezoFlush. For some reason, yellow is always the most stubborn for color staining due to trapped pigment in the damper crevices. How does your printed nozzle check look?
It can be almost not there at times. when I run a cleaning, it comes back to the same pattern of clogged nozzles. The last print seemed to be mostly pink, but it has all the gaps in it. I was going to do a power clean on the pairs, but it says there is not enough ink,(flush cart), there is flush above the minimum line, so I guess I could use the chip setter. I thought I might turn it off for the night and try again tomorrow.
I wouldn’t do a power clean cycle unless the flush level in the refill cart is at least up to the first plastic horizontal support bar inside, to avoid running the cart dry, and sucking air into the ink line.
I am having the same problem with a 7900. The orange ink is low density and printing more yellow . I saw an earlier recommendation to remove and shake the orange cartridge once a week because of ink settling. Is this a common problem? All nozzle checks okay, I have done power cleaning . Ink purchased in December 2022 and installed in July . Did not notice the problem before as not printing many with orange subjects. After reviewing earlier prints did notice weak colors in orange subjects. I would like to print a calibration color chart but do not know how to find it in this site.
The orange absolutely HAS to be agitated every week or at least before you start printing if longer.
What has happened is you have let the orange pigment settle and you have printed it out. So there is no longer orange pigment left. You need a replacement bottle and you need to flush the line with this method:
2x 24x90 inch flush printed (on a cheap roll or throw-away roll paper) with the method above using the Orange purge image with QTR will get you back!
This is the case with all pigment inks. They have to be agitated.
Thanks for the help. I downloaded the software and followed the steps for Windows. All the steps were clear and I was able to set up my printer. I am printing with a 24 in roll on heavy paper and selected 100% ink. I loaded my image that was of oranges to print. As the print started I could see that black ink was running down on the paper as it fed. I cancelled the print job. Also the small strip that printed was not the color of orange but rather black with a small amount of yellow ,purple and cyan. I decided to try with the ink set to 60% but still had excess black ink ( not running) and the same colors without any orange. I checked all the settings again to confirm I had the correct settings but now the setting ink amount was missing. Am I missing some steps. I assume the point is to print enough orange to purge the weak orange by printing large amounts of orange ink?