I ran an initial ink charge with the Epson Adjustment program. Now the left bank of ink carts are not being recognized. I have two sets of Ink carts and none are being seen by the printer.
In addition my printer’s fan is running very loud.
Please tell me the workflow leading up to this initial fill, ie. Filled certain carts with Flush and have a combination of color & flush carts, all at different levels before starting. To get a better idea where to start with a diagnosis, I need to know how you got this point.
I see from your sales history that you may have 9 carts + an addition set of 11 (assuming they are filled with CCPRO), all purchased at different dates that you would have filled with Flush, just not sure which ones, or if ALL 9 are filled with flush, with CCPRO in 2 others?
Please let me know which carts have flush and which ones have color,
Kindly,
Kelly
I have a set of ink carts with Flush and a set with Inkjetmall ink. My printer has been sitting used for two months and most of the heads are clogged. I inserted my flush carts and instead of selecting the initial fill, clicked on initial charge in the EAP. After the program completed the Epson screen indicated with flashing Xs that the left bank of ink/flush carts were not there.
I turned off the printer and removed the left carts and replaced them with my ink carts to see if the printer would see them. The printer was rebooted and still the indicator screen said there were no carts or replace carts.
Next step I changed the chip in all the left (flush carts) and the printer still said replace ink carts.
I believe you are dealing with dead batteries in your chips, some of your cartridges are well over a year old (from your order history). Have you replaced any of the batteries in any of the chips, either from your carts or from the set you purchased? 1 dead battery can cause an entire bay to not be recognized, in my experience, it is wise to replace ALL the batteries in ALL of your chips, to start you can replace the batteries in your flushing cartridges to get the process complete. I can send you set of batteries, hopefully get them in the order you placed today as a replacement (no charge to you). Be advised, the batteries in your 4900 cartridges are expected to last for 1 year, although this is a pesky interruption to your progress, these chips can be manually reset, an option that has been taken away with the current chips that do not contain batteries. So, you are using older chips, that require replacing batteries once a year, BUT you can manually reset them when you want, in my opinion is worth the annoyance of replacing batteries once a year.
Hmmmm. The chips I received from Inkjetmall do indeed have a battery attached. However they don’t detach from the chip board without being pried off. The silver bracket is glued to the chipboard and doesn’t have any sort of “clip tabs”
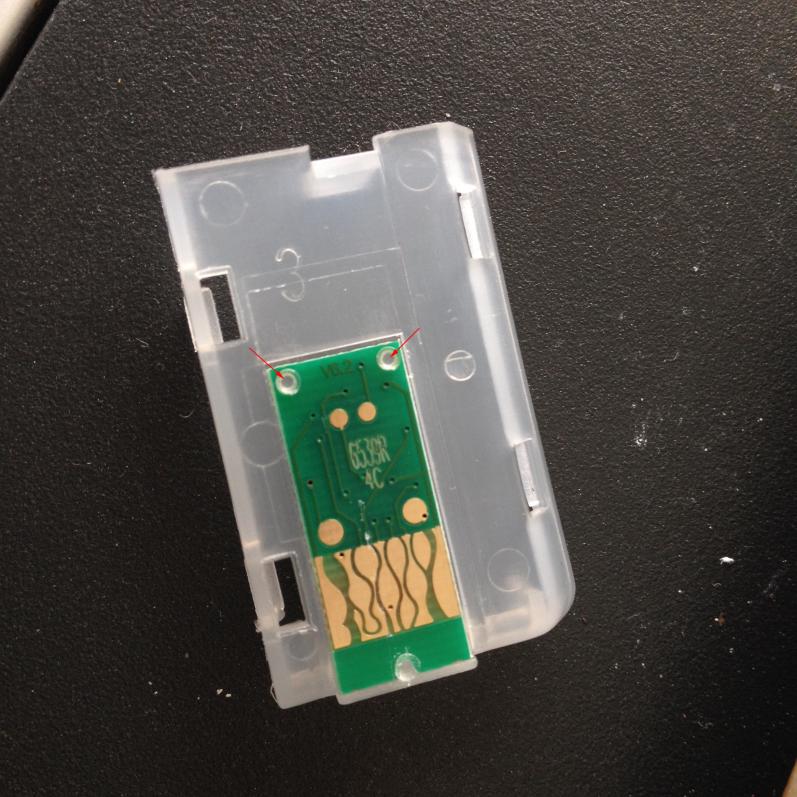
The chip is held onto the bracket with “3 tabs” you can cut the 2 at the top of the chip with a razor blade, after you replace the battery then you reapply the chip to the bracket with double sided tape. Make sure the chip lays flat/flush as it did before you removed it, to ensure you won’t damage the chip read sensor.
HI Jeffery, Wells let me know you are interested in the Non-Battery style chips, instead of replacing the batteries in your original chips. I will explain the differences and let you decide what fits your needs best.
Battery Style Chips-
1.Can be Manually reset by shorting out the 2 copper contacts at the top of the chip
-This is useful when you want to top off your cartridges all at once, instead of 1 at a time, saves time
-Also useful when you need to flush your printer for storage, the 4900 requires you to run the adjustment program 2x to get the flush into the head-You can top off the carts and reset, then run the 2nd Init.Fill
2.Batteries will need to be replaced once a year approx.
-When you have 1 dead battery, it can affect the other chip reads on that side of the printer
-Best to replace all the batteries at once, top off carts and re-install
Non-Battery Style Chips
1.These chips are very accurate at reading ink levels, they will reset themselves only AFTER the cartridge reads empty, you remove, refill and voila, the chip reads full again
-For flush carts, this would mean, you would install and run 1 Init.Fill and not be able to run another, UNTIL you run the carts empty, at which point there is no need of running a 2nd init. fill because you would essential have the flush worked well into your system
-But, if you wanted to do this again, say after you have cleared your clogged nozzles, re-installed your printing inks and then want to store your printer with the flush carts, you would could then swap out your chips from already empty reading chips from other carts and install as a full set
So, you see there is ways around making both style chips work for your needs, they are just different. If you already have the older battery style chips (3 sets from the looks), in my opinion it would make sense to keep them and replace the batteries, which is a very easy task. Please see picture with arrow pointing at the tabs you need to cut off to remove the chip from it’s base