Digital Negative QTR Curves are not working

Nobody said it’s going to be easy…

Hello all! I was very happy with contact silver prints using digital negative through HP method that required almost no efforts, then I got greedy for higher quality, and now I am trapped into quest for making any decent Piezography print!

I spent 2 years testing and fine tuning curves in the forbidden black box inside ColorBurst Rip, CMYK Proofing System, so I thought I new how this things work, but I was wrong.

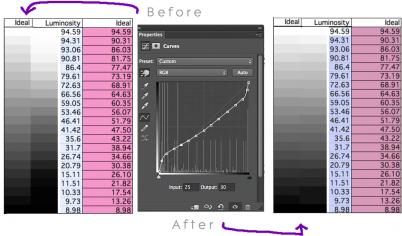
The problem started when I realized my Digital Negatives were way too dense. I realized after drown in the sea of Piezography blog pages, that I was supposed to use Photoshop Curve to compensate the densities. (http://www.piezography.com/PiezoPress/blog/digital-negatives-part-2/)
But at the beginning of this post, it says in the pink colored warning “This system is now deprecated…” so I thought the new curves fixed or somehow minimized the issues. This thinking is based on the expectation of the Digital Negative Curve 1_4 would gives me the dMax of 1.4 and 1_6 for 1.6 and so on…

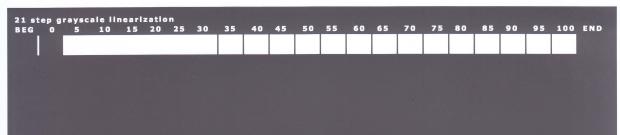
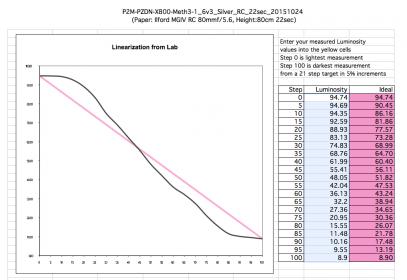
I printed Step-21-gray on Epson Premium Photo Paper Glossy using P2M-PZDN-X800-Meth3-1_4v3.quad and P2M-PZDN-X800-Meth3-Carbon-v3.quad to read the densities. The two were almost identical!!

I read through more forum posts and suspected my operating systems, so I tested on my MacPro OSX10.9.5, MacPro OSX 10.6.8, Parallels 11.0.2 running XP (on OSX10.9.5), but the results were all same. I reinstalled QTR, Pront-Tool, and the curves separately for the three systems that I tested.

I would accept if this is how it is, but I think I am missing something. If I make the Photoshop Curve to compensate the way it is now, the results would be wasting potential of what Piezography could offer greatly because I would be using only small portion of the QTR curve.
Any help would be greatly appreciated. (Since I haven’t be able to make any print so far after about a week of struggling.)

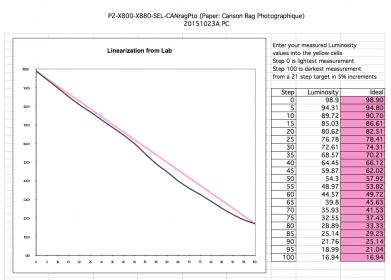
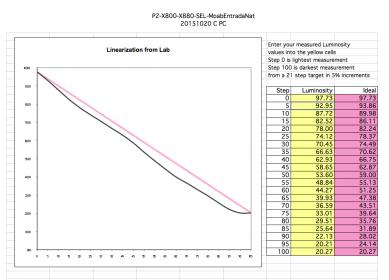
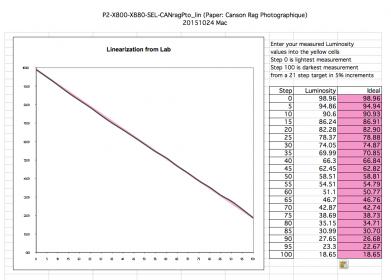
Please see the attached images for measured densities.
I compared my Inksep readings to the one that were available on the forum using Excel chart. Besides mine has extra slot for shade 2.5 and 4.5, mine is very dense specially the highlights.
Measurements were done on MacPro OSX10.9.5, i1Pro2, i1Profiler 1.6.3.

Thank you!

Piezography2 (K6-Digital Negative), Epson 3880, Mac OSX 10.9.5, Print-Tool 1.1.0, i1Pro2/i1Profiler 1.6.3

Printing a negative film curve on paper and then introducing the reflective measurements into the linearization checker tells us nothing about the film curve, it’s density, or the performance of the negative system. I hope that you understand that what you have been spending a week doing is not how you use this system or evaluate the system. The linearization checker is only for the use of checking linearization of paper media K7, K6, and P2 curves.

Film is transmissive (light travels through it, not reflecting off it). You would need to use a transmissive densitometer and take measurements off of the Pictorico Ultra Premium OHP film to use this excel spreadsheet. You can not duplicate the effect of light passing through ink on film by printing it on a Glossy Media using the film curve and then taking a reflective measurement from the Glossy Media. I hope that you can understand this and that you will stop this phase of your experimenting - and move onto actually making negatives.

What I would want to know is what happens when you use the system as it is designed. Have you gone that far yet?

Let’s check on that…

  1. Do you have the ink shades in the correct positions according to the curves that you are using: please check here.
  2. Are you printing your inverted image onto Pictorico Ultra Premium OHP film or another film (there is no substitute anywhere in the world for Pictorico Ultra Premium OHP film regardless of what anyone tells you).
  3. Is your image a single channel grayscale embedded with a Gamma of 2.20, or a desaturated RGB grayscale embedded with Adobe RGB 1998?(there are no other suitable alternatives to these two modes and embedded profiles.)
  4. Are you printing from Print Tool using No Color Management, the correct curve for silver film (from 1.4 to 1.6) and the dpi is set to 2880, uni-direction - and no Advanced Settings have been initiated?
  5. If you are running test strips, have you CONFIRMED that the values in the test strip are actually 0, 5, 10, 15, 20, 25, 30, 35, 40, 45, 50, 55, 60, 65, 70, 75, 80, 85, 90, 95, 100 by using the eye dropper and Info window in Photoshop, and the test strip has been saved with an embedded Gamma of 2.20? (double check your 21 step to make sure that it has not been converted and the densities thrown off.)
  6. Have you made a test film using the 21 step with the three curves and exposed and developed normally? You can print the 21 step using three different curves on one sheet of film by moving the image and reprinting the film and selecting a different curve.
  7. Are you contact printing? (you can not enlarge this type of negative.)
  8. Have you seen the results of these three test strips and have you been able to evaluate which curve produced the largest density range?

Have you been able to get this far?

Please let us know what if anything you have deviated from steps 1-8 above in your workflow.

Thank you so much for a quick reply, legendary Mr Cone!

Here are my answers;

  1. Yes. P2 matte + PZDN Meth 3. Using P2M-PZDN-X800 curves.
  2. Yes. Pictorico Ultra Premium OHP film (They produced a new version which has matte surface on the back of the film so there are no newton ring effects, but I used the regular glossy films).
  3. Yes. Also my Photoshop Working Color Space is AdobeRGB and Gray Gamma 2.2.
  4. Yes.
  5. Yes. CONFIRMED. However the provided Step-21-gray.tif has no embedded profile as it were originally.
  6. I will do the silver test as soon as I can book a rental darkroom, but I did print Cyanotype prints using 1_8 which is recommended for Cyanotype and 1_6 to have a choice. Those two looked identical and printed identical. Both were too dense so I exposed 30 minutes instead of regular 7 minutes but highlight needed much more exposure time to get any details to appear.
  7. Yes. I have made dozens of 20x24 contact silver print using HP method, so I am familiar with the digital negative process not just yet for the Piezography systems.
  8. No. I have been seeing no differences among 1_4, 1_6, 1_8, Carbon curves on Pictorico films nor on glossy papers.

THANK YOU!

Thanks for your replies.

  1. Did you save the target with Gamma 2.20, or are you printing it without an embedded profile from Print Tool? Save it with Gamma 2.20 after confirming the values have not been converted.

  2. Sorry but can not help you with Cyanotype as I have no experience with it - but we do have customers posting their results in Cyanotype on the Piezography Facebook page. Maybe you can contact them to see what you are doing differently than they are, or whether your cyanotype process has been geared towards using color inks negatives (the HP neg process) rather than a traditional density negative (like film or Piezography Digital Negative). The response is different to density than it is to UV. HP Is UV based and Piezography is density based.

Do you have a transmission densitometer so that you can measure with an instrument rather than eyeballing it? Can you post the density of the dMax of the two curves that you see as identical?

  1. Your base exposure if based upon HP negs is UV dependent. So you would want to base your exposure and development on traditional negatives. Maybe before you get started on contact printing for silver, you should establish a base exposure from a 4x5 or 8x10 neg. Use an exposure and development on grade 2 paper that allows a “normal” negative to print well. The HP negs do not function like a traditional negative and therefore you can’t simply replace a color neg with a density based neg. Your times will differ - and this may relate well to your experience with Cyanotype by the way.

  2. I meant on the silver prints. You are relying on reflective eyeballing and that’s not going to be correlative. I think in general that your HP experience in using color negs is coming into play here. Those who are used to traditional silver based analogue negatives have a very easy transition. Piezography Digital film acts more like traditional film and nothing like negs made with color inks…

I hope that this can give you some insight into establishing a new baseline. I really do think that if you have some large format negs - you should pull them out and establish new baselines (exposure/dev) with them. Then work off those… Or just establish new baselines with the Piezography Digital Negatives. You will have to sort of drop the HP baselines from your workflow. Two different approaches…

best,

Jon

I was curious if my curves are working at all, so I printed a random image using GO curve.
The result confirmed that they are working. White area was printed with the shade 4.5 ink which is on the LLK position on my setting as it should.

I also printed Step_21 on a Canson Rag Photographique paper using P2-X800-X880-SEL-CANragPto.quad QTR curve.
Please see the image bellow.


This is on MOAB Entrada Rag Natural using P2-X800-X880-SEL-MoabEntradaNat QTR curve.

TAHNK YOU!

Thank you Jon. I have started flesh with Piezography system. :slight_smile:

Both of these linearizations have a similar issue with printing darker in the bottom end…

This does look like what happens when the 21 step file has been converted, but you have already confirmed that your 21 step file is accurate by using the Photoshop eyedropper tool in combination with the Info Window. And you have also confirmed that the Gamma 2.20 is embedded. So, your system is printing darker than it should - and that could be for reasons I can’t trouble shoot in workflow if you indicate that you are faithfully following the Gamma 2.20 workflow and our instructions.

If you have an Eye1 you can use the new .quad linearization droplet and get these curves dead on straightline. Are you familiar with that new QTR droplet?

[QUOTE=ono333;9427]I was curious if my curves are working at all, so I printed a random image using GO curve.
The result confirmed that they are working. White area was printed with the shade 4.5 ink which is on the LLK position on my setting as it should.

I also printed Step_21 on a Canson Rag Photographique paper using P2-X800-X880-SEL-CANragPto.quad QTR curve.
Please see the image bellow.


This is on MOAB Entrada Rag Natural using P2-X800-X880-SEL-MoabEntradaNat QTR curve.

TAHNK YOU![/QUOTE]

No, I am not familiar with the QTR droplet.
Please let me know.

THANKS!!

I created a linearized ink description file and then uploaded using the Install3880-K7.command script but it is not appearing as a curve option.

Please help.

Thank you!

Shin

If I understand what you are saying, you can only work with .quad files in Piezography unless you design the curves and the ink description files on your own from scratch using QTR Curve Creation Tools and follow the QTR recommended workflow - in which case you will need to get support from QuadTone RIP rather than from Piezography. Naturally, we do not recommend this. The overwhelming consensus is that Piezography produced curves (.quad files) are superior to other methods for making curves for QTR.

Piezography does not use the QTR Curve Tool, nor use ink description files. Piezography is not actually compatible with QuadTone RIP recommended workflow. Piezography only uses the QuadTone RIP driver in conjunction with the Piezography curves creation software which compiles .quad files that we provide. Those are what we supply and they are not editable nor compatible with Advanced Settings in QTR, etc etc. No ink description file ever exists for a Piezography .quad file.

If you want to make your own Curves - you can do that - and you will need to make density measurements for paper curves and you would need to be able to make transmissive densitometry measurements for film - and come up with your own ink scheme, etc… But you would not benefit in the same way with increased detail and smoothness, etc. I do not mean to discourage you - but you have not yet actually used Piezography as we recommend and intend that you use. And its difficult to support an issue that may not even exist. So far, what you have been doing is a little or a lot off our menu so to speak.

Because you are venturing into areas I consider to be unusual for a Piezography practitioner, I am beginning to wonder if you read the QuadTone RIP Manual (which we ask you not to read because it is not compatible) instead of the New Piezography Manual which we ask you to read in order to use Piezography correctly.

The New Piezography Manual is located on the Instructions Tab of the item you purchased. This will give you the best understanding of how to use Piezography inks and curves in conjunction with the QTR driver. You can not mix the two workflows (Piezography methodology and QTR methodology.)

The droplet tool I mentioned is part of the new 2.7.6 release. It is called QTR-Linearize-Quad which allows you to re-linearize a .quad file directly. Simply drop a .quad file and a measured-patches-data file (.txt) onto the droplet together. A new .quad file will be created. So you can use the Eye1 to measure the 21 steps (as long as you confirmed the file has not been converted.) You can do this for your Canson and Moab curves. And actually - you may find success for using one of these curves on a non-supported media that is close and linearize that material.

But you will not be able to use this on a Digital Negative Curve unless you can make accurate transmissive densitometry measurements through Pictorio Ultra Premium OHP. And you have no reason to do so - because you have not actually used the system in the way it is intended yet. So do not get so far ahead of yourself that you are attempting to customize a system that you have not yet mastered in its basic intended form.

When you rent a darkroom - first find your base exposure and development or ask someone using traditional film with the same silver paper you are intending and use that as your base settings to determine which meth3 curve is correct for you. Then if you need to, you can make some slight adjustment to your mid-tone, 1/4 and 3/4 tones in PS (only if necessary). Silver is very linear to the PZDN system. Pt/Pd is not linear because it is more sensitive to UV. For that we suggest a correction curve which we supply or you can devise yourself.

Thanks to all, I finally made the linearization on Canson paper.

Beautiful! I think linearization is an essential step that everyone should master.
(By doing this I also learned how to fix a broken Print-Tool which lost QuadToneRIP drop-down menu, and how to fix the issue of not uploading certain quad files to the printer etc etc… I am guilty of reading QTR manuals for fixing these problems! Sorry!!!)

In the darkroom, I established my base exposure using Pictorico film base density.
I printed Step_21 using 1_4, 1_5, 1_6 QTR curves.
Despite my premature doubts, those three curves had slight but enough differences in the highlight!!
I am sorry if I mede anyone panicked to rescue me and rescue the reputation of the great Piezography system, but I did learn a lot about how this thing works because of my detour.
:slight_smile:

However, too much contrast is still an issue for me.

I printed Step_21 charts with variations of exposure in the darkroom and measured the densities of the silver print which had the best white point and black point level. (Other tests were more or less the same as the chart below.)

I used Ilford Multigrade IV RC Paper for this test using no multi grade filter which should produce low contrast image (contrast of grade 2).
I understand that my ink set has higher densities in the shadows but the overall contrast is way too high.
I tried to linearize this in the same manner as Canson Rag but I get this message “Invalid linearize curve – not constantly increasing”. (I know Jon didn’t recommend doing this.)

I made a Photoshop curve to compensate the contrast.

Further testing in the darkroom is in order…
But I hope that I can make a proper adjustments ether to the 1_6 curve or to my ink set to get smother and less contrasty densities. Just like how I like my Eizo monitor’s hardware calibration, I believe the better quality prints come from fundamental technique rather than tweaking my Photoshop curve… (I also know that the Photoshop curve should be as simple as possible but it was not easy to do…)

Thanks,

Shin Ono

The fundamental technique of a Piezography Digital Negative is to produce for you linear film that is smooth, more detailed, and absent of digital defects. The linearization is from film base+ fog to the designated dMax of the film. Or in the case of the Carbon curve, we have eliminated the film base+ fog.

If you use 16bit imaging - then tweak Photoshop to your hearts content to match the peculiarities of your chemistry, paper, or daily variables.

You can not adjust the Piezography curves to suit your changing conditions. That is how other systems work - and you have moved to Piezography for smoother and more detailed film. So, take advantage of it by going full monty! rather than trying to do what you have always done. It is a different approach, but it does produce superior film. Think of Piezography film as traditional silver film. Think of Photoshop as where you control the contrast of your images, do the dodging and burning, and hopefully do not oversharpen (Piezography has more detail than traditional dithering drivers because it uses more shades of ink printing at much higher dithering frequencies).