I’ve been struggling with an issue ever since I replaced an MK Epson cartridge with one of your cartridges. The printer prints fine on multicolor prints and shows all nozzles clear. But…when I print a very large 40x60 inch image with about 90% solid black, it gradually progresses from printing the solid black to printing white lines across the black worse on the edges than in the center. When checking the nozzles after printing they are 80% clogged in the MK channel. The center nozzles are completely clogged with some nozzles still firing at the top and bottom. A nozzle cleaning brings them all back. Walker thought the head was probably de-laminating or there was a problem damper.
Just before changing the cartridge I printed several similar images, 40x60 inches, mostly black and they printed perfectly. this issue developed after I installed the InkJetmall cartridge and ink. I have installed a number of cartridges previously without any problem. I did have trouble getting the foaming looking ink completely out when priming it. I sucked out a lot of ink before getting a flow of clear ink. Rotate the cartridge exactly isn indicated in the video about filling cartridges. Wondering if there is an issue with the cartridge and how I might fix it. As I said, just before replacing it, I printed several similar images with no problem. As you can see from the note from Epson, they believe it involves air in the ink line.
I sent images to Epson and they replied as follows:
Hello Mr Oleari,
I have just received a reply from our Senior Team.
They have informed me that the reported issue would not be caused by de-lamination of the print head.
The issue would more likely be caused by there being air in the ink lines. Which would be a pump cap issue.
So the recommendation would be to have the pump cap replaced.
Please let me know if you need any other information.
Very Respectfully,
Mario Portillo
Is there any chance that there could be a defect in the cartridge I bought from you that is causing air to enter the head in that channel. I filled it and primed it as I have other cartridges I got from you and the others are working fine. I would hate to pay to have the pump cap replaced and then get more air in the lines.
Can you give me any advice on this?
I have enclosed nozzle check patterns below.
Epson refuses to give me their flat rate service because I am using your ink. I would just have to pay to have it looked at and fixed.
I look forward to your response.
Thanks,
—Kenoli
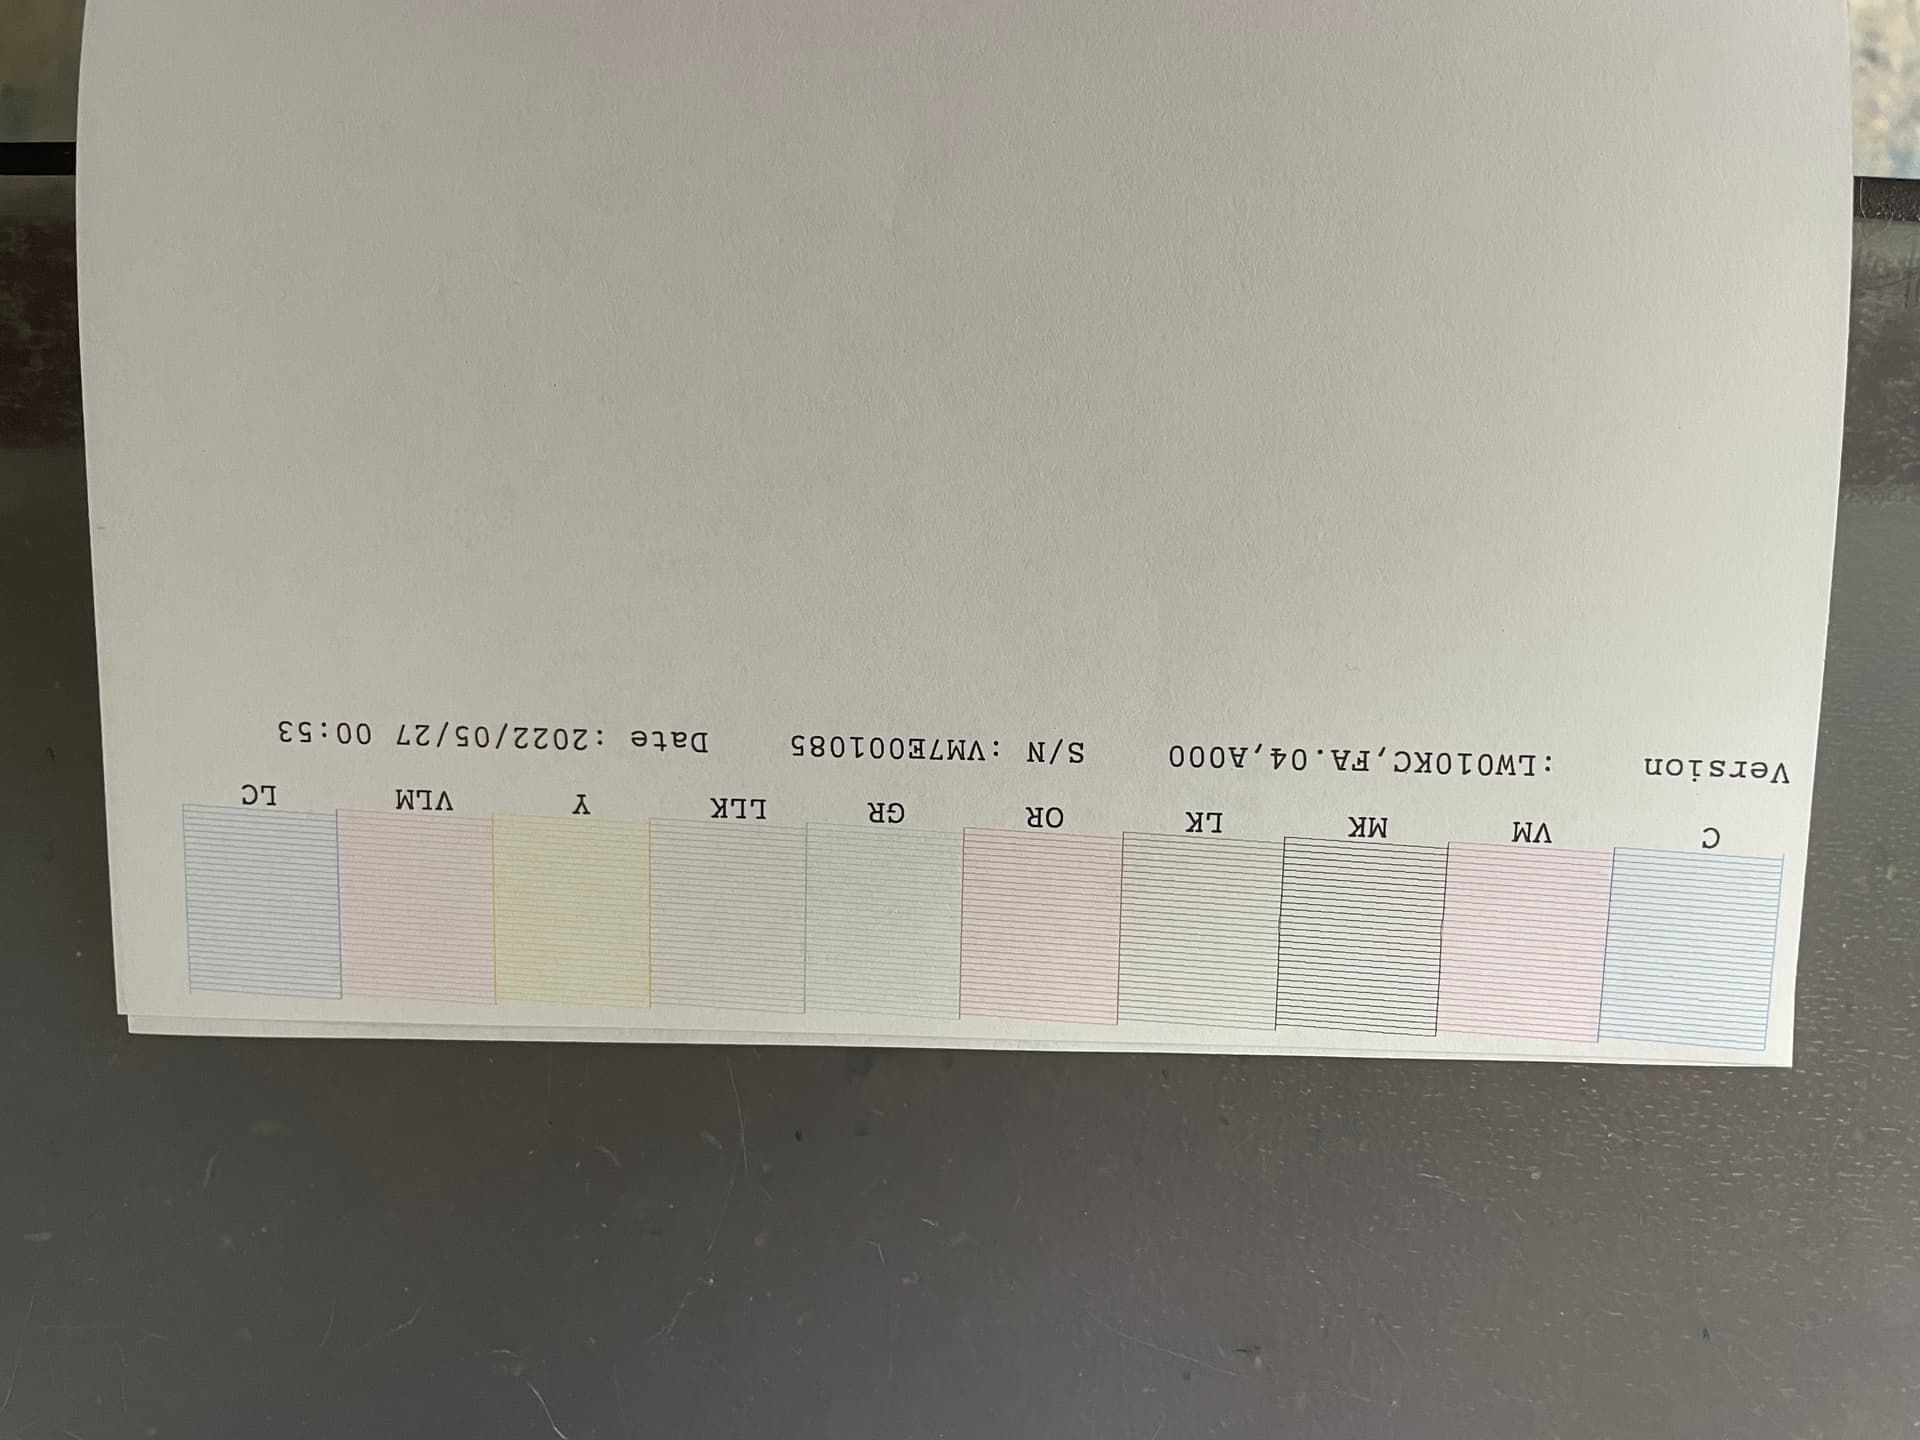
After printing a large black image:
![IMG_2156.jpeg]()
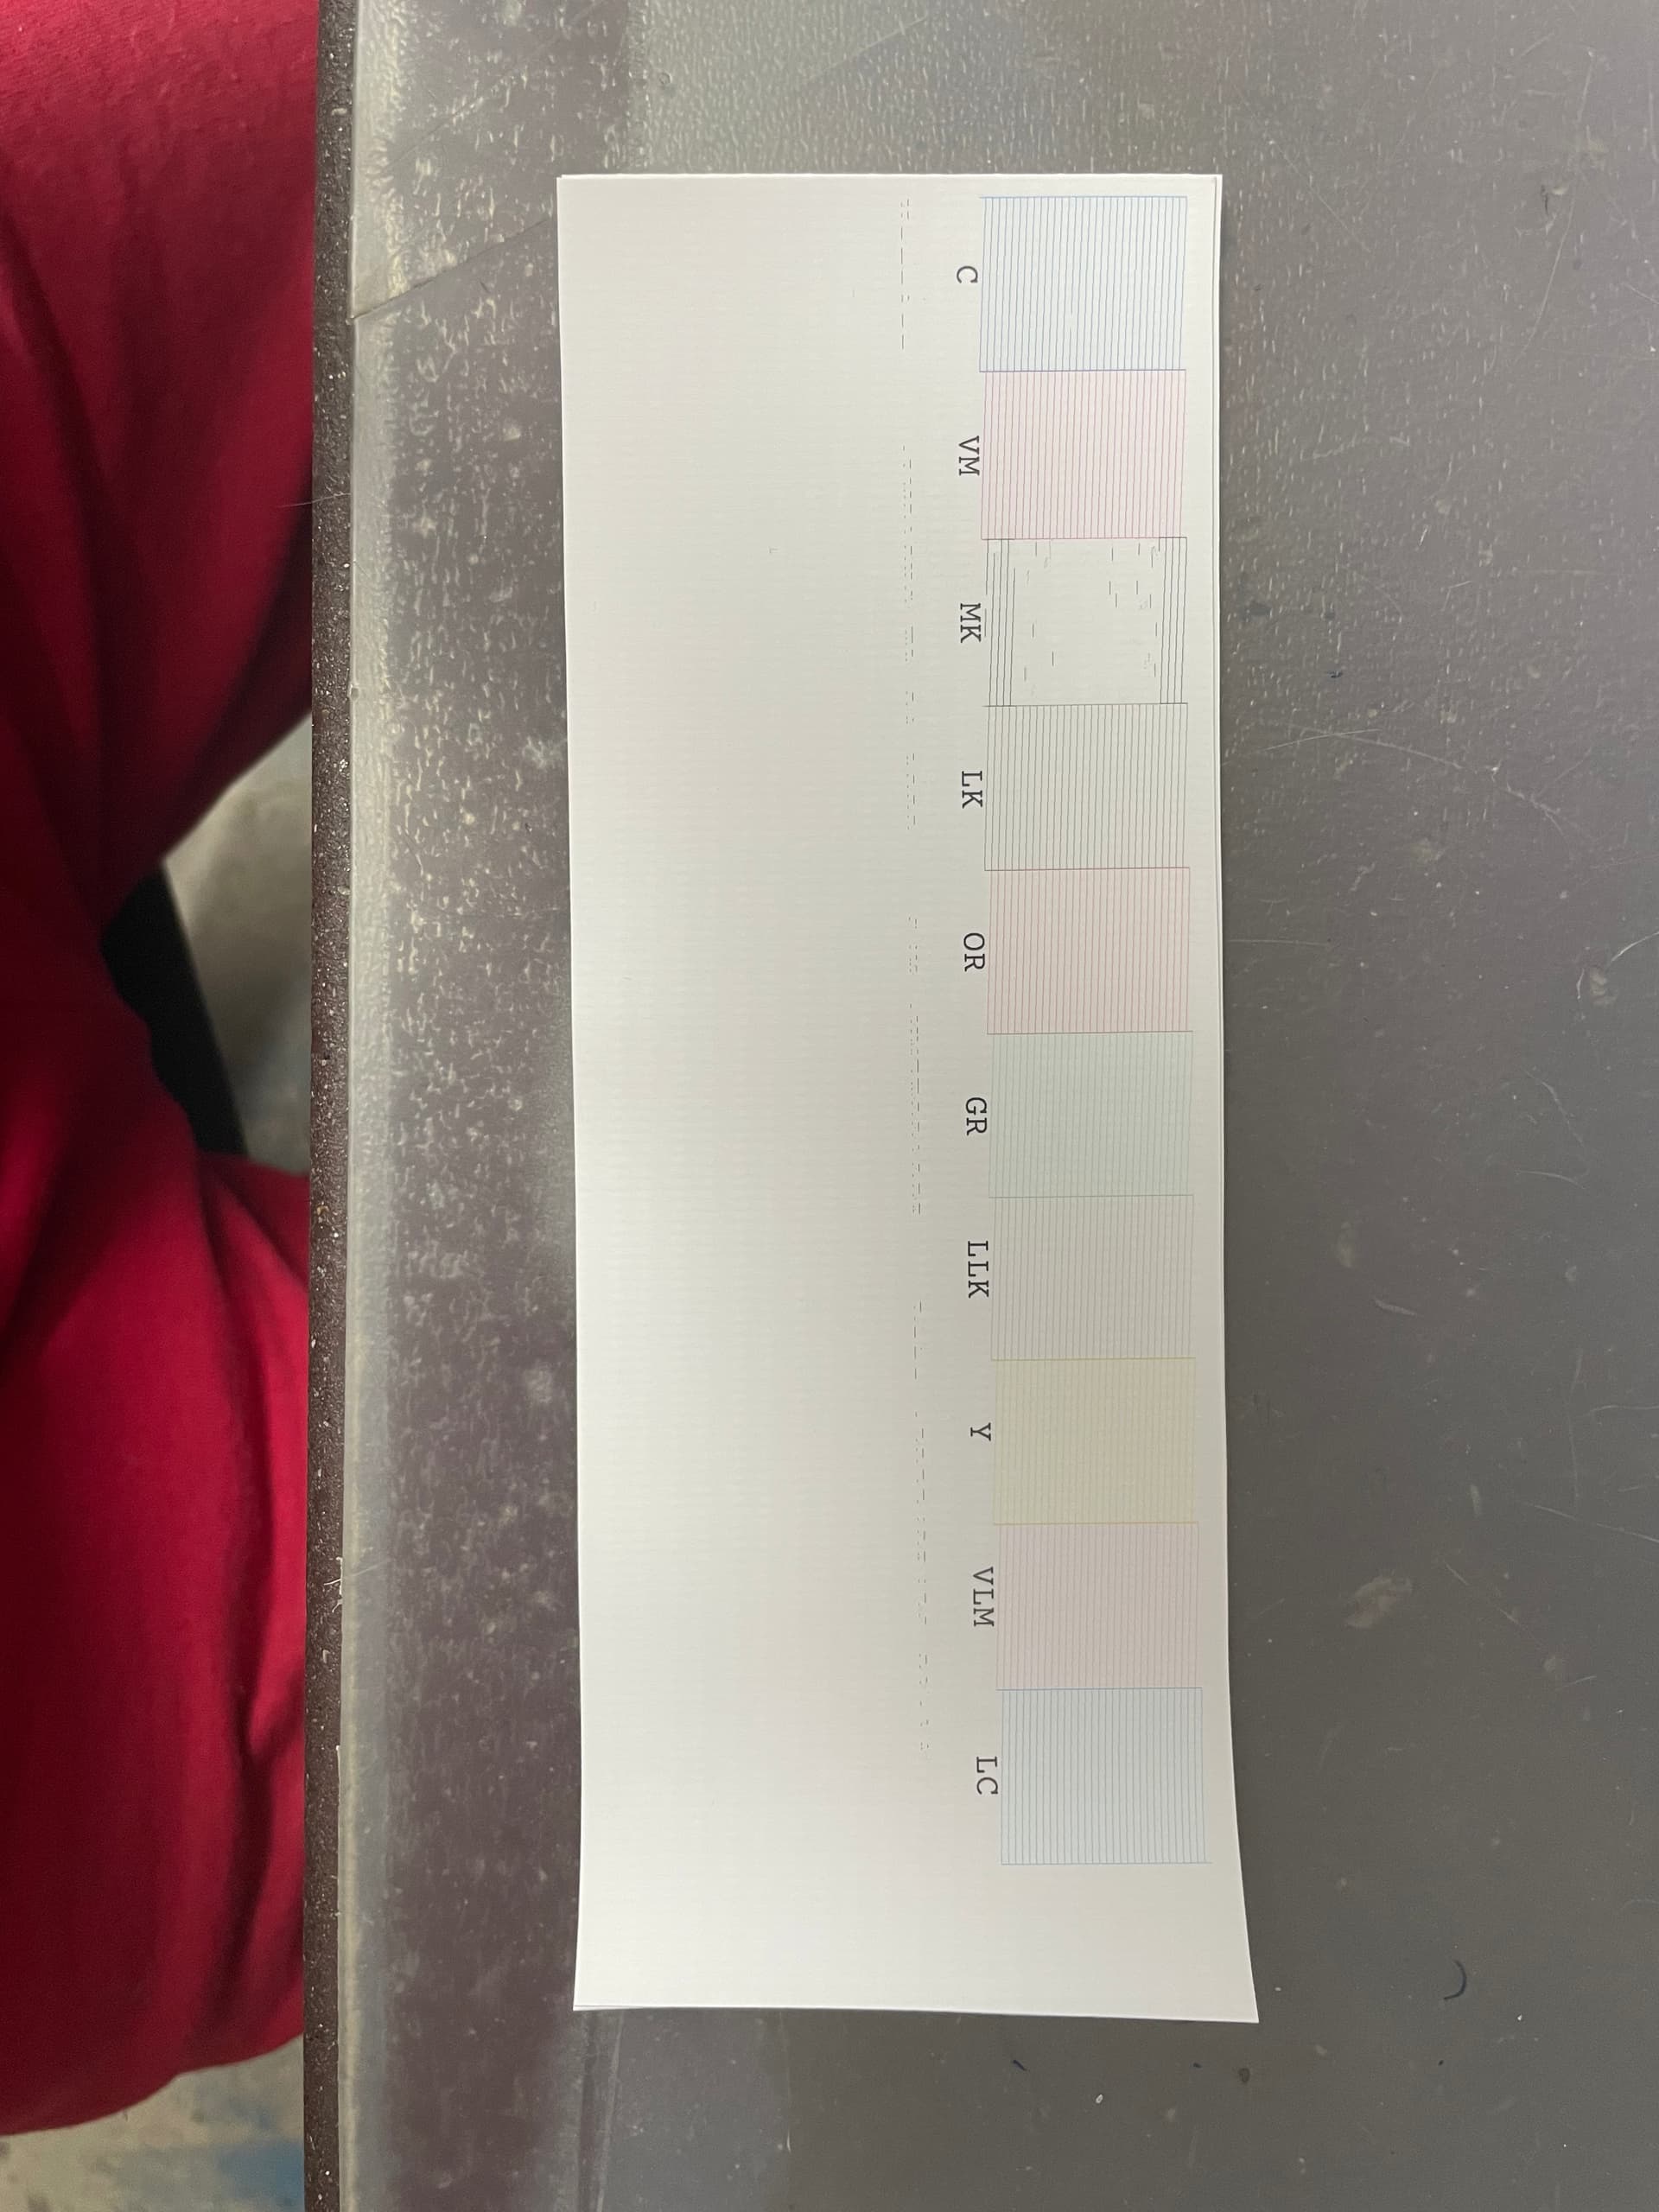
After cleaning the MK channel:
![IMG_2155.jpeg]()
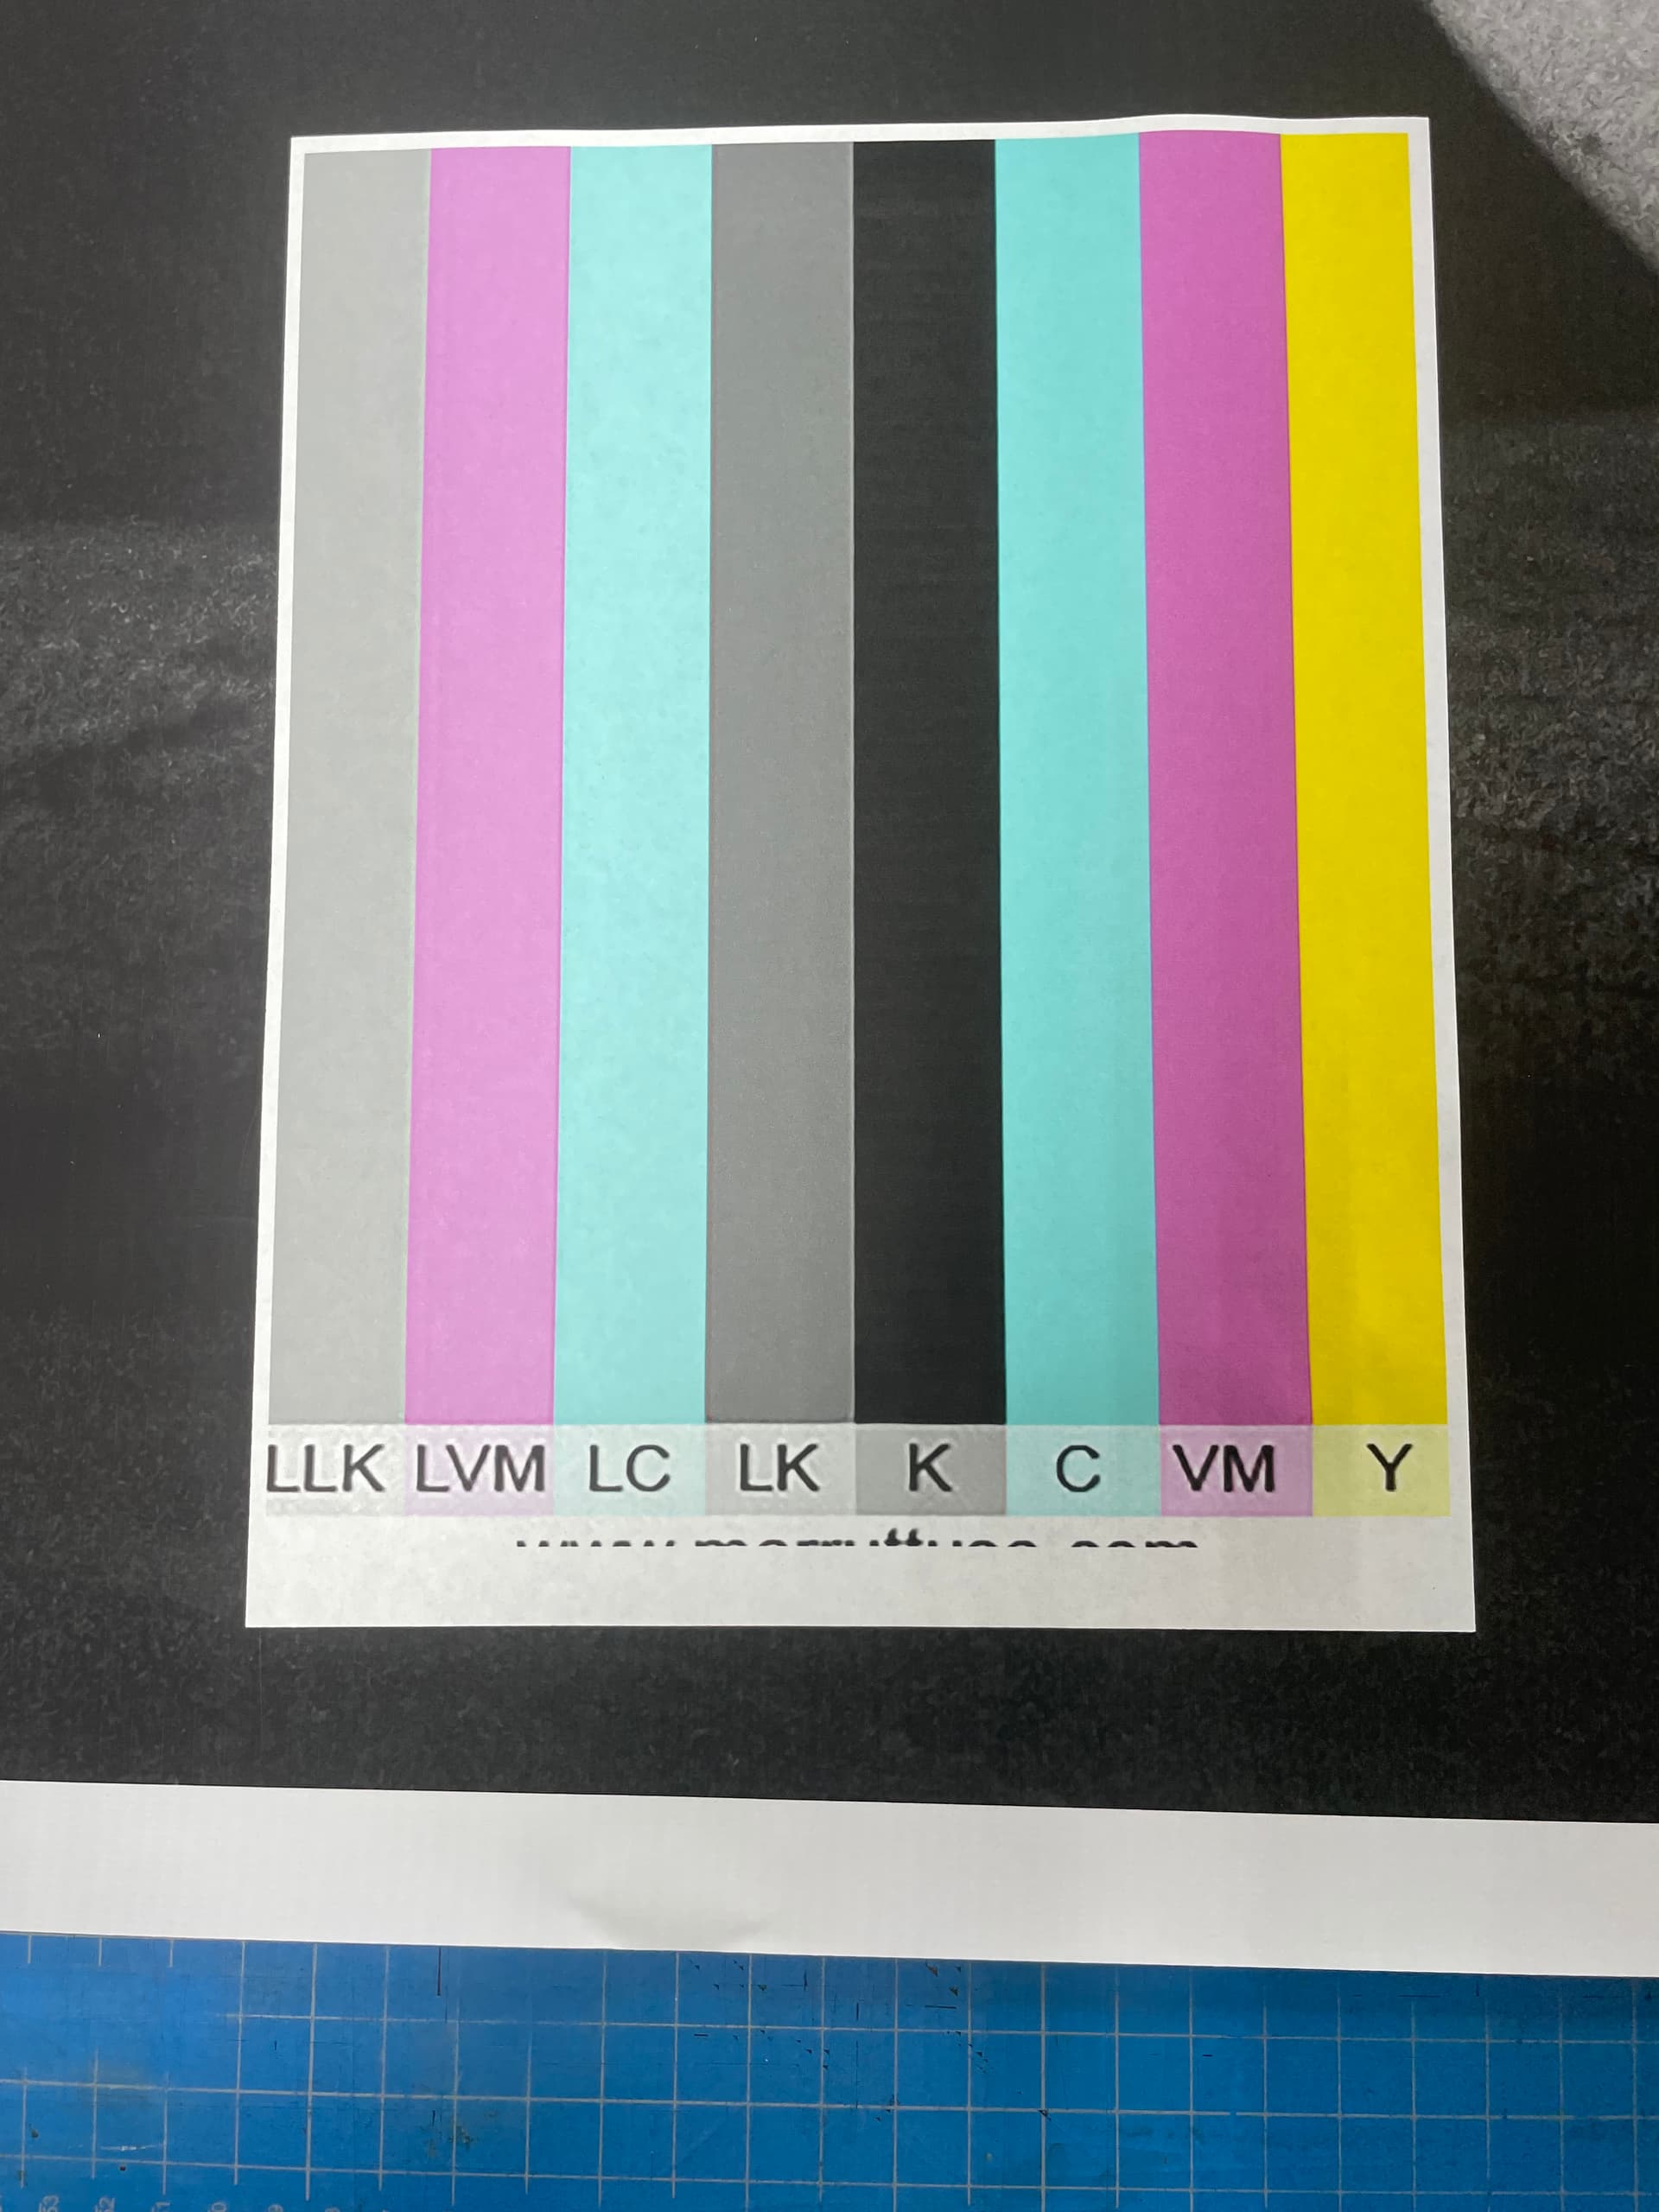
Printing a spectrum:
![IMG_2157.jpeg]()
I sent an email about this to help yesterday and have not heard back. We are under pressure to get these prints out so am posting here. I would upload the nozzle check images here as they didn’t copy over from the email I sent to The image with missing nozzles show up after trying to print a large black image. The clear nozzles show up one cleaning after that. The colored bars show that short of printing a large black images the printer is printing fine. These images let Epson to believe the issue is air in the line.
dear Kenoli, I replied to your email too but I will respond here with the same content:
Dear Kenoli,
Thanks for the more detailed description of the progression of the problem compared to your initial emails to me.
It seems to me that it’s partially a damper lock issue caused by air in the ink line caused by not having primed out all the air in the first place. (One note here, if you are using a clean priming syringe you can suck the ink out during prime and put it back in the HD MK bottle for later use so-as not to waste ink and so-as to clear MORE bubbly ink than you would otherwise do if you were going to chuck the ink . . .)
BUT, that is not enough to cause the middle-gap you are seeing. IMO, this is due to the pump cap (aka, cleaning assembly that I had mentioned in previous emails) not adhering properly to the head during cleaning. It’s letting air in. This is cause by a lot of different things but in general it’s caused by dirty pump cap assembly that was just not maintained monthly. This happens the most to printers that cut a lot of canvas or textured matte coated paper. Ya gotta keep these things clean.
So there is a progression of two things, air in the ink line (possibly), and a gap in the cleaning assembly caused by a dirty or miss-aligned cleaning assembly.
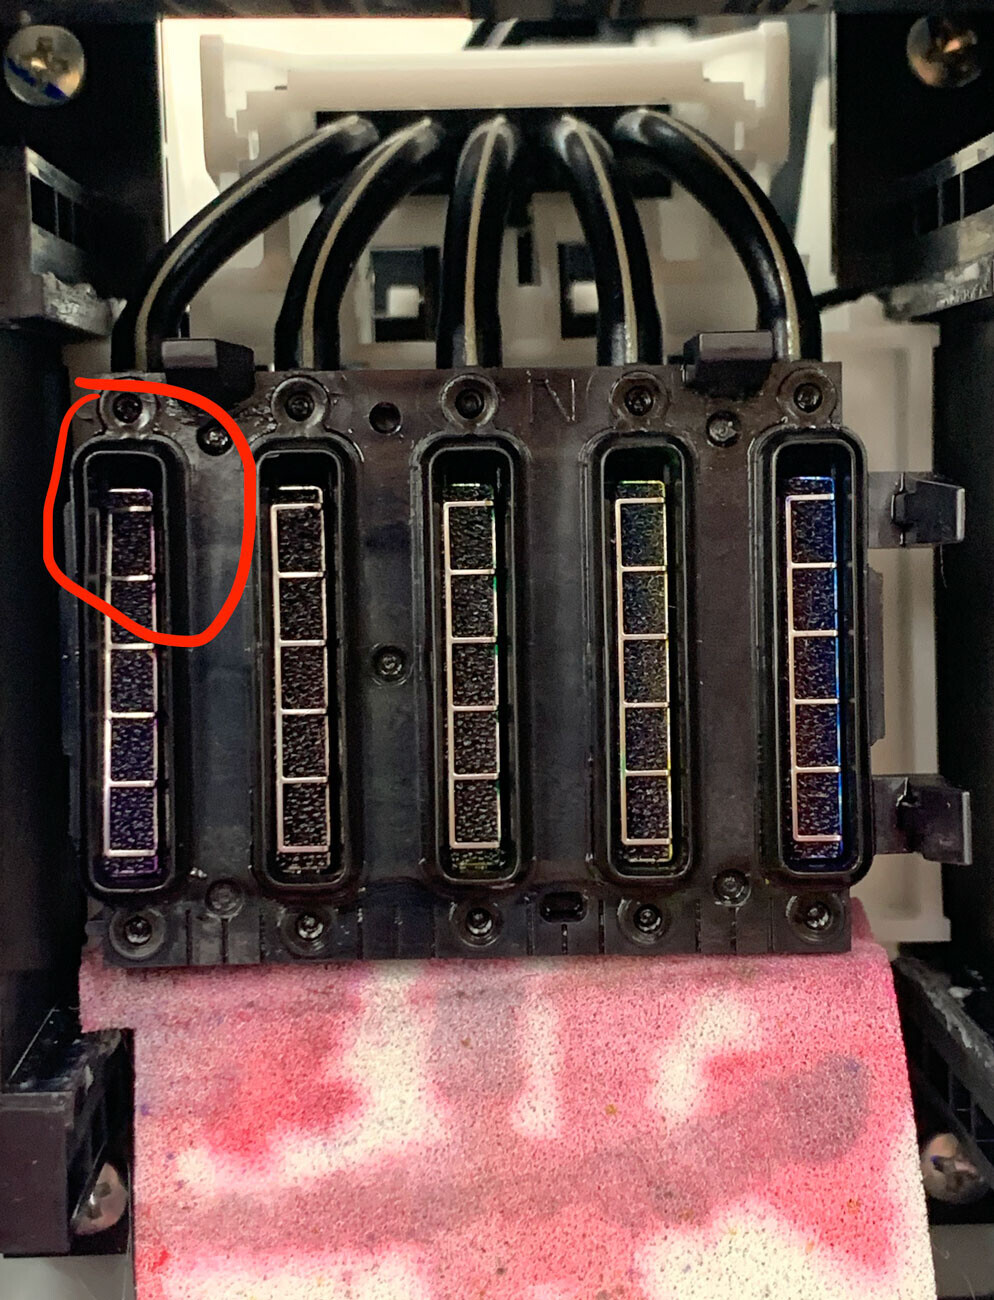
This is a cleaning assembly we that pulled off our P9000 a few months ago that had caused a “pre-delaminated” head. Aka, all the nozzles would clear but they were getting progressively harder and harder to clear (see email I sent to epson-wide-format board below + screenshot):
On 1/31/2022 9:14 AM, Walker Blackwell wrote:
Recently we had a head slowly start to lose cleaning ability at the top end of the nozzle check (cyan/magenta) over time. It was not a de-lamination yet but it was pre-delaminated. We removed the head a saw a curved laminate breakage line around the nozzles lines right where the rubber of the channel pad makes contact with the head. This head was GOING to de-laminate in the nozzles soon. It was not worth continuing to print with the head. We traced the de-lamination to a mis-aligned channel pad (see photo). I think this is the root cause of a lot of nozzle cleaning issues and delamination issues. Keep an eyeball on this part folks! This is why replacing the entire cleaning assembly every 2 yrs is the recommended procedure.
What I can diagnose about your head from seeing just oodles of similar problems over the years (mostly with OEM ink mind you) is that you have about 5 more heavy cleanings and it will fully de-laminate. It is in the process of de-laminating. It was not caused by air in the ink line. That alone is not enough to do it. It is caused by dirty or miss-aligned “pump cap aka cleaning assembly” and it was exacerbated by the ink line air that was causing you to have to clean more in the first place. In this case the more you clean the more the pump cap miss-aligns and the more de-lamination progresses.
The other thing that fails in the pump-cap is the peristaltic ink pump (aka vacuum) . . . but in this case it seems to be just alignment and dirty cleaning area.
regards
-Walker
Thanks for your replies, Walker.
I talked to the d1 guy who was really nice and told me to do a few strong cleanings. He said he has never hurt a head doing a few cleanings and didn’t know where that caution came from. It was not really dirty and I was careful so I don’t think I damaged it but will check. If that doesn’t work, he can replace the whole thing. I just have do decide if I want to go into debt for the head. I once had a head replaced at the end of an extended warrantee and it went bad within 5 moths, just outside of the warrantee on the head, so I am not sanguine about head replacements. He thought if the head was fine there was not reason to replace it. I’ll just have to make a decision. There is also the 1497 error that indicates a problem with the MK-PK switch device. I would probably have that replaced as well. I’ve never done that switch, but according to you I should do it every now and then.
It’s gotten better but is not improving with more cleanings, so I will probably opt to going into debt to my credit card. Guess the wealthy win.
Thanks for the help. Any further suggestions are welcome.
–Kenoli