I have been printing with the WNK7 inks though the QTR Print Tool and Rip and everything was going great. I removed the PhotoBlack cart to agitate the inks, and when I put it back in I got a cartridge error. I tried resetting the chip on the cart and got the green reset light, but the printer still showed the error. As I didn’t have another chip and did have another cart, I filled the new cart with ink and placed it in the printer. The error showed again. I turned the printer off, then on again and the error disappeared. Happily, I resumed printing. However, the prints now appear to be incorrectly printing the darkest tones (corresponding to the cart with the problem (cart#5 Shade#1Black). The nozzle check prints out fine. I am about to print a 21 step wedge, but it is clear to me that something is wrong with the way shade#1 is printing. I don’t really understand how to use QTR to print or flush a particular channel, but how do I address this sudden dropping out of shade #1 when the nozzle check does not show any clogs? Otherwise, the image is printing out very smoothly, no banding. I tried different image and different paper- same problem. Don’t know what to do! Can you help?
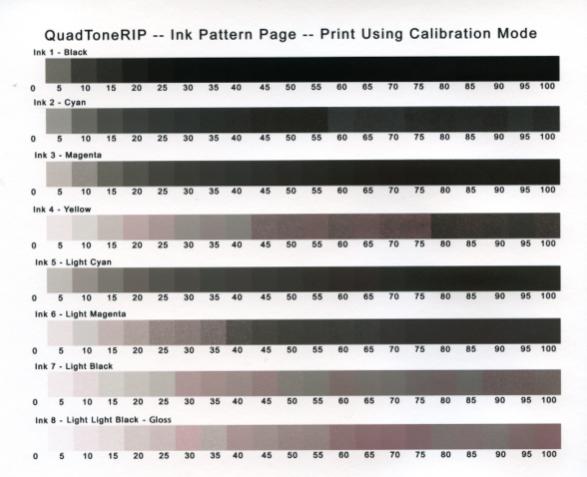
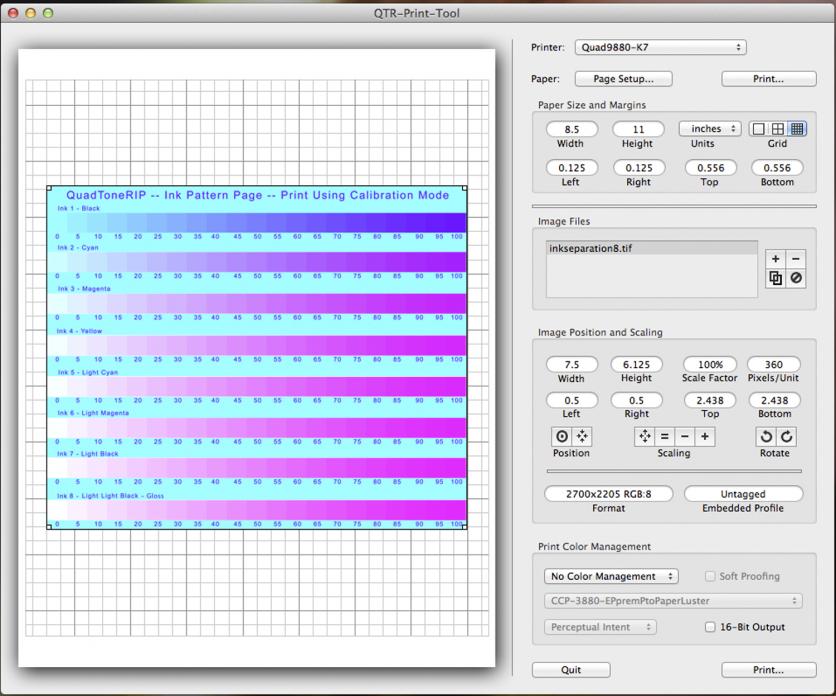
To follow up on my previous post while awaiting a reply, I tried to print ink separation image through QTR Calibratiion Mode. I am not certain I did it correctly as it doesn’t look right, but here’s what I did.:
- Open “ink separation” file in Photoshop. I used the "inkseparation8.tif file found in the QTR Curve Design Folder/Images folder.
- Assign Profile>sRGB. I used the sRGB iec61966-2.1 profile. Is this correct?
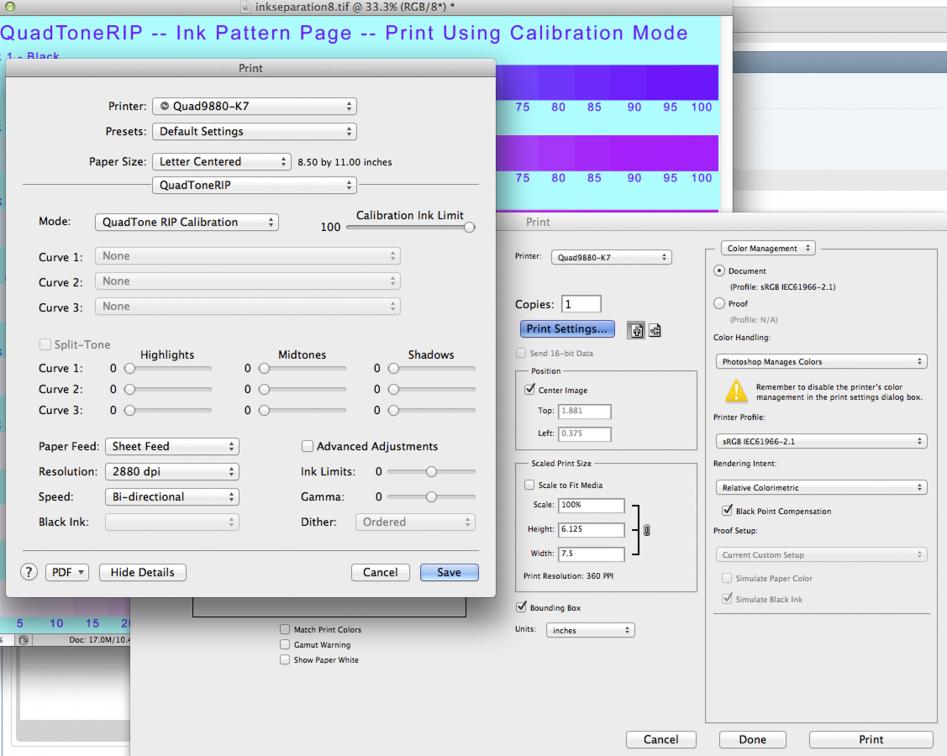
- Print- Photoshop Manages Color, Print Profile sRGB. I am in CS3, and I used the sRGBiec61966-2.1 profile. Is this correct?
- QTR-Select Calibration Mode, Ink Limit 100%. I followed this with resolution at 2880.
I am having trouble uploading the jpeg. I just emailed it to Dana and Jon, but it sure doesn’t look right. Since the printer was printing beautifully until the chip error (and subsequent change of cart), and I am certain I put the correct ink in that cart#5, I am at a loss to figure out what happened to drop out these dark tones. Thanks so much for any help you can give me!
Hi Garie~
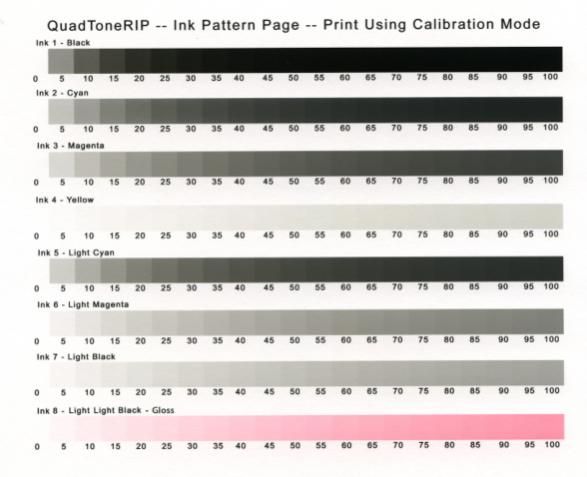
I attached the printed inkseparation image you emailed me, as it’s a helpful visual reference for others to see.
It’s easy to see this doesn’t look right, and from my experience I can tell that a print setting was not what it should be.
What Mac OS and Photoshop version are you printing from? (The print settings depend a lot of the OS and PS versions you’re using).
Please let me know and I will help you get past this and back to happily printing.
Best regards~ Dana 
I wanted to share this to help attaching images in the future: http://www.inkjetmall.com/tech/content.php?152-How-to-attach-images-to-this-forum
I am on OS 10.6.8 and PHotoshop CS3. Not sure what I did wrong, and hoping that the info I posted above about how I printed the calibration image is clear. Any help is greatly appreciated so I can figure out why the darkest tones are dropping out. The above Ink Pattern Page sure looks wrong! Dana to the rescue! xx
I am following the instructions for posting an image and finding that in step #2, after “Insert Image”, “From Computer”, instead of “Browse” I am seeing “Choose”. When I choose the image, and click on Upload Files, the image is not appearing in the typing field. Instead, this is what is appearing:
. Not sure what’s wrong!
Thanks for the additional information Garie.
Assigning sRGB is correct for the OS you’re using, so let’s figure out what’s causing the strange output.
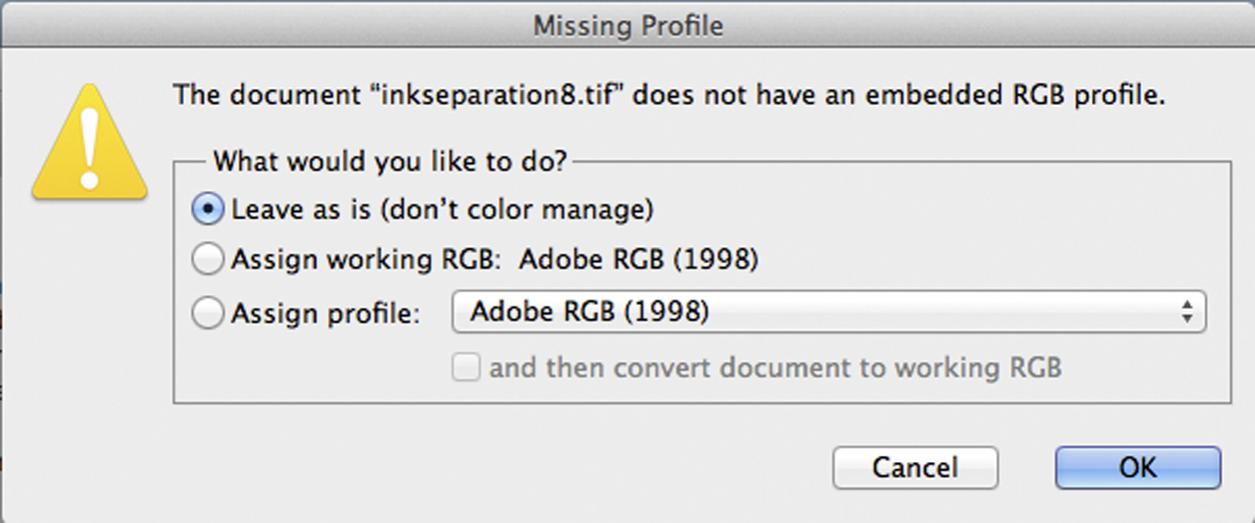
When you opened the Inkseparation image in Photoshop- did you use the embedded profile, leave as is (don’t color manage), or assign working RGB? Or, if you didn’t receive this message when opening the image, please check your Photoshop Color Settings, and make sure they’re set at RGB: Adobe RGB(1998), Gray: Gamma 2.2, and profile mismatch: ask when opening (these are the main important settings for your needs). Now, reopen the image and it should come up with the profile mismatch window- select “use embedded (don’t color manage)”. Then, select Assign Profile> sRGB. I attached a few screen captures below to show you these steps.
I am still waiting to hear back from Roy regarding the best workflows to print with Calibration Mode thru QTR Print Tool on different Mac OSs’, so don’t know exactly what to recommend, but can suggest what I would try (if I don’t hear back from Roy, I will begin testing next week to gather some info for our users) if the above Photoshop workflow doesn’t produce correct results.


Thank you so much for getting right back on this!!! TO answer your question, when I opened up the ink separation image I did not follow exactly what you’ve indicated here. I assigned the profile sRGB immediately upon opening, rather than using the embedded profile to open and then going to Assign Profile>sRGB in a separate step. Will redo and post the result. However, I am not certain how to interpret the printed image, but I am assuming that if I post what the QTR Calibration Ink Pattern Page looks like you might be able to tell me something! What I don’t understand is what made it go from printing great to suddenly dropping out the tones…Will work on it shortly.
What I meant to say regarding the first QTR ink pattern page, rather than clicking on “Do Not Color Manage” when I opened the file, I clicked immediately on “Assign Profile”- I did not do it in two steps as you indicate above. Now I have followed your step by step, and printed out the test pattern. It is printing differently than the first time, but still looks very incorrect! Here’s my sad pattern:
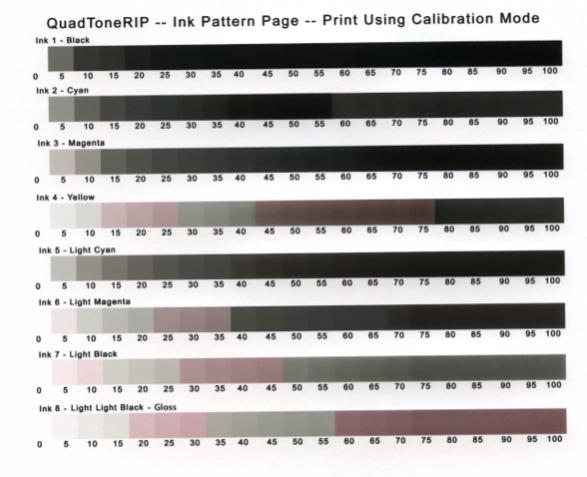
As you can see above, not only are the tones incorrect, but the dot pattern under magnification is unsmooth in certain tonalities. Any help to figure this out is greatly appreciated!!!
I have forwarded Roy this link and asked him to review your workflow to see if he can tell what’s causing your strange output.
I’ll be in touch as soon as I hear back from him.
Al the best~ Dana
Thank you for your help!!!
Good morning Garie~
Roy suggests printing thru QTR Print Tool or Adobe Color Printer Utility for accurate color management, without the strange auto color management of Mac 10.6+ effecting the output.
Please print the Inkseapartion image thru QTR Print Tool following the screen captures below, and let me know your results, or if you have any questions.
All the best~ Dana
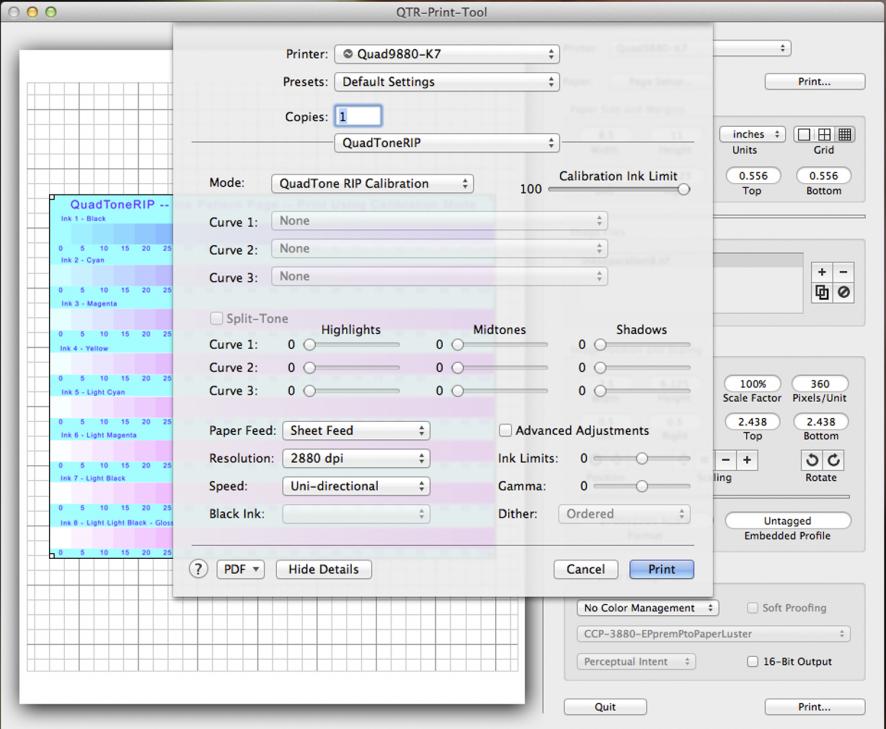
Thanks for your help! I’ve reprinted the inkseparation8.tif file using the QTR Print Tool, following your screen grabs exactly. Here it is:
I will wait to hear if you think the above looks normal. Meanwhile, I will reprint the image this all started with because now it seems as though the Shade#1 is printing normally and with full density. I will let you know how the image looks shortly. Best to you! Garie
YES, this is what the inkseparation print should look like! I’m glad to hear your black seems to be printing correctly again.
Please keep me posted ad let me know if there’s anything else I can help you with.
Best regards and happy printing~ Dana
Subsequent to printing the inkseparation image above, I returned to my image file and reprinted. It is still printing with the darkest tones dropping out of the image, so even though the calibration mode prints the test target correctly, when I print using the HahnemuhlePhotoRag curve, the dark tones are still dropping out in exactly the same manner as before. Could there be a problem with the curve for HahnemuhlePhotoRag having gotten corrupted? Should I do something with reloading the curve? In printing a different image, it is dropping the darkest tones in exactly the same manner. I am hoping you can suggest a fix since all was printing great until this little episode. I will wait to hear back. If you want me to post the printed image before and after this probelm, I can scan and post- let me know. Thank you!
Having just re-read the instructions for uninstalling and re-installing profiles for QTR, I have a few questions. If you think that indeed, something got corrupted with my K7-HanPhotoRag profile, then should I simply re-install the profiles I currently have in my QTR Profiles folder or would I need to download new profiles from the QTR website? According to your instructions, I would delete the Quad9800-K7 printer in my “Print and Fax” System Preferences folder, and then do an install of the profiles in my QTR Profiles 4800-7800-9800-K7 folder. Should I do? Thank you again for bearing with me- I am hoping this might fix things!
Hi Garie~
If all 7 Piezography shades are fully printing and in the correct order, then let’s check what else could cause this sudden lack of black issue in your prints.
Are you using the standard “K7-2880-HahnPhotoRag” curve included in the QuadTone RIP download, or a different curve that you installed separately (such as a “P2” or “UC” curve)?
I have never heard of a curve becoming corrupt, and you would have to open it to modify the inner guts of a curve… but I have certainly had and heard of strange things happening, so won’t rule out the curve.
I recommend you uninstall the Quad9800-K7 printer, then reinstall by running the 9800-K7install.command in the 4800-7800-9800-K7 folder. It would also be a good idea to shut down both the printer and computer at the same time, then start up and make a test print.
Please let me know your results, or if you have any questions.
Thanks- Dana
Ok Dana! I have to leave for a while, but will try this tonight and will let you know the results of this rather mystifying scenario. I am using the standard K7-2880-HanPhotoRag curve included in the QuadTone RIP download. I think everything else I am doing is correct- all files are 2.2 gamma embedded profiles, etc. I am optimistic this will work itself out and I will be on the path to printing again soon! Thank you and I’ll keep you posted.