Customer feedback: how to get customers to read instructions?

We value customer input, so would like to hear from you to help make things run as smoothly as possible, and provide the best experience for you.

We provide detailed instructions on each product page, as well as lots of troubleshooting and helpful information, but still frequently run into problems with people not reading (or fully reading) instructions, and getting themselves into trouble… We used to include paper instructions with each order, but found they were not always noticed/read, plus it was difficult if an instruction had to be updated, and we hated all the paper waste, so decided to go paperless as much as possible, and provide all instructions online (though cartridge kits and the print head cleaning kit still come with paper instructions).

Please give feedback of your experience and thoughts:
Is information hard to find, or difficult to follow?
Do you prefer paper instructions in-hand, instructions you can download and read online, or video instructions (or a combination)?
Do we provide too much information, or not enough?
Do you prefer an all inclusive instruction with text and photos, including all relevant information to the product you’re using, or a basic quick-start guide?
Is it just human nature to not read instructions? (I have to admit, I’m guilty of this sometimes)

Any feedback from our customers, would be greatly appreciated~ please help us help you have the best possible experience with our products and company.

Thanks and happy printing~ Dana :slight_smile:

Dana

I got this from you after I messed up print for the custom profile:

Your package of targets to have a custom Piezography curve arrived on Friday afternoon. Upon opening your package, I discovered you printed the color profile target with Piezography inks, which is not correct. I have attached the correct target image you’ll need to print to have a custom curve made, along with printing instructions.

1. Install Curves:

To install a Master Curve, GO curve, and/or custom curve to use with QTR, you will need to drag and drop the curves (NOT the FOLDER containing the curves, but the individual curves themselves) into the following folder location:
(Windows) C:\ProgramFiles\QuadToneRIP\QuadTone(Your Printer Model)-K7

This is on the web site:

Download the package by clicking here.

Custom Profiling Kit Contents:

Master Curves
1400_K6_MasterCurve.quad
2200_K7_MasterCurve.quad
4000-7600_K7_MasterCurve.quad
3800-3880_K7_MasterCurve.quad
4800-7800_K7_MasterCurve.quad
4880-7880_K7_MasterCurve.quad
7890-9890_K7_MasterCurve.quad
R800-1800_K7_MasterCurve.quad
R1900_K7_MasterCurve.quad
R2000_K7_MasterCurve.quad
R2400_K7_MasterCurve.quad
R2880_K7_MasterCurve.quad
R3000_K7_MasterCurve.quad

The curse listed are not accessable. The curves in the pacakage are not listed by printer. Where are the master, Go and custom curves located. I expected to find a curve for my 3880 as it say will be in package. Is the package the same as the kit. Do you have links to the curves I will need to print the target.

Hi Frank~

Thanks for the feedback, I have corrected the list of master curves on the custom Piezography curve page, to now reflect the curves included in the download (which changed since the description on the page was originally written). I also made the download link more obvious- now bold and red. Download the custom curve “package”, which includes the printable target image, master curves, the Piezography manual and the linearization checker. Instructions for having a custom curve made start on page 44, and target printing instructions start on page 59 of the Piezography manual.

For your Epson 3800/3880 printer, using the regular K7 ink shade placement, you will want to select the “x880-x800_GLOSS-Master” with any gloss or semi-gloss paper, and “x880-x800_MATTE-Master” with any non-gloss paper.

I hope this clarifies where everything is and what you need to do.
Please let me know if you have further questions or there’s anything else I can help you with.

Warmly~ Dana :slight_smile:

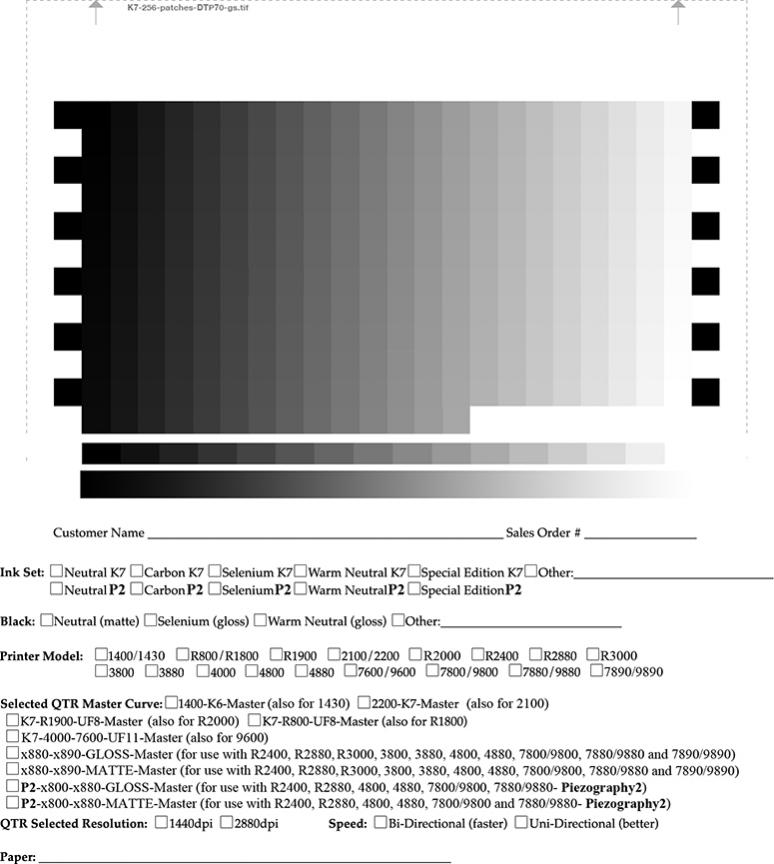
The Piezography manual, starting on page 59, explains which master curve to use for which printer models, and the target image also indicates the master curves and corresponding printer models:


As a long time user this is hard to comment on. The challenge for me is picking up when something changes, e.g. when I get new carts with different filling instructions.

But I’d been doing a lot of forum and website reading lately about B&W printing and piezo and one comment that I’ve seen made a number of times is that all the information is there but it’s hard to find. There are quite a few websites, blogs, forums and you have to discover them all. Once you do then you feel well-informed, but it’s a challenge to get to that point. As you know, I’ve been helping a new piezo user in my region and he made the same comment. In giving him links to read, I often have trouble finding where on this sprawling collection of online information it was that I saw something.

There is the manual, but it is long, and in some places rather discursive, esp towards the end, and it doesn’t cover everything. (Personally I think that the material on digital negatives should be in a separate document, as this topic is rather specialised and breaks the flow and makes the document long.)

So I think you need to invest a bit of time (not sure where you would manage to find this) to do a stock-take and some reorganisation. Part of the problem is that you deal in both colour and piezo products and in terms of usage, different issues are involved. But the printer maintenance and cartridge usage issues are common. Failing that, perhaps at least an over-arching index.

(One other comment that I’ve seen repeated a number of times is that people gave piezo a try despite rather than because of the pack of sample prints that they bought, but that’s a separate issue.)

I agree about printed instructions, but what you could do is send a single page out with links to the various instructions online, which are kept up-to-date. You could also include this text with order confirmation emails, since it would provide easier access to live links.

To answer some of your questions:
. A picture is worth a thousand words.
. A quick start guide is valuable. No-one wants to have to read a 100 page document in order to get started.
. But it needs to be supported by a detail reference manual.

Thanks for your input Brian.

I agree that we have a TON of information, and it could use a major re-organization. We were having people missing parts of Piezography, which is why Jon put everything into one fat Piezography manual, but I agree it could be broken into sections/topics to be easier for some to follow (for example, digital negatives and custom curves don’t apply to everyone, and add a lot to the manual, which can be helpful to some, but overwhelming to others). I have spent a great deal of time over the years looking at other websites to see how other companies organize and provide information. I am relieved to discover we have a great website and more helpful information than any other site, but organization and clarity are important, and something we need to work on.

Thanks again~ Dana :slight_smile:

I know that Jon is proud of the manual, and deservedly so - it represents a lot of work and years of experience. But a document of that size and complexity would benefit from some independent scrutiny from someone familiar with piezography, to make it easier to understand and more accessible. And no, I’m not volunteering.

Some amplification of my previous comments. There are a lot of separate websites:

www.inkjetmall.com which redirects to http://shopping.netsuite.com/s.nl/c.362672/.f
http://www.inkjetmall.com/wordpress/
http://www.piezography.com/PiezoPress/

There are links between them, but what’s the difference and where should I look for what?

If I’m looking for support, do I use the support link on piezography.com or http://www.inkjetmall.com/tech/content.php or perhaps even the Yahoo piezo forum?

If I’m looking for glossy curves for example, do I go to:
http://www.piezography.com/PiezoPress/blog/piezography-k7-inks-and-curves/piezography-glossy-curves-library/
or
http://www.inkjetmall.com/wordpress/piezography/piezography-glossy/piezography-glossy-curves-library/
The content may nor may not be the same, but this sort of duplication makes it confusing as to where I should look for something.

Dana,

I find your YouTube videos to be priceless. I know where they are, I remember what I saw and can find them again quickly. Just yesterday I was watching your R3000 Fill/refill video. I’m sure when the time comes your maintenance video(s) will make life easier. I would encourage to keep them updated and produce more.

I have to agree with Brian, the website(s) are full of information and I’ve spent many hours reading before purchasing ink/carts/paper. I read the manual 3 times trying to decide how best to accomplish what I want. I ended up with three printers as that seemed to be the best solution for me. The trouble becomes…where did I read/see that?

One suggestion - see if you can better organize the printer profiles. They seem to be everywhere and when you find some, you aren’t quite sure if you have the most recent ones, or all of them. It took me quite a while to discover there were a whole bunch of P2 profiles available. The Manual only lists Selenium paper profiles for Method 3 Dig Neg. (I was setting up to use WN inks) I later found an article on the Support page (I think that’s where it is) listing many, many more P2 profiles.

There are articles/blog posts/responses to questions that refer to 2.5 & 4.5 being available for both Sel and WN inks, yet the shopping site only lists them for Sel. I wound up mixing my own 2.5 & 4.5 for WN, but would much preferred to obtain them pre-mixed.

There are references to Cone Type 4 paper, yet the shopping site only lists Type 2 and Type 5. I did find a response from Jon stating Type 4 is now EEF (took me a while to figure out what EEF is).

I do have to commend the fine folks at Inkjetmall for developing/supporting a wonderful B&W workflow. I am enjoying your products and look forward to developing my skills to fully take advantage of your product’s capabilities. I must confess that learning Silverfast, Lightroom, Photoshop, Piezography and how to use a Wacom tablet is quite an undertaking. I’ve found the various video tutorials to be very helpful in this pursuit.

And yes, Dana I can confirm that reading seems to be a lost art. My professional life deals with folks who won’t take the time to read/understand the instructions.

I’ve followed this forum because I’m a firm believer that we learn from mistakes. I’ve also learned it’s much cheaper to learn from other’s mistakes rather than my own :slight_smile:

Thanks for all you do to support us. I’ll offer other suggestions as they occur to me.

Dana,

As a very recent arrival, I found the Piezography and IJM sites to be like an archaeological dig. There is so much information, some current, some old, and the names have changed on some things. Even getting to this forum is not intuitive. Why not just have ‘Support’ on the front page? My suggestion would be to have a page or pages to cover carts with links to the videos and instructions for the various iterations of cart. Another could point to the maintenance videos. Another, could point to curves and soft proofing profiles. As is stands, you need to stumble on the articles to find a lot of stuff. As an example, it was only when looking for something else that I discovered that I am meant to remove the silicon caps from the bottles. I assumed that I was meant to insert the needle in via it. Dumb, and messy, I know but…

I am eternally grateful, for the help that you and Jon have given me, and I hate to sound like I’m complaining. If you made information more obviously accessible, and identified what is current etc., I suspect that some of your workload would decrease.

When you said that there were issues with people not following the instructions, it wasn’t clear whether you were thinking of any instructions in particular. For all systems there’s the refilling and printer maintenance instructions, and clearly those are frequently not read.

But I also get the sense that Jon gets frustrated because people don’t read his “New Piezography Manual”. I’m going to make a few observations about the manual. There are a couple of things missing in my ever so humble opinion, and I’ll add more to this thread as they occur to me.

  1. There’s no mention of lead sheets for gloss overprinting. The manual just says (p19) to leave a 1" margin on all sides, although the online instructions. I’ve got a couple of problems with this. In order to avoid roller feed marks on prints, my experience suggested that 1" is not enough. Moreover, it’s wasteful. If I print an A4 page with the minimum 1/8" margin then I can use around 95% of the area of the page, but with a 1" margin it’s only 64%. Better to use a 2" lead sheet.

1(a). There’s also very little mention anywhere of the technique whereby I can control where GO is printed using and image with black and white areas, as you and I discussed in that thread.

1(b). I think lead sheets should be encouraged for image printing as well as GO overprinting, as they enable more of the page to be used, as I suggested to another user today in this post. It complicates the workflow, but being able to print on only 64% of the A4 page is not a big attraction for piezography, in my view.

  1. There’s almost no discussion of the need to use “preserve numbers” when soft-proofing a GG2.2 image. As far as I can see, the only mention is on page 66 and this appears in the middle of a lengthy discursive section pp62-66 extolling the virtues of a hardware calibrate-able screen and the right viewing conditions. Someone coming to piezography from a background in colour printing will find the way that soft-proofing is done to be non-obvious and counter-intuitive. And I speak from personal experience.

  2. Following on from this, there isn’t a concise section that explains the piezography workflow. There is a discussion of how to use QTR early on in the manual. There’s also a discussion right at the end pp67-71 entitled “Making a fine Piezography print” which does include much of the workflow information, but not all, e.g. not “preserve numbers”. And it’s definitely not concise, covering as it does printer maintenance (p67), iPhones, scanners, screen calibration again, and the general philosophy of what makes a good print. I’m not saying that these things are unimportant, but that it’s pretty darn hard for a new user to distill a concise summary of the piezo workflow from all of this. And they have to make it to p67 to find this section.

  3. I think a quick start guide is a good idea, because a concise summary of the full workflow is needed. Input to Photoshop, GG2.2 workflow, soft-proofing to see the opened shadows, use of QTR / Print Tool. Philosophical comments about what makes a good print should be separate.

This is all intended as a constructive contribution.

I’d like to see better bottle labeling on the piezo inks along with a matching stick-on label that goes on the cart saying what bottle of K7 belongs in what ink cart. As it is, sometimes the labels change on the new ink bottles and it gets confusing with some (Like the PK/MK which is often oddly labeled.). Ain’t easy for new users to figger out as color tank refillable labels do not match up. No doubt some have put wrong inks into wrong tanks due to the labeling info. Maybe “Ink #2 goes into Vivid Magenta tank” or etc, but that would make it printer dependent too. Actually, the terminology of LLK, PK, MK, LK, VM, GO, etc. is probably best to get rid of and spell it all out, especially for newbies.

Worse when the bottles leak in shipping and cover the info on the label, but that’s another matter (ahem!). The one has to figure out what is left-over from all other non-leak labels that are still readable as to which the messed up bottle is.

Mack

Thanks for all your feedback, it’s helpful to get input from customers to help us make things easier/clearer for everyone!

We will begin by organizing and updating our current documents, then making quick start guides to go along with more in-depth manuals we already have. We are already planning on making LOTS of new videos, as well as updating ones that are outdated. I am going thru all our current manuals to make edits needed, and will make sure to add more info to the GO printing section. I think it would be good to separate technical workflows from aesthetic print quality discussion and how to make the best Piezography print, though both should reference each other, as both are important.

Mack: I understand your point, but don’t think it makes sense to add shade position info to the ink bottle labels, because different printers and setups use different shade placement (for example the R1900 uses shade #5 in the cyan channel, but many other printers use shade #2 in the cyan channel). We include a Piezography shade placement chart in the cartridge instructions, which are specific to that printer model. I am currently working on updating the cartridge instructions, and will add a note to all under the Piezography section that we recommend labeling each cartridge with the Piezography ink shade, as per the printer specific chart, for easy filling/refilling, and to avoid mis-filling (yes, we’ve had a few people accidentally mis-fill carts with the wrong ink shade). Yes, we have recently changed bottle labels, but all Piezography ink labels clearly list the ink tone and shade #.

We welcome your feedback and suggestions!
Best regards and happy printing~ Dana :slight_smile:

@Dana: Well, so far you’ve only got feedback from a few of the regulars here. It’s a small sample. I hope you’re approaching others for feedback, although it’s new user feedback that’s probably most valuable. Also, in situations like this, assistance from a professional technical editor can often help.

@Mack: As an R1900 user I’d find it very confusing if the K3 ink placement was put on the bottles. If you look at the instructions, I think you’ll find that it varies a lot between printer models. I share your concern. What I have done to reduce the risk is to use a big thick Sharpie and plastered 1-Pk or 2-Mk etc on the top and sides of the bottles, on the top and sides of the carts and on the syringes. I also made up a large ink placement chart that lists the placement both by the order of the carts and and order of the shades. So when I fill, for each cart I do a 4-way check that the marking on the bottle matches that on the cart matches that on the syringe matches the chart. There are many mistakes that you can make using refillables and I’ve made most of them, but using this approach I haven’t mis-filled a piezo cart yet.

[QUOTE=Dana-IJM;6578]…
Mack: I understand your point, but don’t think it makes sense to add shade position info to the ink bottle labels, because different printers and setups use different shade placement (for example the R1900 uses shade #5 in the cyan channel, but many other printers use shade #2 in the cyan channel). We include a Piezography shade placement chart in the cartridge instructions, which are specific to that printer model. I am currently working on updating the cartridge instructions, and will add a note to all under the Piezography section that we recommend labeling each cartridge with the Piezography ink shade, as per the printer specific chart, for easy filling/refilling, and to avoid mis-filling (yes, we’ve had a few people accidentally mis-fill carts with the wrong ink shade). Yes, we have recently changed bottle labels, but all Piezography ink labels clearly list the ink tone and shade #.

We welcome your feedback and suggestions!
Best regards and happy printing~ Dana :)[/QUOTE]
Actually, if stick-on labels were included that could be attached to the ink refill tanks and actually matched in name and numbers that would be ideal! As it is, my last batch were labeled differently and somewhat confusing relying on the first batch for names as they were very different in next batch. Right now I wouldn’t at all be surprised if I have reversed my PK or MK black with what was in the Cyan refill tank. My black shadows are sort of light, and then go really black now. Seems the same for all profiles too so I suspect I now have a mix-up in the refills.

The labeling on the bottles, and some sort of better ID corresponding system (Even peel-off those new bottles with a stick on labels for the refill tanks that actually match what is printed on the bottle, pending yet another label/name change!) is needed. Too easy to mix up MK PK and whatever tank you think it belongs in, plus last labeling of Selenium only had me confused as to where it goes, PK or MK, or somewhere else? Hence, I think it is now in the wrong place - maybe. It’s a very confusing system with the names and numbers, and old tanks with the color labels don’t help matters for the K7 inks. Heaven forbid changing to K8 inks down the line too and a whole new set of names.

Mack

As promised, a few more things that I don’t think appear in the New Piezography Manual, or only in passing, and which should be included in a workflow document.

  1. Jon’s discussion on sharpening in this post:
    http://www.inkjetmall.com/tech/showthread.php?1262-Print-file-resolution&p=6586#post6586

  2. Related to this, the discussion on p68 of the manual, and in that thread, about not resizing (i.e. not resampling) the file for printing is rather hidden. It should be prominent in any workflow document.

  3. We’ve just had another instance of a user discovering micro-banding in the first inch:
    http://www.inkjetmall.com/tech/showthread.php?1123-Epson-r3000-not-recognizing-2-cartridges&p=6542&viewfull=1#post6542
    Micro-banding is not mentioned in the manual. There is a reference on p19 about a needing to use a 1" border, but it’s rather oblique and passing, and doesn’t explain why. Micro-banding is not a piezo problem pe se, it’s the dirty little secret of QTR on some printers. But if you want to avoid people continually tripping over this issue and post on the forum about it, then the workflow document needs to be more upfront about it and have an image showing what it looks like and why you need to either leave a margin or use a lead sheet. I also think you should include lead sheets as one of the solutions.

3½. Related to this, in this post Dana said that micro-banding “is only an issue with desktop printer models, and is related to paper feed at the very top and bottom of the sheet”. It would be helpful if the manual indicated where the boundary between desktop and non-desktop falls. That link in #3 suggests that the R3000 is desktop, but I’ve had reports that the 3880 doesn’t have this problem, so is it a desktop or not for these purposes?

Thanks Brian~

We will keep your feedback in mind when re-writing/updating and separating sections of the Piezography manual.

Warmly~ Dana :slight_smile:

OK, here’s a take from a newbie.

I just purchased an R3000 and from all the searching and discussions in other forums (especially www.nikonians.org) I have been very confident in the knowledge base here.

However, I come across strange remnants from the past here, some useful, some
irrelevant. For example, the following page has some of the best maintenance information for my printer:

But I got my hopes up over an out of date coupon for a flushing kit (not that I need it now). If the maintenance and cartridge filling/ care info were organized in a link from the home page (support, as suggested earlier) than organized by printer (or printer types), it would be really useful. I found things like the R3000 cartridge filling video from a google search. It would be so refreshing to find it in a support or tech page.

Thanks! You have some great information, just hard to find.

Happy helping!

Larry

By the way, I have the same problem getting my students to read lab instructions before doing labs. I share your frustration! I make my students rewrite instructions in point form first. I guess that wouldn’t work in a business model!

Larry

Thanks for your feedback Larry. A link to our R3000 cartridge video is right on the front page of all the R3000 cart pages, we also have current PDFs and videos on our support page, here: http://www.inkjetmall.com/tech/content.php?121-Refillable-Cartridge-instruction-manuals

We realize we have a LOT of information, and several websites, so organization is important for people to easily find the necessary and helpful information we provide. We’re working on organizing!!

Best regards and happy printing~ Dana :slight_smile:

I do realise that it takes thoughtful time to plan good organization. Believe me, I’ve seen much worse organization out there. My own school district is a great example!

keep up the good work!

Larry