Clogged or other issue VM

I have a seriously clogged (or other issue) VM channel in the R3000. Am using Cone inks and old style manual reset carts. The history - The printer has not been getting enough use, which leads me to think the nozzles or damper are clogged. Have been printing weekly nozzle checks, but not enough photo printing. Last week I printed a nozzle check which was fine, then printed about 20 5"x7" photos. After the print run the a nozzle check showed the VM channel was plugged 0 no nozzles print. In an effort to get things moving I have done a couple of Windex towel treatments under the nozzles (one was left overnight) and two cleaning cycles from the printer driver. All of this was over a period of several days thinking the ink might loosen up, but nothing. Having read some support threads here I purchased the Epson Adjustment Utility from 2manuals.com and ran one ink charge. A nozzle check pattern still showed no nozzles firing. This is where I get confused. The LCD panel on the front of the printer and the driver as seen on my monitor show ink levels that dropped about 50% - the amount used in the ink charge process, however, the VM shows full ink on the printer LCD and in the Epson driver. When I pull the cart the VM is full and the other carts are, in fact, 1/2 full. Someone suggested that perhaps the cart (chip) is at fault because it should show in the driver and on the printer LCD as 1/2 full because of how the ink levels are measured (electrical pulses?). It was also pointed out that if the chip is at fault the printer would not “work”. I don’t have spare carts or original Epson carts to test this.

So my question is should I pursue this as a clog? air in the line? or faulty chip? Should I start with buying one new cart and see what happens? I am thinking the response will be this is a clog - so the question is can I buy one new cart and Piezoflush to clear that channel? Am assuming that would also involve buying QTR, which I do not have. Or would it be best to buy a full set of carts and enough Piezoflush to fill them all? Cost is a factor, but if doing the full flush is the easiest, it might be best in the long run. Can the old manual reset and the new auto reset style carts be mixed?

I understand that using the printer on a weekly basis is the best way to keep these things from happening so hopefully I will do better once I get this issue resolved.

Thank you,

Jay

Hi Jay,

These are all very valid questions and the answer is not exactly direct or straight forward. Lets 1st get a good base line of the situation, which sounds to me may be different then just a clogged Vm channel.

For the read out of the chip level for the VM cart, this is unusual. Yes, it should be reading 1/2 full after performing the Ink Charge (because that is the amount of ink the printer uses for this procedure). Even if the Vm cartridge is actually FULL, possible due to a clog, then it should still read 1/2 full like the rest of the cartridges. Lets start with these questions:

  1. If you run a cleaning cycle, does the ink level move on the VM cart? Or stay Full?
  2. Leading up to this have you noticed the VM ink level staying Full or automatically resetting itself?

Normally if there is a faulty chip on a cartridge you will get a Cartridge error, this would be if the battery was dead. If the cartridge levels are reading full on the printer panel, as well as on the Status monitor through the printer utility this points more towards printer chip read sensor read outs and not cartridge itself. Although anything is possible! I would for good measure, replace the battery on the VM chip and see if that changes the reading capacity of the printer. So, replace the battery and run a couple cleaning cycles to see if the ink levels change on the read out or if the VM comes back.

It sounds to me like the printer is not pulling the ink from the VM cartridge possibly due to an electrical error internally. There is still the possibility of clogged head, damper and/or capping station, but at this point you need to get the VM cartridge ink levels reading correctly to diagnose this problem. Once there’s a diagnosis we can offer a solution for a fix.

Before going through all that I would give the printer a good thorough cleaning following these video instructions http://shopping.netsuite.com/s.nl/c.362672/sc.42/category.122444/.f

Hi Kelly,

Thanks for the reply. I should refill the carts before running cleaning cycles. Will do that later today and then reply with the results.

Jay

Hi Kelly,

I replaced the battery in the VM cart and printed a nozzle check - no nozzles printed on VM. Then all of a sudden the PK cartridge is not recognized changed that battery and it is still not recognized. Unless you have another suggestion, I will wait until I have more time and patience and then putz with it.

Thanks,
Jay

PS to answer your questions I don’t know for sure if the ink level in the cart moved with a cleaning cycle and up to this point the VM was operating as expected (to the best of my knowledge).

It can be hard to see from the graphical displays whether the coloured bars went down after a head clean or a single print and if so by how much. I don’t know whether the adjustment program can do this, but the WIC reset utility (free if you don’t want to do a reset) gives a readout of the chips in numerical percentages. So you take a before and after reading and you can get a more precise estimate of ink used, although it’s still a bit rough as the readings are only in whole numbers, i.e. no fractions of a percent. Usually each chip only moves a small amount in a head clean, although over 8 channels it certainly adds up.

Hi Kelly, sorry this took so long to get back to you. The printer issue had to move to the back burner for a bit. Hopefully I am on track to work at this until a resolution is found.

[QUOTE=KellyC;8334]Hi Jay,

These are all very valid questions and the answer is not exactly direct or straight forward. Lets 1st get a good base line of the situation, which sounds to me may be different then just a clogged Vm channel.

For the read out of the chip level for the VM cart, this is unusual. Yes, it should be reading 1/2 full after performing the Ink Charge (because that is the amount of ink the printer uses for this procedure). Even if the Vm cartridge is actually FULL, possible due to a clog, then it should still read 1/2 full like the rest of the cartridges. Lets start with these questions:

  1. If you run a cleaning cycle, does the ink level move on the VM cart? Or stay Full?
    I ran four cleaning cycles and the ink indicator on the printers LCD screen and in the printer driver shows the appropriate ink usage - comparable to other inks.

  2. Leading up to this have you noticed the VM ink level staying Full or automatically resetting itself?
    No

Normally if there is a faulty chip on a cartridge you will get a Cartridge error, this would be if the battery was dead. If the cartridge levels are reading full on the printer panel, as well as on the Status monitor through the printer utility this points more towards printer chip read sensor read outs and not cartridge itself. Although anything is possible! I would for good measure, replace the battery on the VM chip and see if that changes the reading capacity of the printer. So, replace the battery and run a couple cleaning cycles to see if the ink levels change on the read out or if the VM comes back.

I did replace the battery before doing the cleaning cycles.

It sounds to me like the printer is not pulling the ink from the VM cartridge possibly due to an electrical error internally. There is still the possibility of clogged head, damper and/or capping station, but at this point you need to get the VM cartridge ink levels reading correctly to diagnose this problem. Once there’s a diagnosis we can offer a solution for a fix.

Before going through all that I would give the printer a good thorough cleaning following these video instructions http://shopping.netsuite.com/s.nl/c.362672/sc.42/category.122444/.f

The way the printer is behaving now it seems to be communicating with the VM channel. I also found old OEM carts and stuck the VM in the slot to see if it would be recognized. The printer saw it as being empty. I did give the printer a good cleaning and with the above cleaning cycles, however, it is still not firing in the VM nozzle pattern. It seems the printer is recognizing the cart and communicating - does it make sense to try the cleaning the VM channel? Can I do that with Piezoflush just in the VM channel? Or do I need to clean all channels? Can manual reset carts (the ones I have) be mixed with the ARC type? Just trying to figure the most economical and practical solution.

Which begs one more question, I now have the Epson Adjustment Utility - would I need Quad tone rip to clear just one channel? I do not have QTR

Thanks for your help (and patience),

Jay

[/QUOTE]

Hi Jay,

Ok, it sounds like you are dealing with either a clog in the damper itself, or the head channel for that position. You can read through this post that relates to your problem to see that using the Print Head cleaning attachment fixes this users 3880, which in effect is the same set-up at your R3000 http://www.inkjetmall.com/tech/showthread.php?1848-Replaced-Ink-Assembly-still-no-magenta-ink. They both use Dampers, have internal lines that lead to the print head and due to having dampers (which serve as a filter for the ink) can become clogged at either location. The “simplest” fix would be to flush the print head itself, if you don’t feel any resistance in that channel and you get the same results on your Nozzle Check after performing the cleaning, then I would replace the damper assembly (which Epson recommends replacing once a year). More times then not, we find that flushing the head will clear out any stubborn clogs, but you can think of the Damper Assembly as a Filter, such as your car uses to filter your oil, it will/does need to be replaced at a certain point and is always a good preventive maintenance step to help keep your printer running without set backs.

Hi Kelly,

I ordered the small format flush kit, then after doing some more reading it became clearer to me how this is a solution not designed for the R3000 printer type. How difficult is it to access to the print heads? I am capable of doing a variety of repairs, but would need some instruction. One advantage to my doing this fix is I would better understand the printer. Another thought - what is involved in replacing dampers? If that is a similar scope project as the small format cleaner then I would be part way to understanding how to replace dampers? Do you have a link to the damper source?

The other option ( I am assuming) is to buy a full set of carts and use the Epson Adjustment Utility (which I now have) to do a full cleaning. The only thing that has kept me from that solution is the cost. But might be the most sensible. And certainly not overly difficult.

Thanks again - I do appreciate the support,
Jay

PS Wells is holding my flush kit order until I get this sorted out.

Hi Jay-

You can gain access to the print head by removing the Ink Supply Unit, you will need the R3000 repair manual for this procedure, found here http://www.2manuals.com/product_info.php?products_id=1376
Epson recommends you replace the Ink Supply Unit once every 12-24 months depending on usage of the printer. This unit actually comes as an entire assembly and is MUCH easier to replace all at once then to replace each individual damper from this unit. It is also more cost effective over purchasing Flush and Cartridges, thus saving you valuable time and money in the long run, in addition you have access to flush the print head and effectively you end up with a fresh starting point. So long as your print head is in good working order still, you will basically have a brand new printer.

You can see an exploded parts diagram on the Compass Micro web-site, it nicely breaks down each part and shows you how they are assembled together. By using the Epson repair manual and these parts diagrams, this job is fairly straight forward if you are mechanically inclined. A word of advise, make sure you read the repair manual thoroughly, step by step to make sure you don’t miss any vital steps along the way.

The Ink Supply Unit is assembled of all the dampers, the cartridge housing & chip read sensors & the ink tubes and only costs $172.39. You can purchase this item at Compass Micro by following this link https://www.compassmicro.com/parts_detail.cfm?ID=7461&form.mfg=Epson&form.printerstyle=Inkjet&form.printername=Stylus%20Photo%20R3000

Hi Kelly,
I sent an email to IJM to fill the order for the small format cleaning kit. I looked through the Epson service manual - looks sort of formidable, but hey, only live once :slight_smile: 
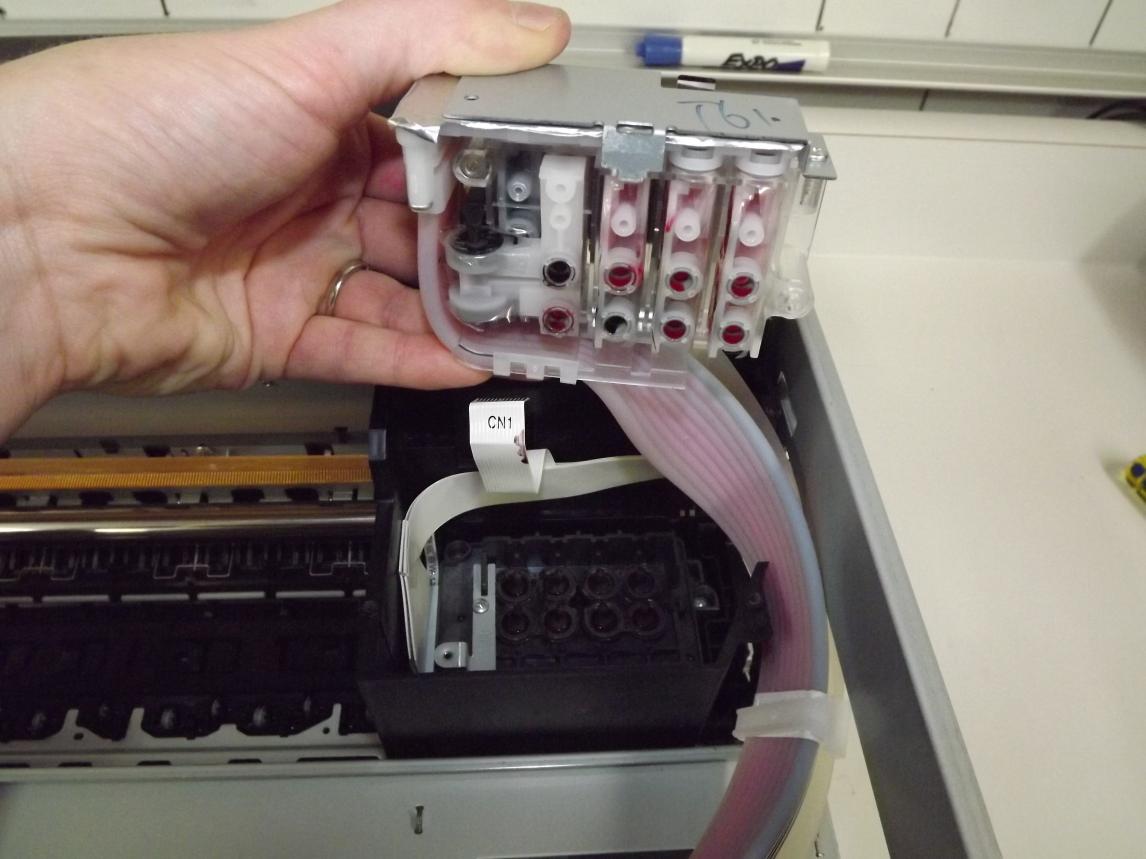
It looks like the case needs to be removed, then the dampers to get at the heads? Sure would like to see a picture of what is takes to do this.

I’ll let you know what happens.

Jay

The repair manual has clear instructions on how to remove the case.
Here are a few photos showing the ink supply/dampers being removed from the head on a R3000 printer.

Best of luck~ Dana :slight_smile:


Facing the printer (as in the photos above), the black channel is the bottom/left in the print head.

Sorry about being so tardy in getting back to this. I just now removed the ink supply/dampers assembly and used piezoflush in the VM head - or should I say the head I assumed to be VM based on ink coloring around the head. When reassembled - no change in the nozzle test pattern - VM is still clogged. Actually the nozzle check pattern does show a few nozzles in the VM position with ink, however, the ink is not VM - more like black. That was the case before I opened the printer.

Based on what you have stated before it appears my option now is to install a new ink supply/damper unit. My only concern with that is if it does not fix the issue I would be incredibly frustrated. I suppose the highest likelihood is a clogged damper, but no way of knowing? Am also prepared to move on to one of the new P series - probably P800. Will there be Cone ink and cartridges any time soon for that printer?

Thanks Kelly and Dana - I am so grateful for all of your support,

Jay

Hi Jay,

It sounds like a replacement of the Ink Selector Unit is your next step for repair. For the amount of $ and time put into doing this repair (which you are obviously capable of doing) it is most certainly worth it.

Although we are currently developing the SCP600 printer, we are not certain of a release date. It could be a year from now, we are not in a position to say when at this point these printer models will be supported. BUT, the R3000 is and will continue to be supported for the next few years at least.

I will probably be ordering the ink selector unit. question - does that include the ink supply lines?

Thanks,
Jay

Yes, if you open up the exploded parts diagram and scroll to the reference #501 you will see the entire ink supply unit, part #511 reference the ink lines, you just can’t tell from the image because it looks like a cable instead of the ink lines. I would recommend replacing the Capping Station at the same time (aka Ink System Assembly) found here https://www.compassmicro.com/parts_detail.cfm?ID=7459&form.mfg=Epson&form.printerstyle=Inkjet&form.printername=Stylus%20Photo%20R3000