9900 Head Problems

I am getting a bad nozzle check on the C cartridge of my 9900. I have a head that was newly installed in the Fall of 2013, when the printer was also cleaned. I installed a new wiper in Fall 2013. As far as i know, the printer has its original dampers. I keep a humidity-controlled studio, shake the cartridges regularly, and print frequently, though not in high volume (a whole week almost never goes by without printing). I’ve been using Epson inks since the new head was installed. I had been using Cone Pro inks for about eight months before the head was replaced.

I did several C/VM head cleanings and two power cleanings, to no avail. I would upload an image of the nozzle check, but your forum just gives me a cryptic error code when I attempt it, even though I have a JPEG image that fits well within the rather tight restrictions on file sizes and dimensions.

I hesitate to do more power cleanings, given the warnings Jon has posted about how the 9900-7900 power cleanings are not the same as on older printers. I installed a new wiper in Fall 2013. I suppose that opening up the printer and putting in new dampers, a new wiper, and generally cleaning the interior would help. You most recent newsletter recommended that. it indicated that Inkjet Mall would sell dampers for various models but not for the 9900. Where can I get those?

I think I have the necessary manuals already.

I am also considering using PiezoFlush, both to help clean the head and also to mothball the printer while I am away on vacation. I will only be gone three weeks, but in the future I could easily be away for months.

Could I use my old refillable cartridges for the PiezoFlush? There is still some ink in them, which I can return to the original bottles.

best,

– Paul

image I tried to upload: Dropbox - File Deleted
error message: Dropbox - File Deleted

A continuation of my documentation of problems with the 9900 printhead.

I asked Jon Cone if I could use my old refillable cartridges for the PiezoFlush. There was still some ink in them. He suggested I could return the ink to the original bottles and then rinse the cartridges with distilled water.

So, I bought a gallon of PiezoFlush. I rinsed the cartridges with distilled water and filled them with PiezoFlush. I primed them (pulled extra air out with a small syringe that InkjetMall had supplied me) and installed them. I powered up in Maintenance mode and ran the Init Fill. That was where the problems began.

I noticed PiezoFlush leaking out of the printer first on the right side and then on the left. It leaked out right at the front wheel on the right and at the front wheel on the left. I pressed Power Down, but the printer did not stop. It evidently finished the Init Fill and then powered down, all the while leaking.

I opened the ink covers (gently, with a fine screwdriver, since the machine was off) and pulled out the cartridges. Light Light Black and Yellow were nearly empty. Vivid Magenta was down to about a quarter of its capacity. The cartridges showed no sign of leaking before I installed them. There was no PiezoFlush in either one of the compartments except along the plate at the very back. However, the empty cartridges, LLK, Y and VM, all show signs of PiezoFlush at the front, where they attach to the ink lines. Could they have leaked where they snapped into the lines? Could priming them have displaced or damaged the valve in the ink channel of the cartridge?

Since the printer seems to have completed its Init Fill cycle, I think I’ll put in the PiezoFlush cartridges that did not leak and put ink cartridges in everywhere else. Then I’ll wait 48 hours and see what happens. Fortunately, the color that is blocked, Cyan, did not leak.

The leaking PiezoFlush also seems to have spread along the bottom right edge of the chassis, just above the skirt—the right top edge of the skirt is soaked with PiezoFlush.

It would be great if questions on this forum actually got timely responses. That has never been the case, in my experience. YMMV. I’ll go ahead and document what I do anyway.

Hi Ignotus~

I’m sorry to hear of your continued troubles with this printer after the head was replaced, and that you experienced leaking refill carts. I have been involved in workshops and production printing recently, though Kelly has been helping me with tech support, and I have been trying to keep an eye on things, so I apologize that you did not receive a timely response to your post.

Dampers should ALWAYS be replaced when a print head is replaced, this is standard Epson protocol, so I’m very puzzled why your dampers weren’t replaced, especially considering your printer is 4 yrs old… The fact that you have been running Epson inks since the new head was installed, and are still not having good results, makes me suspect the dampers need to be replaced. I also recommend manual cleaning of internal parts, following our instructions, here: http://www.inkjetmall.com/tech/content.php?133-Printer-Cleaning-and-Preventative-Maintenance

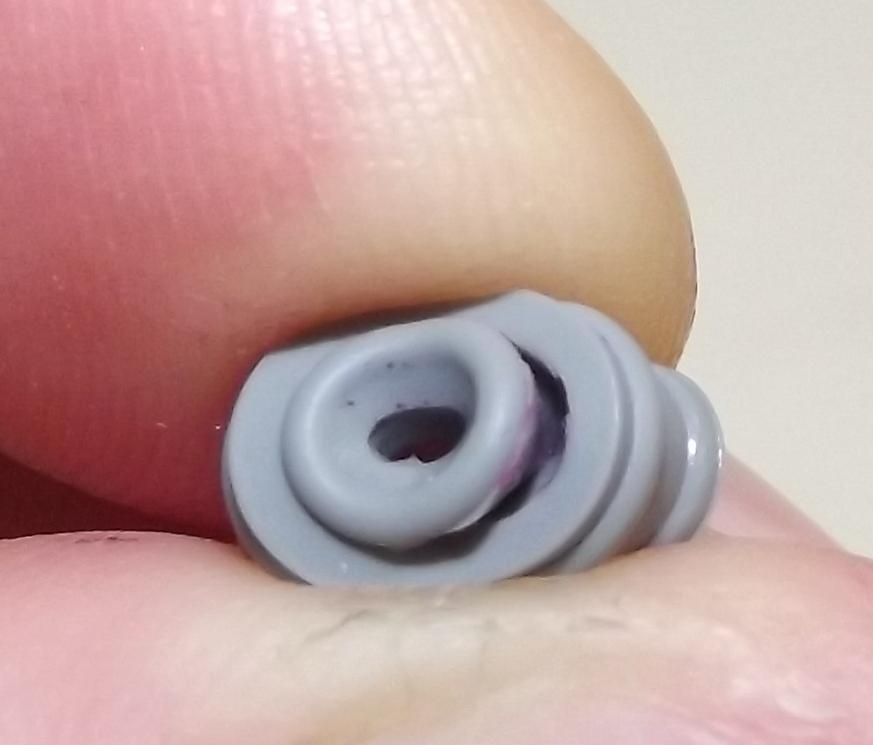
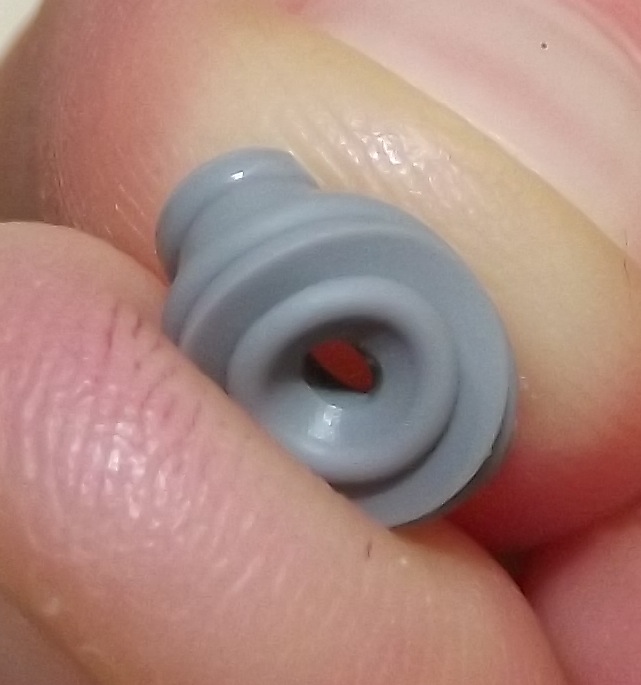
After reviewing your order history, I see you purchased the set of internal bag style refill carts in Feb 2012. If you emptied the ink and refilled carts with PiezoFlush, then three carts leaked from the exit valve while the printer did the Initial Fill Cycle, then I suspect the exit valve seals may have been damaged, which can happen occasionally when priming. The old priming procedure for these carts instructed to insert a slip-tip syringe into the exit valve, then tilting at an angle, and draw up to remove air from the ink bag, and prime the exit channel with ink. This worked well, but we received a few reports of leaking carts, and discovered these customers had accidentally punctured the rubber seal with the syringe, which caused ink to leak out when the printer pressurized carts. The new priming tool and procedure work very well, and we haven’t had a single report of damaged exit valve seals. I attached a photo of a BAD/ripped seal, and good seal for you to see what I’m talking about below.

I will check to see if we have some spare exit valve seals that I can send you to replace with these carts. I will also send you our new priming tool, which is a small syringe with plastic priming tip, which opens the exit valve to prime, without damaging the rubber seal.

To replace the rubber exit valve seal:
Hold the cartridge exit valve up and carefully slide the plastic tab off the exit valve to remove the rubber seal. You would want to be very careful when doing this with a cartridge that contains ink to avoid accidental spilling- make sure the cartridge remains up and take care when handling the exit valve parts as they are small and I have certainly shot the parts across the room by not holding them in place when I slid the top plastic door off (due to the spring pushing up). To avoid shooting parts across the room, hold your finder over the exit valve when sliding off the plastic piece, then using a straightened paperclip, insert the paperclip tip straight thru the gray rubber seal center hole and gently pry up to remove it- behind the gray rubber seal is a tiny metal ball and spring. To put it back together, put the spring in first with metal ball on top, then push the gray rubber seal straight into the hole and while holding the rubber seal down, slide the plastic piece back in place- making sure the rubber seal is flat and evenly secured under the plastic cover.

I hope this helps. Please let me know what you discover, if you have questions or there’s anything else I can help you with. I will be out of the office tomorrow, but have left myself a note to check for replacement exit valve seals on Thursday morning when I return, and will let you know if I locate some to send you.

Best regards~ Dana


Thanks, Dana.

It certainly seems likely that the priming procedure damaged the valve seals. I do have a small syringe, but its tip seems to be the same size as the large syringes that came with the kit I purchased.

I have another 24 hours to wait until I print a nozzle check. That seems to be the best thing to do. I don’t know if the Init Fill pumped PiezoFlush into the lines for Y, LLK and VM, the cartridges that leaked. I suppose if it didn’t, at least they should still have ink. There were working fine before.

I spilled some 1000 mL of PiezoFlush onto my studio floor. I was planning to replace the carpet, anyhow. If you send me the valve seals, I’ll need more PiezoFlush to fill the cartridges. It would be good of you to send me some with the valve seals. In this DiY printer world, I end up spending quite a lot of time and money fixing things that probably should have worked in the first place. No doubt there is a learning curve, but at times it seems needlessly steep.

– Paul

Okay, so 48 hours have past since I ran the Init Fill with the PiezoFlush in my set of refillable cartridges. As I reported, the Y, LLK and VM cartridges leaked, spilling about a liter of PiezoFlush on my studio carpet. I replaced them with ink cartridges.

It seems I probably should have also done another Init Fill just to get the ink from the Y, LLK and VM cartridges back into the ink lines. In the nozzle check, Y is not printing at all. LLK has a few lines. VM seems to be okay. I guess the PiezoFlush did not enter the Y or LLK lines at all.

I can also report that the problem with the Cyan head is not fixed, but at this point the line does at least contain PiezoFlush, so I can go ahead and run some pair C/VM pair cleanings and see if I can improve matters.

–=--=–=--=–

(2 hours later)

The Y and LLK and VM lines seems to be gradually coming back to printing. The C head is still clogged, as before. Only a few lines a missing, but it’s not acceptable for fine art printing to have any missing. This seems to be one of those 9900 clogs that PiezoFlush just doesn’t resolve. At this point I may consider getting a new printer, just so as to have an extended warranty on it.

Any suggestions, Dana?

For those who haven’t seen this: How to Permanently Resolve Print Head Clog, Nozzle Clog & Banding on Epson Stylus Pro 9900 Printer - YouTube

p.s. I’m not making fun of people with 9900 problems. It’s just that I’ve seen so many posts here and elsewhere about them that this video seemed to sum up the frustration. I am surprised that there hasn’t been a class action.

When the 9900 works, it can do beautiful prints, but it seems increasingly clear that there are serious problems with the longevity of the printhead. If it weren’t so expensive, it might be justifiable to replace it periodically, but by the time I get around to paying for two printheads, I could practically buy another printer.

The technician who services my printer from time to time is not an Epson employee. He sees a lot of printers, but thinks there is no clear pattern of failure–some printheads last many years (my first one did), some don’t. So what we’re left with is anecdotal evidence that head failures may happen too frequently to consider this printer a reliable investment. My own experience is now rather dismal. It seems pretty clear by now that the failure rate is a problem, but I don’t know of a single statistical study that takes it out of the realm of anecdotal evidence. If anyone wants to confront the company, that’s where you’d have to begin.

For anybody who happens across this thread, here at InkJetmall we prefer to make use of otherwise “useless” printers and have come up with a very clever conversion to turn your X900 printers with bad channels into Piezography printers. Here is an article by Jon Cone about this conversion http://www.piezography.com/PiezoPress/blog/piezography-technical/how-to-perfectly-repair-an-epson-4900-7900-9900-printer/

Personally, watching that video made me cringe, I know these printers can be frustrating beyond belief, BUT there is hope still for them! Please consider re-purposing your X900 printer into a Piezography printer and NOT throwing away an otherwise perfectly good machine due to frustration.

Thanks, Kelly. That is indeed an interesting option. I will probably need to get a new color printer anyhow, since I depend on color and large format for my work. Don’t know if there’s even room in my small studio space for two 9900s.

Hi Ignotus~

I found some replacement exit valve seals that I’m going to send you, along with priming tips. I agree with Kelly about repurposing your good working channels to be a Piezography printer.

After replacing the exit valve seals, please use the new priming tips on your slip-tip syringes to remove air from the internal bag and prime carts before installing into the printer.

Please let me know if you have questions, or there’s anything else we can help you with.

Best regards~ Dana

Thanks Dana. I guess I will have to order another gallon of PiezoFlush to make up for the liter that spilled.

This month I can get a new 9900 for $4000, so I suppose that is what I will do. I will also purchase the extended warranties. The salesperson I talked with said Epson would replace the head while the printer was under warranty, which can be for as long as three years. Seems like a necessity.

Because I anticipate being out of the country for extended periods of time in the future, I think that I will also plan on leaving both printers filled with PiezoFlush while I am away. Your documentation indicates that that should have the effect of keeping the printhead functional. What about the warranty, if I do that?

cheers,

– Paul

For the record, I don’t like trashing printers either. I’ve only ever disposed of one (1410), and if it was here now knowing what I know today there are further things I would try. I have my 11½ year old 2100 boxed up ready to go, but I can’t bear to trash it because we’ve been through a lot together and there’s always a chance that I or someone else may have a use for it. I came close to taking my cantankerous R2400 to the e-waste, but I’ve re-purposed it as a GO-only printer, with flush in the other 7 channels.

What would worry me about re-purposing a 9900 is what if, after buying the inks and carts and paying for the curve remapping, more channels went and could not be recovered? Does this happen?

Yes, it’s a very good idea to get the extended warranty when buying a x900 or x890 printer model, as you may very well need to get the head (and/or other parts) replaced.

If you will be away for a while, it’s best to flush ink from the printer and leave it set with PiezoFlush in the lines for safe long-term storage. PiezoFlush does not effect your printer warranty, it helps keep your printer clean and working well.

With these model printers not being very stable, yes, it’s possible other channels will go after setting it up for a custom Piezography machine, and having curves re-mapped, but that’s a chance people take when considering throwing away the whole printer because of a dead channel or two, or repurposing it. We have many people happily printing with custom Piezography setups on their repurposed x900 or x890 printers.

Warmly~ Dana

Hi Dana,

Just how many cleaning cycles do I need to run until I print pigment instead of leftover PiezoFlush? Did I have to run an Init Fill with the ink cartridges, too? The instructions seemed to imply that I should just power up and the printer would automatically perform an Initial Charge on startup in normal mode—but perhaps I misunderstood: http://shopping.netsuite.com/s.nl/c.362672/it.A/id.7536/.f?sc=18&category=31348. Let me quote the relevant part:

“5. After 48 hours, power on the printer and the Initial Ink Charge is initiated a second time. This is the when the most effective treatment from PiezoFlush occurs. The PiezoFlush is pulled through the ink lines, ink damper and the print head with force from suction for eight minutes. Any softened pigment is brought back into suspension and passes out the print head.”

It doesn’t say to power up in Maintenance Mode and it doesn’t say “You should run the Initial Ink Charge again.” It says “the Initial Ink Charge is initiated a second time,” as if it just happened all on its own. I don’t think that instruction is very clear. If you mean that the operator needs to go into Maintenance Mode and run the Initial Ink Charge again, it would be better to state that directly.

I would guess that I also need to go into Maintenance Mode and run an Initial Ink Charge when I put the ink cartridges back in, but that isn’t stated at all.

I don’t mean to sound overly critical, but the instructions could be a lot clearer and more complete.

Please inform. Do I need to use Maintenance Mode and manually do another Initial Fill?

thanks,

– Paul

Hi Paul~

I see what you’re talking about on the product page, and will update the instructions so they match, to avoid future confusion.

On the Instruction tab of the PiezoFlush product pages, it directs you to this page explaining how to flush a printer, and reinstall inks after flushing: http://www.inkjetmall.com/tech/content.php?140-Flushing-Epson-Pro-and-desktop-model-printers-for-safe-long-term-storage-or-when-switching-inks
This flushing page has a link to direct you to Initial Fill Cycles for different Pro model printers, here: http://www.inkjetmall.com/tech/content.php?151-Initial-Fill-Procedures-for-Epson-Pro-Model-Printers

I hope this helps clarify the flushing process.
Please let me know if you have further questions, or there’s anything else I can help you with.

Best regards~ Dana

Hi Dana,

Okay, that makes things clearer. It’s a classical web site problem of having variations on instructions in many places—I’ve had to deal with it myself. The ideal is to have a one-stop instructions, but given the way web sites just grow, it isn’t easy to maintain that ideal.

I did reinstall my ink cartridges, but without an Initial Charge. I didn’t do a second initial charge with PiezoFlush either: after three cartridges leaked, I didn’t want to use them again, and anyhow, only Cyan was a problem.

I could an Initial Charge with the inks now, either with ink in the misbehaving Cyan position or with PiezoFlush. Since all the other heads were printing fine, and look clear now, I suppose that using the PiezoFlush on an initial fill just at the Cyan position might make sense, to provide the thorough cleaning that wasn’t done before. It’s still misbehaving, so the first cycle of PiezoFlush didn’t clear the problem.

I’ve also received your package with seals and syringe tips, thanks. I’m waiting on another gallon of PiezoFlush, which should arrive early next week. So I could also just fix the problem cartridges and run the whole PiezoFlush cycle again next week. Not sure what makes the most sense. Probably will go ahead with PiezoFlush at the Cyan position only.

thanks again,

– Paul

Hm. I could also continue flushing the Cyan position with Quadtone RIP, I suppose, once I’ve done the Initial Charge with the ink cartridges and PiezoFlush in the Cyan position, if it still doesn’t print. You pointed me to this previously: http://www.inkjetmall.com/tech/content.php?144-Print-Ink-Separation-Image-thru-QTR-Calibration-Mode.

That page doesn’t actually have explicit instructions on how to flush an individual channel, though it says “[QTR’s Calibration Mode] is also a great way to flush an individual channel without wasting ink in all the other positions as well.” Does that just mean one should repeatedly print a Calibration image for one channel, or is there more to it? The QTR manual also doesn’t say anything about flushing an individual channel.

cheers,

– Paul

Hi Paul~

We’re currently working on updating instructions and re-organizing website layout, etc… for clarity and to make information easier to find.

You can follow instructions on this page to flush just your cyan channel with PiezoFlush, since your other channels are all already flushed: http://www.inkjetmall.com/tech/content.php?166-Flush-individual-channel-using-QTR-Calibration-Mode

Please let me know if there’s anything else I can help you with.
Warmly~ Dana :slight_smile:

Thanks, Dana. It seems as though I’ll get better cleaning of the Cyan if I run an Initial Charge with all the cartridges filled with PiezoFlush (cheaper than ink, anyhow). Since I never did the second Initial Charge, I think I’ll just wait for the bottle I ordered to arrive, put new seals on the damaged cartridges, and have a go.

I’ve been reading Don Norman’s book The Design of Everyday Things, a classic text on designing architecture, tools, electronic devices, and software with human cognitive abilities in mind. It’s not particularly about web design, but it says so much about how to design for human beings that it has made me rethink some of the interface design work I used to do. I think you’d enjoy it—but perhaps you are already familiar with it.

Ok, let me know how things go with flushing after you’ve received the PiezoFlush.

Interesting, thanks for the recommendation!

Keep me posted, thanks~ Dana