Hey All-
Weird problem. Heads were clogged. Replaced cap pump assy with wiper. Better but not great. Replaced dampers. Better but not great again. Replaced the ink with PiezoFlush and let set for 2 days. Nozzle check, CL1 cleaning, no improvement. Let set 3 more days. Nozzle check, CL1 cleaning, no improvement. It’s not getting better. Don’t want to replace the PiezoFlush until it looks great
What do you think the problem is?
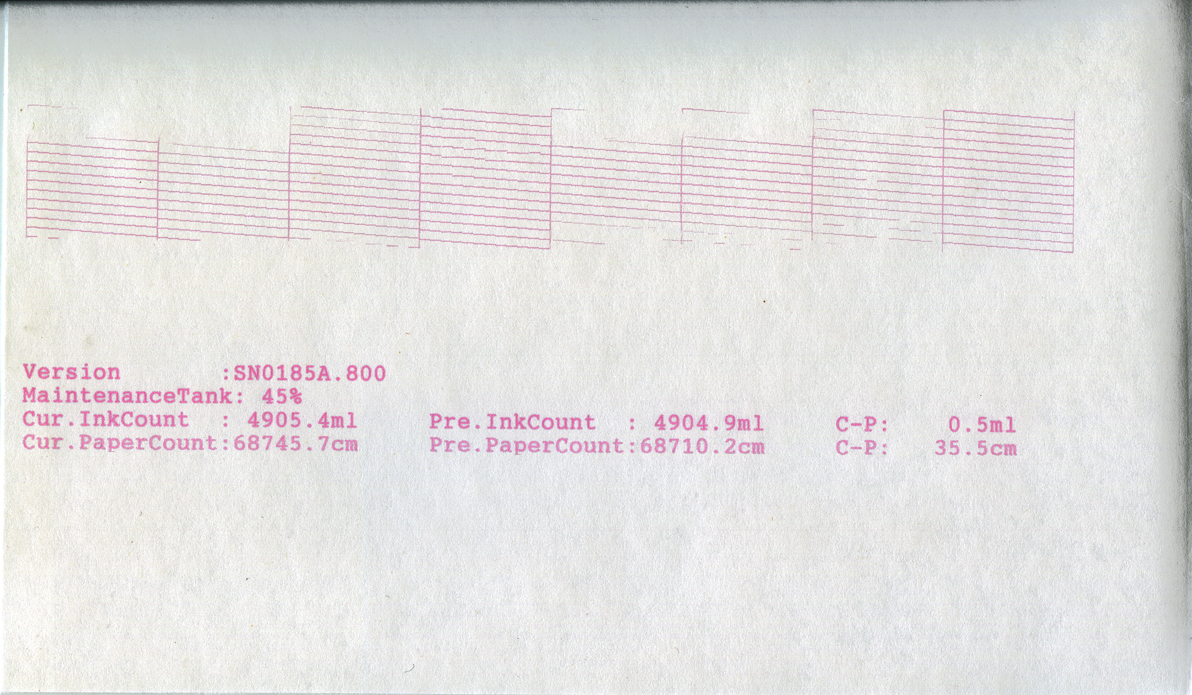
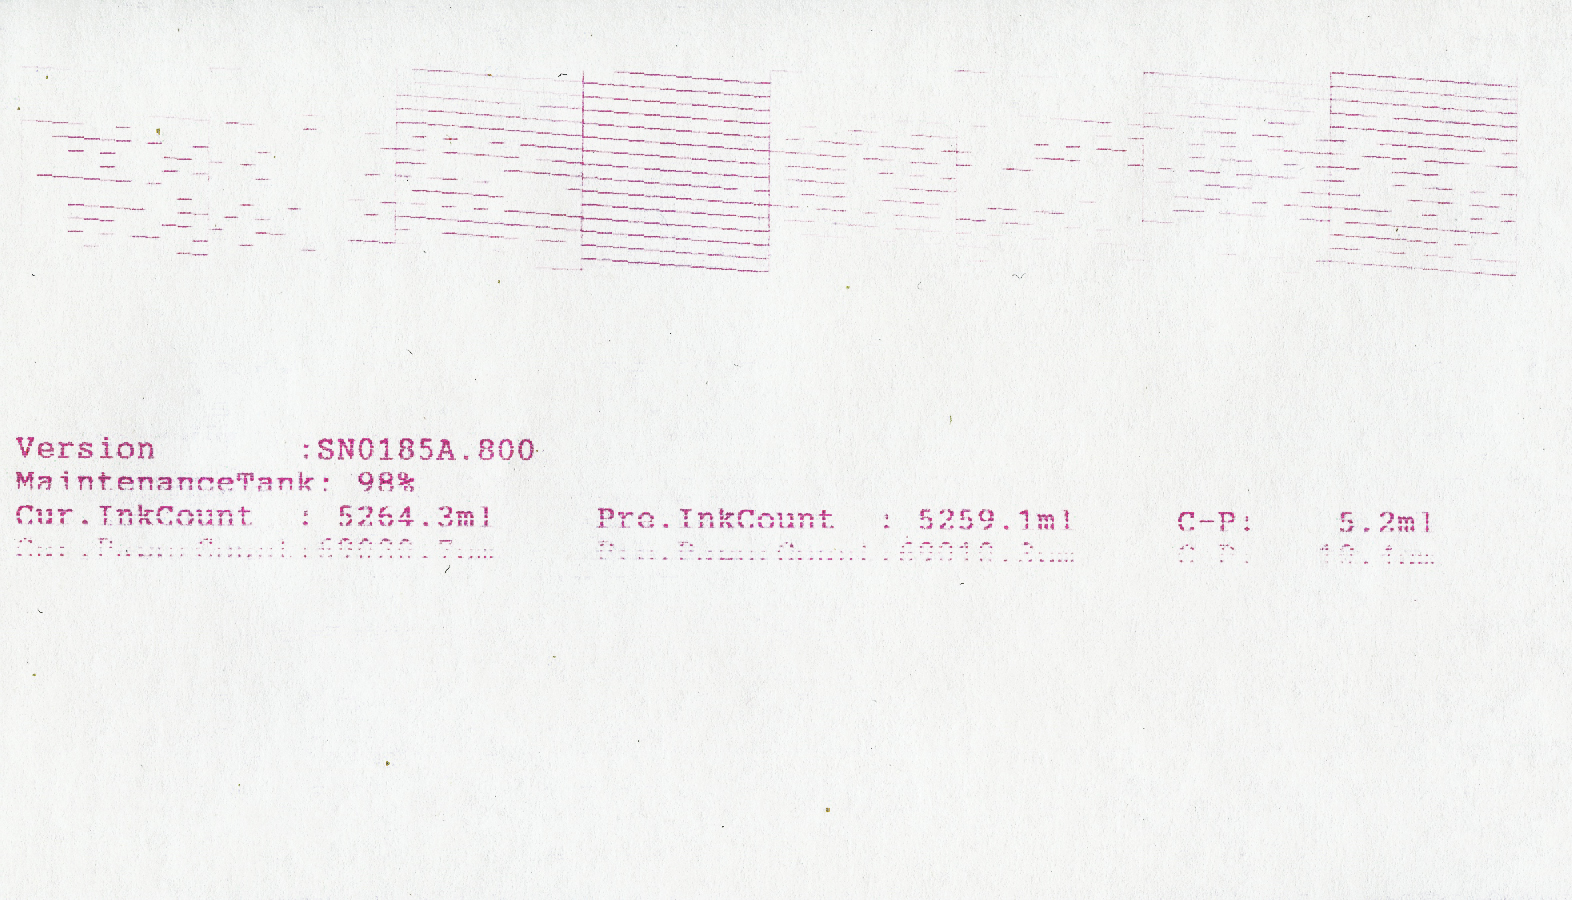
Here’s the autocheck pattern…even worse!
One last bit of info: It was printing perfectly until I ran a power clean. Should know better than to listen to a nagging printer
Please share the longer history of nozzle checks if you could. Before and
after damper replacement if possible.
The difference in nozzles between dampers and after dampers is key. I think
it’s your damper tightness or alignment.
Best,
Walker
Would it be worth trying the folded paper towel under the head soaked in Piezoflush. That worked on my horrible Canon Pixma-Pro 1 after I managed to avoid using it for a year and over half the nozzles had blocked. I am sure Dana has posted a video showing how to do this. It also worked on my 3880 in France when it was leaving black smears on thick paper, even after cleaning all the ink flushing area and wiper, plus fitting a new service cartridge.
Walker-
Thank you! This is after the cap pump and before the damper replacement.
Do you mean the tightness of the nylon connecting screws to the dampers or the tightness of how the dampers fit into the manifold?
Thanks again!
Kevin
Wilson-
Thanks! I’ve done that about 20 times. Tried PiezoFlush then Original Windex then Simple Green.
Kevin
BTW, the #1 damper (LLK) is fairly loose in the holder but not sure how to tighten. Nothing about it in the service manual
When you say it was working perfectly until you ran a power clean, do you mean you were getting a perfect nozzle check until a power clean and then it went wonky like this?
You may have diss-lodged excess crud that had collected in the dampers and these could have hit the manifold and print-head.
Dampers are basically oil filters for your print-head. But they can break. Usually the result is a leaking damper or a damper that does not let ink through at all (the valve is blown inside the damper), but occasionally the filters can go. I would think it would only happen on one damper though.
If this printer was sitting for a while and a maint-cleaning was requested (it does that sometimes on this printer) it really could actually be clogged nozzles still. The first nozzle check was pretty bad for any ink on this head. If so, this leads me to believe that nozzles are still clogged and you need to run a CL3 cleaning from Maint-Mode.
best,
Walker
Walker-
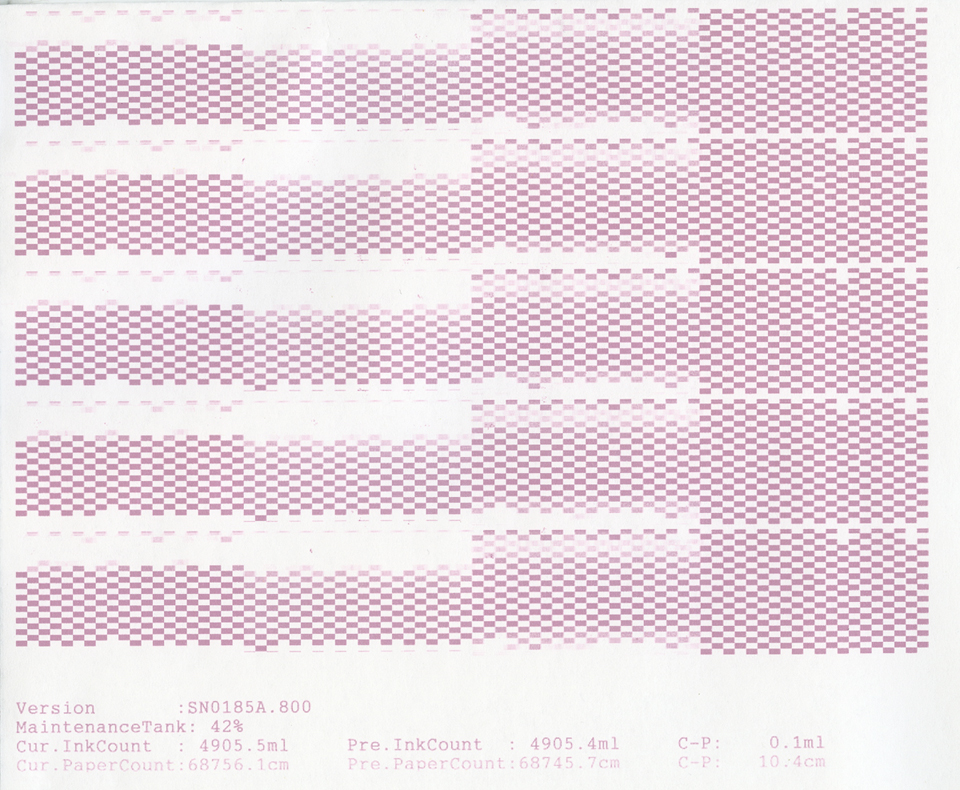
Thank you! Oddly enough, it made it worse. I tried several CL3 cleanings, head (wiper) cleanings through the utility and manual cleanings with folded paper towel strips soaked with PiezoFlush. It’s not progressing beyond this now
Kevin
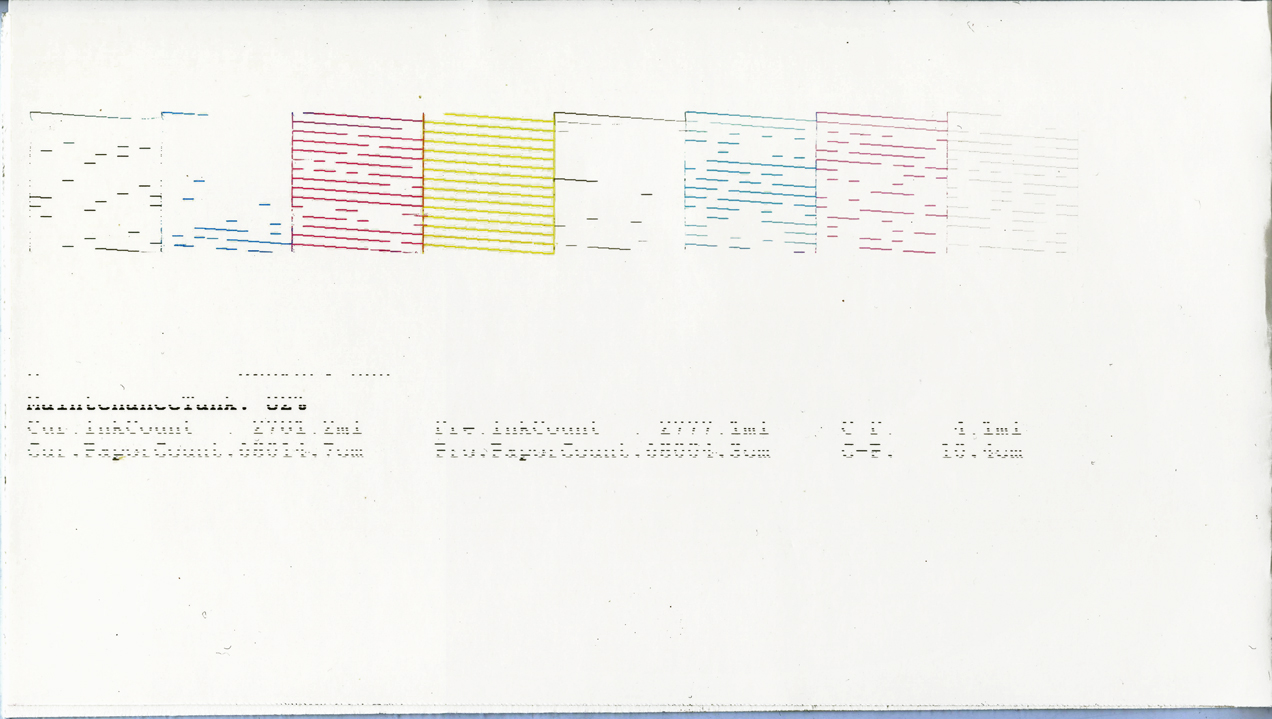
Oh and yes, perfect nozzle checks before the power cleaning.
Another really weird thing is that the cleaning with the PiezoFlush drenched folded paper towel, always results in black ink coming from the bottom of the head. No matter how many cleanings, it’s always there.
I’m wondering if the head is cooked.
If there is black ink coming from the head (after this many cleanings with flush in all the lines), it is NOT the head electionics , but either the dampers or head manifold. Something is not getting cleaned by the flush because the flush just can’t get to it because there is a block (above the head).
I assume your flush level has gone down a bit in the carts meaning the cleaning assembly (vacuum) is working. It should, because it’s new.
Because you’ve tried it all, you have one more thing to check/test:
What we do periodically with this style head is pull it out, cover the top element (it has coper wires exposed) and manually flush with a small format flush kit over a cup or bowl. Sometimes we’ll actually suck up in the opposite direction (from the head plate up through the manifold) in case anything is stuck in the manifold. Then we’ll flush and make sure everything is out. Then we’ll let it sit over the flush for a night. When manually purging these print-heads it’s important to do it with as gentle a pressure as possible (not too hard!). You will most likely see black ink come out (and some colors). This is a purged channel.
Make sure you never get any liquid on the copper contacts where the ribbon cable goes in. Check for corrosion on the cable and head contacts, etc.
Put it all back together, make sure the dampers are aligned and that they aren’t screwed in too tight.
Then do a few cleanings. Make sure you don’t have back pressure. Doing the cleanings with the right cover off can help because you can also check that the cleaning vacuum pad is making connection with the head (no air gab) and that ink is going from the vacuum to the waste tank properly.
best,
Walker
If you have an extra damper, you may want to take one of your existing (new dampers) out of the printer and inspect it. Cut out the screen and see what is behind it.
–Walker
Thank you for the very insightful and detailed reply. I removed the head this morning and what a mess! Do you think this is the problem? Not sure how to clean it up, especially the contacts.
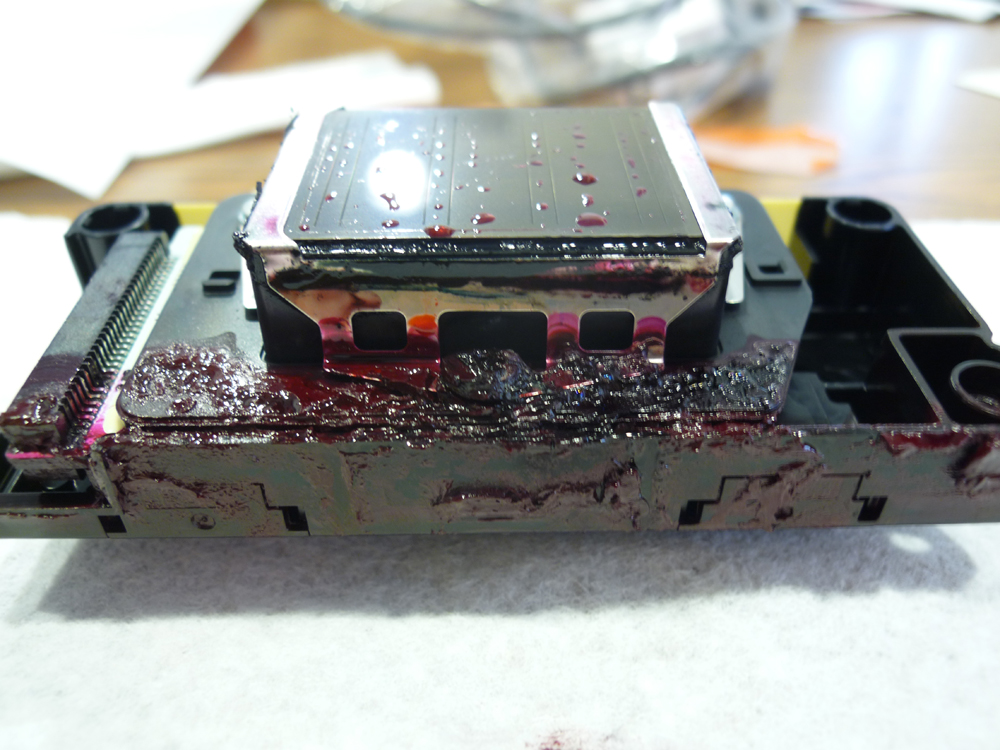
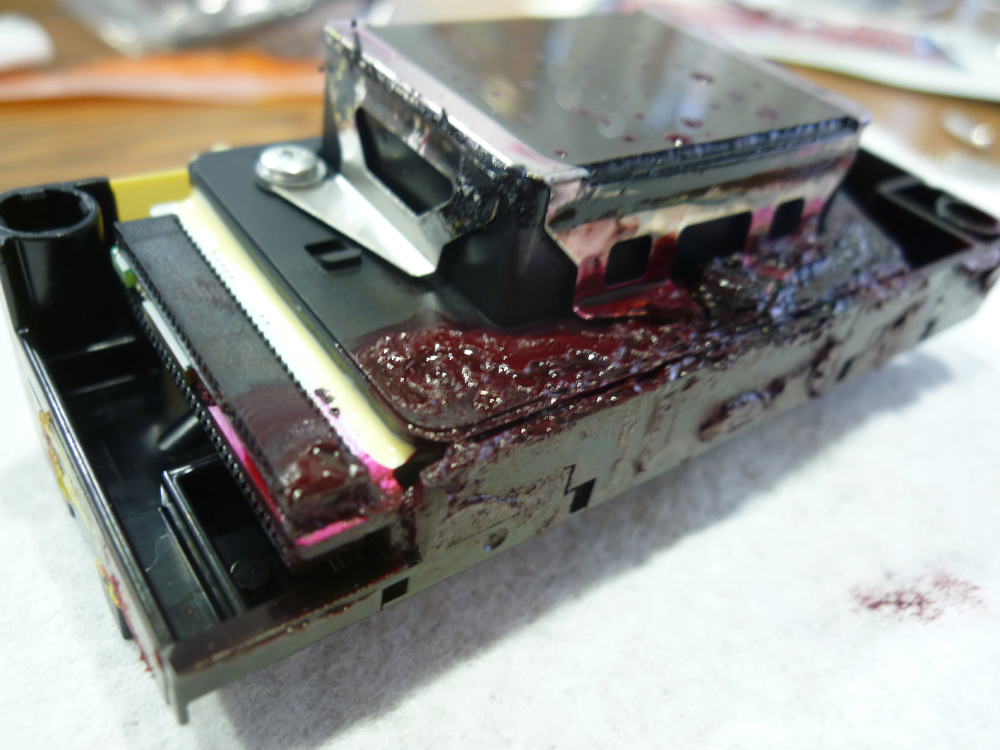
Wow. That is a disaster zone. That first power cleaning must have burst a damper and it leaked.
You need to clean everything but the critical part is the left area where the ribbon cable goes. check for corrosion and check your ribbon cable. Most likely that would need to be replaced.
Not sure if this can come back. The nozzles are probably ok, but the circuitry above them may be damaged beyond repair.
-Walker
but the silver lining is if you replace the head, your basically have a new printer at this point, so there’s that. And these printers last 8+ years generally.
-Walker
Ordered a new ribbon cable. Tried to clean but it fell apart. Unfortunately Epson doesn’t make it anymore and no suppliers in the US so have to wait for it to ship from Asia. 
I got some circuit board cleaner for the print head contacts but it doesn’t seems to dissolve the dry ink very well. A new print head is cheaper than a new printer but still pricey. While waiting for the new ribbon, I’ll clean as best as I can and see.
I really appreciate all your efforts. What a mess.
At least you didn’t get the dreaded “thermistor” error which is a temp sensor on the head that detects shorts in the ribbon cable and head circuitry. This also indicated fried head board.
It will be a few weeks, but then you should be all set.
best
Walker
Decided the head was too far gone so ordered a new one
It’s a wonder that it worked at all
Thanks again for all your help!
I’ll let you know when it’s back together