3800 LC channel completely missing

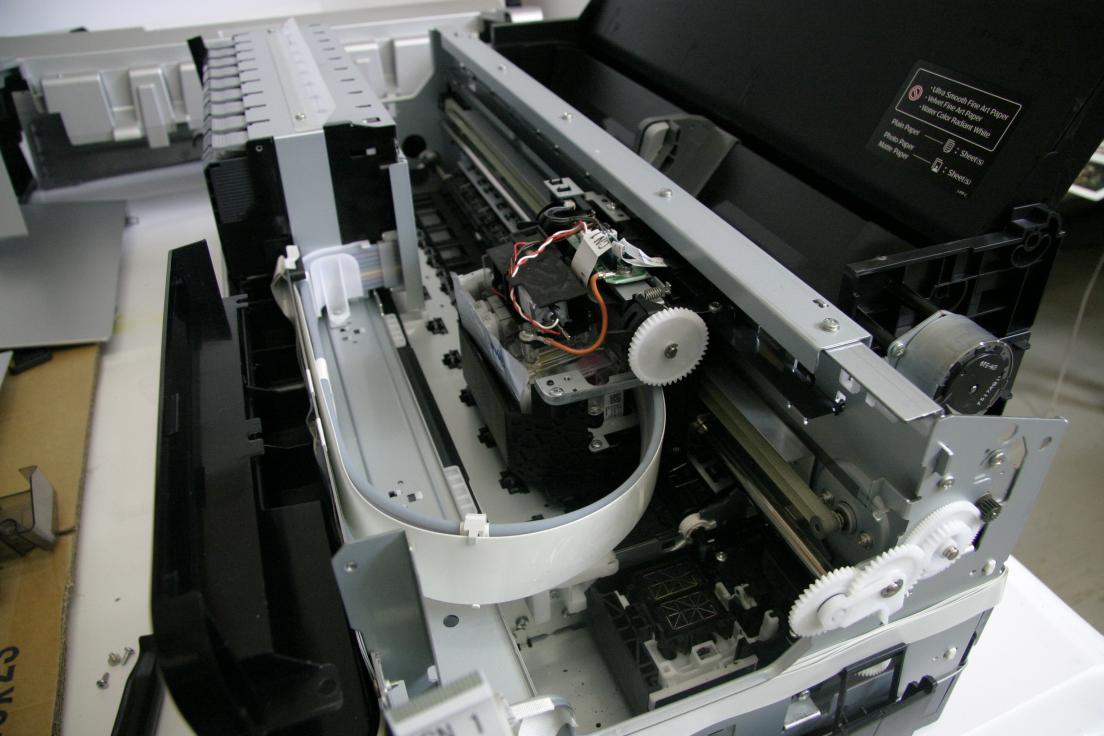
This is really a continuation of my previous thread which is now closed. After changing from the old style refillable cartridges to the new style, everything is working again except for the LC channel which is still completely blocked. Prior to installing the new style cartridges, I found that the valves on my old style cartridges had failed and no ink at all was entering the supply lines on 4 of the 8 channels - LK, LLK, LC, and Y. Now all channels are working well except for LC. I have disassembled the machine and was able to determine that ink is getting at least as far as the damper. I have removed the head and soaked it in a very shallow dish of piezoflush. All of the nipples that connect to the dampers were moist including the LC. After reassembly, nothing has changed. The other channels all work perfectly, but there is still no sign of LC. In addition to the regular nozzle test, I have tried printing images to see if the LC appears at all, no luck. And finally, I have printed the QTR ink separation image in calibration mode as instructed here. I printed the full image and also tried flushing the LC channel. No joy. LC is absent on both. I did print a flush page of LM just to verify that the procedure worked and it did.

Any suggestions on what to do next?

Thanks,
Keith

Hi Keith~

I am sorry to hear you’re having difficulty getting your LC channel to print after switching to the new style refill carts for your 3800 printer. After reviewing your order history, I see you purchased ConeColor bottled ink in April 2010- is this the same ink previously used in your old style carts, that you are now using in your new carts? After re-reading your other thread, I have a few questions to get a better understanding of your situation in order to help me resolve your issue and get you back to happily printing.

In your other thread, you said you reinstalled the set of Epson carts to do some printing and stored the set of refillable carts out of the printer for about two years. When you were ready to reinstall the ConeColor carts, you discovered a few of them had dried over time and were not providing good ink flow, so I recommended moving forward by getting a new set of refill carts, which is the point where we are at now.
When was this printer last printing well (all channels fully printing) with the Epson carts installed?
Please remove the new LC refill cartridge, along with one or two carts that are printing well/fully on the nozzle check pattern: are the two exit chambers of the LC cart equally filled with ink (should be at least 1/2 filled)? Did the LC cartridge prime with ink as easily as other carts, or did you notice resistance with this cart compared to others? Is any ink where it shouldn’t be, such as under the plastic side, or anywhere that could indicate a small leak in the cartridge? Do you still have the Epson LC cart to test your printer’s function?

Please let me know so I can help.
Best regards~ Dana :slight_smile:

Hi Dana,

The ink that I am using now is not from the original purchase. I have a pretty good stock of ConeColor inks from a trade with a friend last year. I recently purchased a Canon iPF6400 which will now be my main printer for color work. I am trying to get the 3800 with ConeColors in shape to trade to another friend. Maybe that is not going to work out, but I’d like to keep trying.

The Epson carts were working perfectly up until the date of the first post in my other thread 3/11/13. That was when I attempted to reinstall the old refillables with ConeColors. After that failed, I replaced the old refillable carts with new ones as per your suggestion. Since the ConeColors are compatible with the OEM inks, I decided to use up my remaining Epson inks while switching to ConeColors as they ran out. At that point, the maintenance tank reached full, so I ordered another one but it never arrived. I was busy with other things and most of April and finally got the maintenance tank a just a week ago. One power clean cycle restored all the channels except for LC which was still OEM at that point. Since it was near empty, I switched it for the new ConeColor LC and ran another power clean. Still no LC. Then I did what I described above and tried again but nothing had changed. Still no LC. All other channels produce perfect nozzle checks.

The round exit chamber of the LC cartridge is full (same as the others) and the rectangular one to the lower left of the round one is about half full or maybe a bit more (also same as the others). I don’t recall any difference in priming, but that was several weeks ago so I’m not absolutely sure. I don’t see any sign of a leak. I do still have an Epson LC cart but I’m pretty sure it’s empty.

As I mentioned above, I disassembled the machine and was able to verify that ink is getting to the dampers in all channels and that the supply lines are full including LC. I had cleaned all the lines previously with piezoflush. I don’t think it is a problem with the cart.

Thanks for your help,
Keith

Thanks for the additional information Keith, this is all very helpful.

From what you explain, all positions were printing perfectly with the OEM carts, but the LC and three other positions dropped out after installing the old set of refill carts. I am unclear about the next part, so please clarify- from the point around 3/11 when you first reinstalled the old refill carts and four positions stopped printing, you said you switched to the new refill carts, but decided to use the remaining Epson ink. To my knowledge, the last nozzle check showed four missing positions at this point. What Epson carts and refill carts did you install after the old set of refill carts?
It sounds like you weren’t able to do much then because the maintenance tank was full and it took several weeks to arrive. I assume the printer sat during the time you were waiting for the new maintenance tank, and the last nozzle check or cleaning cycle you had done was with the old refill carts, and four positions weren’t printing (is this a correct assumption?) After the new maintenance tank arrived and you were able to do a power clean cycle- all positions printed correctly expect nothing from the LC channel. At that point you disassembled the printer to check the ink lines and soaked the print head or did you do additional cleanings to try getting the LC printing- such as manual cleaning of the capping station or bottom of the print head, regular or power cleaning cycles?
Was it before or after (or both) the printer disassembly that you printed the ink separation and LC flush image thru QTR’s calibration mode to try getting it to print?
At any point after installing the Epson or new refillable LC cart have any nozzles printed on the nozzle check, or has the LC position been completely blank the entire time?

Please let me know so I can better understand what you have done in order to help me resolve your issue and get you happily printing again.
Best regards~ Dana :slight_smile:

Hi Dana,

The LC has been entirely blank ever since I reinstalled the old refillables. Since the new refillables do not have to be installed all at once, unlike the old ones, after receiving them I reinstalled the Epson carts that still had some ink left and replaced those with the new refillables as necessary starting with LK and M. All of the channels except for LC produced perfect nozzle checks almost immediately after the first power clean. After another power clean I had to replace the Epson Y with the refillable Y. Still no LC. At this point maintenance tank was full. After finally receiving new maintenance tank and running another power clean, still no LC. At this point it asked for a new LC so I installed the refillable. Another power clean and still nothing showing at all in the LC channel. This is when I disassembled, made sure the lines were not blocked, soaked the head, reassembled, did another power clean to recharge the lines, and found nothing had changed on the nozzle check. LC was completely missing, while all other channels are perfect.

Currently installed cartridges are OEM MK, PK, LLK, and M; new refillable ConeColor LK, C, LC, LM, and Y.

I hope this helps to clarify.

Thanks,
Keith

Excellent, I am clear of what you have done and the order everything was done now- thank you :slight_smile:

You did two power clean cycles after reinstalling the Epson LC cart (which was working perfectly prior to installing the old set of refill carts), but still got no ink printing from the LC channel, then continued having no LC ink print after installing the new LC refill cart and doing a third power clean cycle. Considering all the facts, it sounds to me like you are dealing with a clog somewhere in the LC channel. Since you have tried two different LC carts with the same results, I suspect you may have a blockage in the ink line or the damper screen is blocked. It seems to be related to the instillation of the old refill carts, and at first I thought the old cart was clogged so no ink was flowing out, causing the ink line to draw in air, but 1. you checked the ink lines and confirmed the LC is filled with ink, and 2. you have done three power clean cycles with the other carts, which is enough to move ink from the carts to the print head, so if it were air you should have pure ink flowing thru the internal ink system now… I wonder if dried ink gunk from the old cart entered the ink line and either blocked the line or clogged the damper screen (?) When you had the printer apart, did you try to draw ink thru the LC (or any other position) damper to check ink flow thru the line and damper? If you already went ahead and dismantled your printer, then it sounds like you are technical like me- in which case you would be able to do thinks like manually flush the ink line, change the damper and/or flush the print head if I gave you clear instructions for doing these things- what do you think? I have two other questions just for my records (I am nit-picky about details, relevant or not)- 1. did the old carts still contain old ink, or did you empty and refill them with fresh ink? and 2. do you have the lot#'s and bottle sizes of the old and/or current ConeColor inks you’re using?

Please let me know, thanks- Dana :slight_smile:

Lot # is NIC090416. I still have 3 or 4 4oz bottles of each color. The old carts were cleaned thoroughly before storage and filled with fresh ink when I attempted to reinstall them.

When I had the printer apart I was able to flush all of the lines with piezo flush. I did not try to force ink or piezoflush thru the dampers or the head. My understanding is that doing so can damage delicate internal workings of the head. The dampers on this machine look to be a block rather than individual units. I will look into this further. Assuming that the problem is not inside the printhead, the damper seems the most likely place to look next.

Thanks for your continuing help.

~ Keith

Any further thoughts on this, Dana? Any experience changing individual dampers or must the whole ink system assembly be replaced?

Thanks,
Keith

Hi Keith~

Sorry for the delayed response, I was stranded without my laptop for about a week after it suddenly crashed, but luckily got it fixed and am back to my normal schedule.

It is ok to gently/slowly draw ink from the exit hole of the damper to pull ink thru the line and damper to check flow/restriction, though applying too much pressure to push fluid thru the line/damper could cause damage to the damper membrane. I always prime a new damper with ink by gently drawing ink thru the line to fill the damper with ink before reconnecting it to the print head.
I haven’t personally needed to replace any dampers in our 3800 or 3880 printers yet (they’ve been working great since day one!), though have looked into it and discovered the repair manual instructs to replace the entire ink system, consisting of the cartridge bay, ink lines and damper assembly all as one unit. We do, however, have individual dampers for the 38XX printers that we purchased from the same company we get other model dampers from… Based on my experience dismantling our 3800 a few years ago (I was curious about the new technology), I’m not quite sure if the dampers can be removed/replaced in the assembly unit, or if they’re somehow fused together (I would have to take it apart again to check this).
Below are two photos I took while dismantling and investigating our 3800 years ago, so you can better see the ink system and damper assembly.

Based on the details you provided, I suspect you are experiencing flow restriction after installing the old refill cart that wasn’t allowing ink to flow, and that either coincidentally caused blockage of the LC damper and/or thin labyrinth that connects the ink lines to the dampers (thin metal sheet attached to the front side of the damper assembly), or something to do with air or particles in the line is preventing flow thru that channel…

Our 3800 and 3880 have been working well since day one, so I haven’t had the need to replace parts or do any major cleaning procedures, but have received feedback from other 3800/3880 users who were fighting with stubborn clogs (many with Epson inks who contact us for help cleaning their printers). Several of these people reported they have successfully un-blocked stubborn clogged channels by either forcing PiezoFlush or warm distilled water thru the ink line and damper from the cartridge end, drawing fluid thru the line from the damper end, and/or disconnecting dampers from the print head, then using our print head cleaning kit to flush the micro-channels of the head (we don’t suggest people dismantle their printers or force fluid thru the lines, but they did it on their own, had success, and happily told us what they did to fix their own printers).

Since we last communicated, have you done anything further with the printer in attempt to get the LC printing again? If so, what have you done?

Please let me know so I can try to help get your LC printing well again, thanks- Dana :slight_smile:


Update: I finally got back to this. I had to replace the Ink System Assembly (~ $180 from Compass Micro). The only glitch was that I did not know that after installing the new part I was going to have to use the adjustment program (PC only) to reset its counter before recharging the system. When I first turned the printer on after installing the part but without doing the reset, a power clean filled all but the PK line. Then an attempt to execute a black ink change brought up an error message which alerted me to the need to reset the counter. I had to buy the adjustment program (~ $15 from 2manuals.com) and fortunately I was able to run it on my MBP using a virtual Windoze XP machine. Since I had already attempted to recharge the system, I had to open the printer up again to unplug the electrical connections to the new part and then plug them back in again. This time the counter reset worked. This old 3800 is now fully functional again and running ConeColors.

Thanks for the update, and helpful info about needing to use the Adjustment Program before charging the system after replacing the ink system assembly. I am happy to hear you successfully fixed your own printer, and it’s working well again (doesn’t that feel like quite an accomplishment!?)

Best regards and happy printing~ Dana :slight_smile:

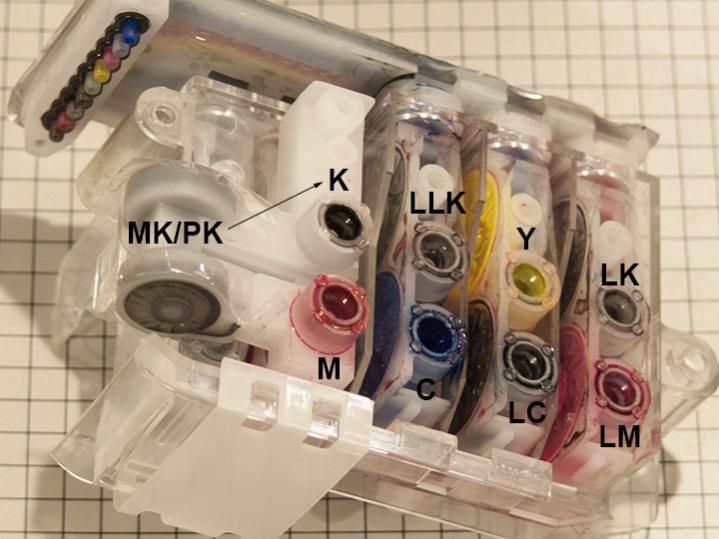
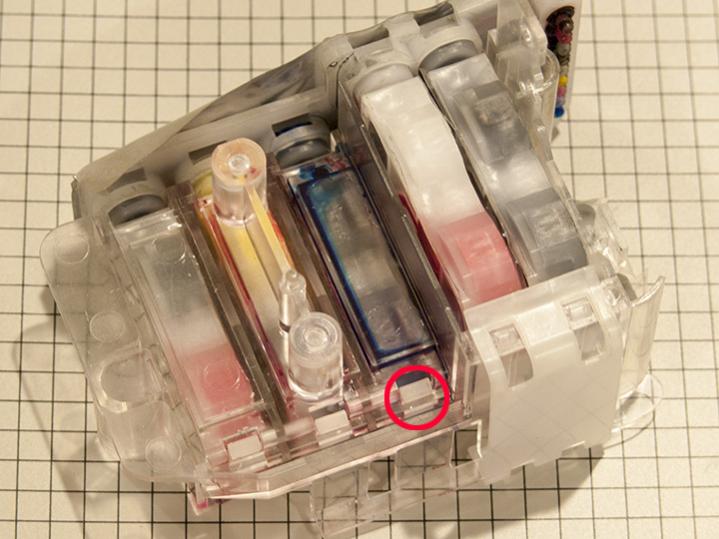
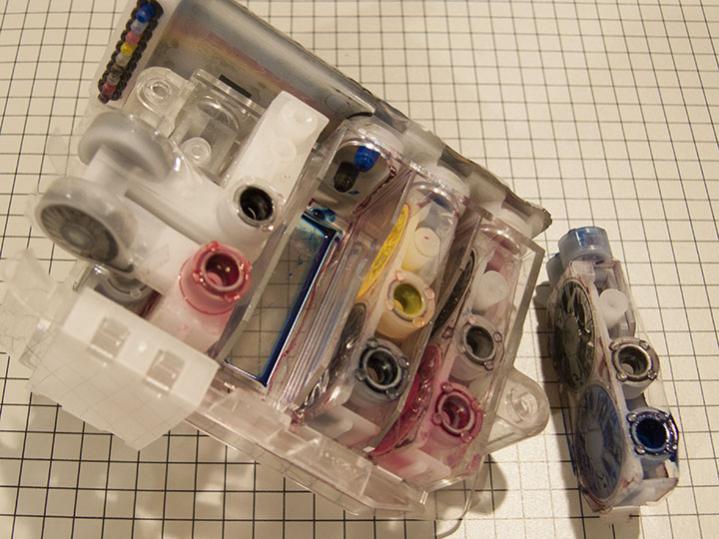
For the benefit of others who may have a similar problem that might be solved by replacing a single damper rather than the entire ink supply assembly, after I replaced the whole thing I dissected the damper block on the old one just to see if it would have been possible to replace an individual damper. The Service Manual only has instructions for replacing the whole assembly and says nothing at all regarding individual dampers. However, individual (actually each damper has 2 channels) dampers can be easily removed/replaced from the block once it has been separated from the head. Here are a few pictures that may help illustrate:


Figure 1 shows the position of each ink channel.


Figure 2 shows the release tabs. One is circled in red.


Figure 3 shows one damper removed from the block. Removing the LLK/C, Y/LC, and LK/LM dampers is simple. The K/M damper is only slightly more complicated in that you must first remove the MK/PK switching gizmo.

I hope this will be useful to someone.

Fantastic- thanks for sharing this information, and am sure MANY will benefit from this! :slight_smile:

I just posted this on another, similar thread, and wanted to share here as well: I am excited to see more users share their experiences and helpful information and photos they learn, as this is exactly what we hoped for when we started this support forum, and although we are always here to support our products and help customers, the support community that is forming here is incredible and benefits MANY. Thanks to all for your contributions! :slight_smile:

All the best~ Dana

I have now gone through the process of replacing just the dampers. Here are my thoughts and suggestions:

  • represents optional steps.
    0- Follow the service manual to remove the printer’s upper housings and the print head housing. (Be careful with the side panels; unhook the lever behind the decoration plate, slide the “back” side out first, making note of the tiny plastic tabs on top, then lift up to remove. If you lift first, you’ll break those tabs.)
    1- After getting the damper assy off the print head, make note of where the ink switcher is. Then spin the motor’s shaft so that the switcher moves to a neutral position. You can then unscrew the black plastic motor holder from the clear damper holder and remove it.
    2*- If you had stubborn clogs, you may want to inject PF into the head at this point and let it sit. You can also sit the head on PF-soaked towels, following IJM’s printer maintenance instructions.
    3- Empty an ink tank, leaving about 1cm of ink at the bottom. Insert it back in the printer with the fill hole plug REMOVED.
    4- The ink tubes are held to the “back” of the damper holder with a simple plastic clip. Remove this.
    5- Unscrew the 2 screws holding the tubes to the damper holder and pull it off. Hold the tubes vertically upwards, above the ink tanks. You should notice the ink drains out slightly. This prevents cross-contamination and messes.
    6- Over copious table coverings, use a flat-head screwdriver to pry the foil-covered ink maze from the dampers.
    7*- To verify that ink flow is unrestricted, push Piezoflush through the ink maze. A regular syringe with no needle fits very nicely over the ink tube nipples.
    8- Remove the dampers from the clear housing and discard (or play with to figure out how they work…more on this below).
    9*- Use the head cleaning kit to push PF through the black ink changer. Make sure to manually swap the inks by pushing on either side of the changer.
    10- Put the new dampers in the clear housing, making sure they snap firmly into place.
    11- Snap the ink maze onto the dampers.
    12- Reattach the ink tubes to the ink maze.
    13- Fill a syringe with air and stick it into the empty ink tank’s fill hole, making sure it forms a tight seal. Push about 20cc of air into the cartridge. This mimics the carts being pressurized by the printer, which activates the dampers.
    14- Using another syringe, pull on the bottom of each damper until ink comes out. Discard the ink.
    15- Replace the dampers onto the print head.
    16*- Before buttoning the printer up, you can test it by reattaching the control panel’s ribbon cable. I like to screw the control panel onto its support post so that it doesn’t accidentally fall and damage the cable.
    17- Turn the power on, do a Power Clean and test. I had 100% nozzles after 1 Power and 1 Regular cleaning cycle.
    18- Pat yourself on the back for saving about 75% the cost of the whole ink assembly!

Note on the dampers: If you look at them, they have a round side (shown in the pictures above), and the other side has the actual filters. Mine had small particulate build-up on VM, K and C, although I was only having major trouble with VM.
The round side is a valve of some sort. For ink to flow, the valve needs to be pulled in by suction, or pushed in manually. Unfortunately, suction alone is not enough to get the valve to open. Pushing it in is fine when outside the assembly, but is impossible when it’s all together. In order to suck ink through the damper, the system must be pressurized on the ink lines side! This is why step 13 is necessary!

Hopefully this is helpful to someone!

1 Like