Make a copy of the original .iquad file first. Name it to differentiate it from the original.
Then open it in Notepad.
Swap the data.
QUIT Notepad, and click OK if it asks you to save changes. Do not Save As.
Your error indicates either the file was saved with some type of RTF or hidden formatting (which can happen by Save As), or you did not copy the data fully. If you miss a line - it won’t work. If you add a carriage return it won’t work. It has to be a clean swap of data.
Jon
[QUOTE=mpan66;9309]Hi Brian,
I wonder if you can help.
I’ve got the cartridges and chips swapped with fresh ink installed.
I edited the quad file in Notepad (I didn’t use the spreadsheet because copying values from the Excel sheet meant that the values pasted back into Notepad all had carriage returns). So I swapped the values for K and LLK in the .quad file and then copied that file into a new folder as you recommended.
In QTR I went to that new folder and loaded the edited profile and tried printing an image. The image comes out with blocked up blacks and the error below is shown.
Clearly there’s some sort of error, but unlike Jon I’ve not seen it before. Can you post the problematic edited .quad file? You may have to zip it. I think we have to see it to work out what’s gone wrong.
I’m a little surprised about the problems of pasting from a spreadsheet. It’s always worked for me.
P.s. I use a free program called Notepad++ for editing text and .quad files on Windows, rather than Notepad. The basic Notepad doesn’t always play nicely with formatting and carriage returns. Should have mentioned that.
Thanks Jon and Brian. Now I have a working quad file.
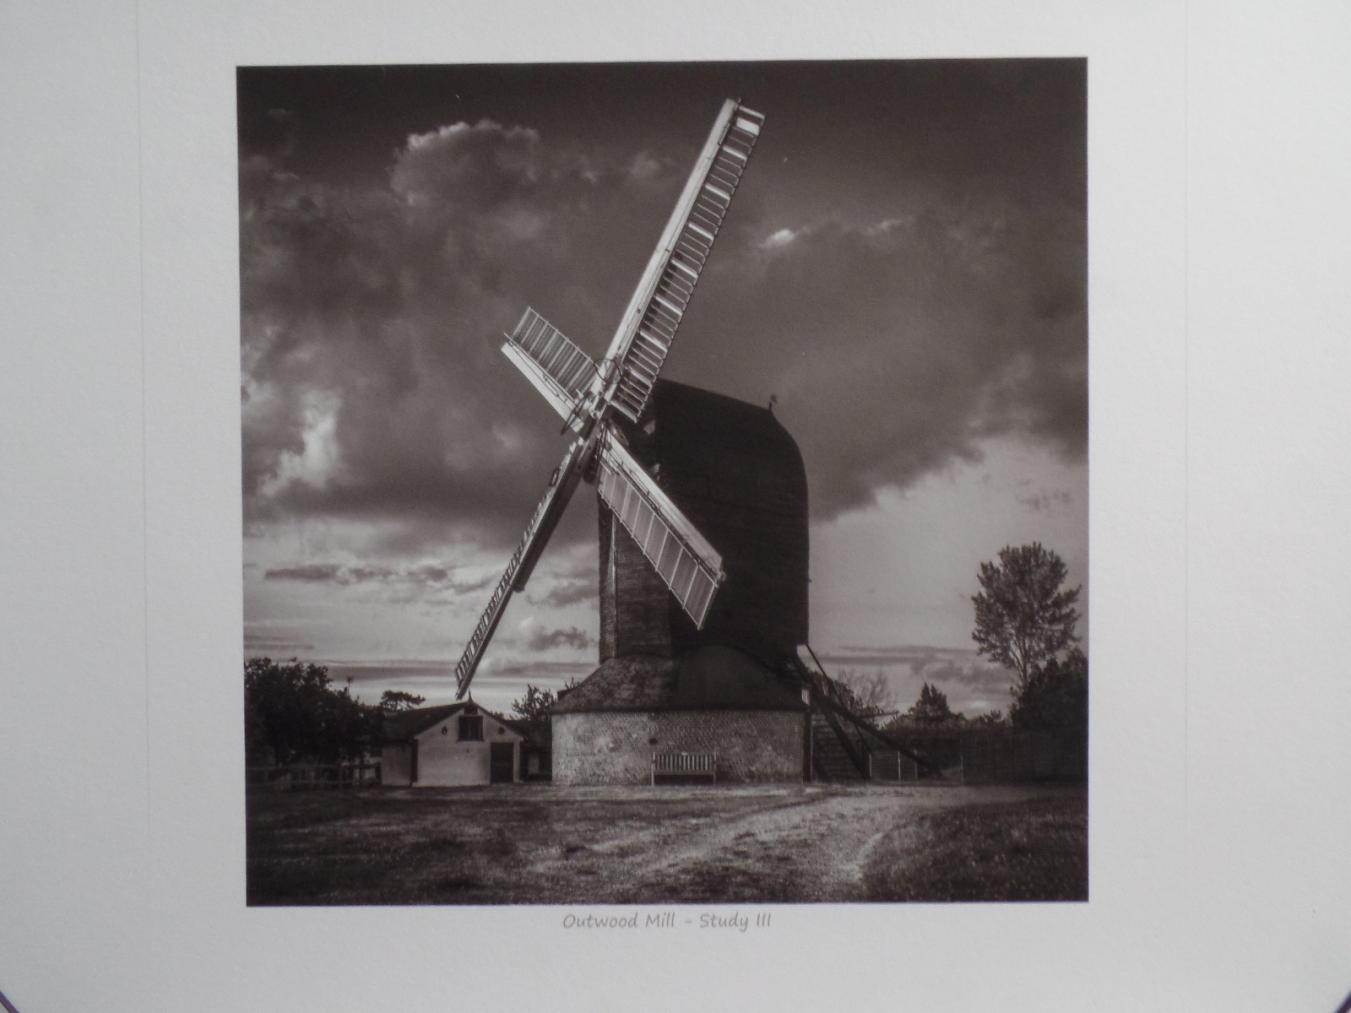
I’ve printed a couple of images and, whilst I’m getting some reasonable results now there is definitely a problem. I’m comparing two A4 prints; one printed today and one printed in August prior to the problem. The one printed in August is much better. It is brighter and has more detail in the shadows. The one I printed today almost looks like it’s been smudged or had too much Noise Reduction applied and the midtone areas seem duller.
I’ve attached two photos of the prints for you to compare.
Look at the clouds and the front of the small building to the left of the mill. That’s the easiest way to see the differences in brightness. The first image is the ‘correct’ one.
<img src="/uploads/default/original/1X/1d50728289df48d5290482b965f218da9520c801.jpg" width=“666” height=“499”>
I suspect some of the definition has gone (hard for you to see that in these images) because the midtones are darker and there’s not so much subtlety in the tonal transitions.
I tried printing an Ink Separation chart in Calibartion mode but only see 6 inks (no text was printed). I assume the black doesn’t print now that it’s in the LLK position - any way around that?
It’s OK, I figured out what was wrong. Working with the logic that the output was close to what I was expecting but not exactly, I wondered if there was some problem with the values in the quad file (I used the spreadsheet to create them).
I decided to take another copy of the quad file and this time I manually swapped the K and LLK curve values in Notepad++
I’m now getting exactly the same as I did back in August
Spoke too soon
I’m missing detail in the highlights. Looks exactly like it did when it went wrong recently. I think I need to print one copy of the flush images for each ink in calibration mode to check they all print OK.
All sorted now. Printing the flush images proved the yellow wasn’t printing at all. 3 or 4 head cleans sorted that out and also showed that black wasn’t printing properly either. I now have a properly printed Ink Separation chart and prints printing exactly as they should.
On an R3000, you’ve got to get the shade 1 ink in the LLK channel to flow all the way through the lines and dampers to the print head. It’s not clear what you did to make this happen. Printing lots of single channel purge patterns is tedious, but head cleans and power cleans are wasteful, esp of the other channels. They’re the only two options.
Re the copy and paste, I’m still a little puzzled what happened. Now that I’m home again, I took that spreadsheet I posted above, copied the entire green zone into a text file in regular Notepad, saved it, copied it into the Quad folder and started a print job with it. It worked here. So I am a little puzzled. Also by Jon’s comment in post #141 to use only Notepad when in post #134 he said that IJM uses spreadsheets.
This is an easy remap to do (unlike the x880 to R1900 remap) and so is not hard to do by hand in either Notepad or Notepad++. But if you’re remapping multiple curves for different papers then the spreadsheet provides a way to semi-automate it and guard against mistakes.
I used the LLK flush image to push the GO out and print solid black. I got solid black after only about half a dozen prints on A4. The head cleans were necessary because the yellow head was completely blocked and there must have been a problem with one of the black heads because the text wasn’t printing on the Ink Separation Chart. Anyway, the head cleans sorted it all out.
I’m not sure what happened with the file I generated using the spreadsheet. I created a new quad file with it and then ran a Compare in Notepad++ and they are identical. Pilot error I guess.
Now I’d like to create profiles for a couple of other matt papers I like. Any good resources for learning to do this?
[QUOTE=mpan66;9326]
Now I’d like to create profiles for a couple of other matte papers I like. Any good resources for learning to do this?[/QUOTE]
Are these papers for which there are already K7 QTR curves? Are you simply looking to repeat the exercise? If not, which papers? Do you have a measurement device, like an i1 Photo?
No, there are no curves available that I am aware of, e.g. Breathing Color Pura Smooth and Optica One papers and they have a new paper called Pura Bagasse. I’m also currently testing Canson Infinity Rag Photographique. I also have some Permajet papers but seem to be moving away from them these days. I have Canson Arches Aquarelle but there is already a curve for that so I’ve grabbed it and modified it in the same way.
I have an x-rite ColorMunki Photo. I use it for creating ICC profile and it seems to do a pretty decent job.
I should have remembered that you had a measurement device, as you posted those fairly wild linearisation plots at the outset. For a paper without an existing curve, you have four options:
(i) InkJetMall may have a suitable curve already that they can provide. If that’s the case then hopefully Dana will jump in and say so, or you could email and ask.
(ii) If not, then IJM create custom curves for $US99 each, but this means posting printed targets to Vermont and waiting.
(iii) You could try to use an existing curve for another similar paper and measure its linearity to see how close a match it is. You may need to try several.
(iv) Roy Harrington, the creator of QTR, has recently released a “droplet” that you can use to relinearise an exising .quad file (curve). A number of us have used this to take an existing curve and adapt it to another paper. I’ve written a blog post about this way of re-linearising a .quad file, which you may find useful.
p.s. Since you’re working with a non-standard placement of inks, you’ll need to remap any curves you use for any of these options as you did for EEM. Even the “master” curves used for option (ii). That probably goes without saying.
JeffG has a K7 curve for CRP which he has relinearised for his 3880. He has used the remapping spreadsheet posted above to remap it to the non-standard ink placement in your printer. I’ve attached the remapped curve. It would be interesting to know how linear it is on your R3000.
Hey everyone. I thought I would add an update to this long-static thread.
Over the past year and a half or so we’ve changed the paradigm a bit.
We’ve introduced a DIY Piezography Linearization workflow (and a lot more) available here: Download Piezography Professional Edition | Piezography. This also enables true i1Profiler ICC profiling for Piezography (enabling Photoshop printing).
We’ve introduced updated P2 (and some updated K7) curves for each ink-set available here: Piezography Community Edition | Piezography (we periodically update these with new papers btw)
We’ve also come out with new HD-MK and HD-PK inks and have made new masters for these two inks that are a step up in their versatility. Often these masters will work better than the old curves even on the old ink. We’ve seen a lot of papers change a LOT (epson exhibition fibre comes to mind) and this makes us have to make new curves. We are in the process of making an entirely new archive of paper curves on our officially supported paper list (https://piezography.com/technical-support/supported-papers/) for x880 and x900 printers using these new masters but you don’t have to wait for them. You can use the masters in the community edition now and if you have the pro toolset you can linearize your own.
We’ve come out with Piezography Pro and in-turn have dramatically updated our ink making facility in Vermont to do small-batch ink-making. The thousands of curves we’ve created for this ink are incredibly linear on a very wide array of papers.
We are working on a new Piezography driver targeting the new sure color printers (it’s going to take some time and won’t release for a while) which will dramatically increase one’s ability to get a wide swath of papers and printers profiled all at once with a single target. I can’t shared details now, but I think it will be awesome.
///
In short, we’ve addressed some (a lot) of the variance issues from printer to printer and ink to ink with new curves, new technology, DIY linearization, and more. Please ignore the default curves that come with QuadtoneRIP. Use the ones found here Piezography Community Edition | Piezography Stay tuned to future developments too.