It isn’t quit clear to me, do you still have the flush cart in the Y channel or the WN1?
The WN1. Flushing cartridge became empty after the weekend.
So, you didn’t verify a good NC after replacing the damper in the Y position with Flush, correct?
How old is the WN1 you are using?
Has the cartridge been shaken to disperse the pigments?
Are you getting anything out of this channel or is a complete blockage?
So, you didn’t verify a good NC after replacing the damper in the Y position with Flush, correct?
Yes, I didn’t get a good NC. But Piezoflush did sit in there over the weekend. I did a some normal head cleanings and printed purge images that had very faint pink lines coming through. So it would seem flush solution made it to the head and sat there for 48 hours.
How old is the WN1 you are using?
I bought it about 3 weeks ago. Lot # 140725
Has the cartridge been shaken to disperse the pigments?
Yes
Are you getting anything out of this channel or is a complete blockage?
Some ink…see attached.

You have several missing nozzles in other channels as well, But I am not convinced doing another Power Clean is going to miraculously clear up your Y channel. If you didn’t get a good NC with flush installed, then I’m not sure if it will come back or not, you may have more to this story still. The next step would be to replace the Capping station aka.Pump Assembly and the Wiper blade, I suggest you get these parts at Compass Micro,https://www.compassmicro.com/parts_detail.cfm?ID=4048&form.mfg=Epson&form.printerstyle=Inkjet&form.printername=Stylus%20Pro%207800. Make sure you clean the bottom of the print head thoroughly when you replace these parts as well, these parts are not too overly expensive (a lot less then a head) and could be causing this problem. Best of luck! Fingers crossed-Kelly
I will try that. BTW the link you sent is for 7880 parts not 7800- heads up in case anyone else follows that link and almost purchases a 7880 part instead of 7800 part - they have different part numbers. Also, the 7800 part is almost $100 more.
Thanks for letting me know, I corrected it to link the 7800 Pump Assembly.
You can also try clearing the clog out of the Y channel in the print head by using a Cleaning Kit attachment. You will remove the damper and ink line and apply the cleaning attachment directly on the head, put a paper towel under the head to collect the flush and push the Piezoflush through gently. If you find resistance while depressing the plunger, you can pull back UP on the plunger and let go, doing this a few times until you dislodge the clog. At which point you can push the Piezoflush fluid through the head without any resistance, effectively clearing the blockage in the head channel. You can purchase the head cleaning kit here http://shopping.netsuite.com/s.nl/c.362672/it.A/id.6605/.f
I would do this in combination with the Pump Assembly and Wiper blade replacement, you should see results!
Thanks for the suggestions with the cleaning kit and updated link to the pump assembly.
The pump cap assembly looks like it contains several of the items IJM recommends replacing every few years (main/right capping station and flushing box)…is that correct?
http://www.inkjetmall.com/tech/content.php?133-Printer-Cleaning-and-Preventative-Maintenance
Compass Micro seems to sell all the pieces separately as well.
I read your instructions for using the kit (in your post from 3/31/15 and the instructions posted here http://shopping.netsuite.com/c.362672/site/techdocs/piezoflush-kit-instructions.pdf (which is for small format printers). Does a Piezoflush cartridge need to be installed on the Y line in the ink bay? Or am I pushing piezoflush in/out of the head with the cleaning attachment only?
I’m assuming after all that, another power clean is needed to pressurize the system.
You don’t need to install the flush cart, you are going to use the head attachment directly on the head itself. You will remove the damper assembly to access the head directly, then push the Piezoflush through the head cleaning attachment onto a paper towel that you will place underneath the print head. Does this make sense? Afterwards, yes you will have to perform one more power clean cycle and you should be good to go!
Yes, the Pump Assembly comes as a complete assembly, to include the wiper blade I do believe. That is why they call it an “Assembly” it has the pump, the capping (parking) pad, wiper blade. Yes, this is the right Pump assembly that I linked on the past thread.
Let me know how it turns out, I’m sending good vibes your way! Kelly
Thanks Kelly - it confusing because Compass Micro told me that the Pump Cap Assembly is different than the flushing box and capping station, and I’d have to order those parts in addition to the pump cap assembly. But the pictures of the pump cap assembly sure look like the flushing box and cap station are included in it. I’m sure I’ll figure it out.
The Pump Cap Assembly https://www.compassmicro.com/parts_detail.cfm?ID=4048&form.mfg=Epson&form.printerstyle=Inkjet&form.printername=Stylus%20Pro%207800 is made up of the Pump, the Capping Station and should be a wiper blade, but for some reason it says to replace the Wiper blade with this unit https://www.compassmicro.com/parts_detail.cfm?ID=4050&form.mfg=Epson&form.printerstyle=Inkjet&form.printername=Stylus%20Pro%207800. In addition the Flushing Box is a separate unit that is housed directly to the left of the Capping Station, that should be replaced at the same time https://www.compassmicro.com/parts_detail.cfm?ID=4950&form.mfg=Epson&form.printerstyle=Inkjet&form.printername=Stylus%20Pro%207800
So, you will need:
Pump Cap Assembly
Wiper Blade
Flushing Box Right
You can reuse the tubes for both the Pump Assembly and the Flushing box, take care not to crimp these tubes and make sure you connect them to their respective locations for draining of ink, otherwise you will have a BIG mess on your hands. If you need a repair manual you can purchase it through 2manuals.com http://www.2manuals.com
/product_info.php?manufacturers_id=&products_id=881
I replaced these parts and used the flush kit to put Piezoflush through the head. Upon starting up the printer I receive a service call message 00010035 regarding the pump head assembly. Service manual says to either replace pump cap assembly (which I just did), or the main board. Do you have any suggestions for troubleshooting, or is it time to give up on the machine?
I suggest opening the printer back up and checking all the connections to make sure everything is tight with the new pump cap assembly you installed.
After checking the pump cap assembly connections, the printer is operating again. Unfortunately the yellow channel is still almost completely blocked. The other channels are working better now with perfect or 99% perfect nozzle checks. Is there any other things to try?
Could a defective cartridge cause the problem? I purchased a new yellow cart from IJM to try, but I have not tried it yet… I noticed the IJM carts for 7800 does not have internal plastic bag inside that seems to pressurize the carts. The carts I use from dtgprinter parts have these internal bags…they look like the pictures of IJM carts for the 9890 printers.
Is your printer’s pressurization pump turning on frequently while the printer sits idle?
When you flushed the yellow channel of the print head using our print head cleaning kit, was there resistance, or did PiezoFlush flow easily thru the head?
There are many different cartridge designs, and we have tested most if not all of them, and sell the cartridges we feel work best.
Please let me know so I can help you resolve this and get back to happily printing.
Warmly~ Dana
The pump isn’t turning on at idle. I didn’t notice any resistance with the flush flowing through the head.
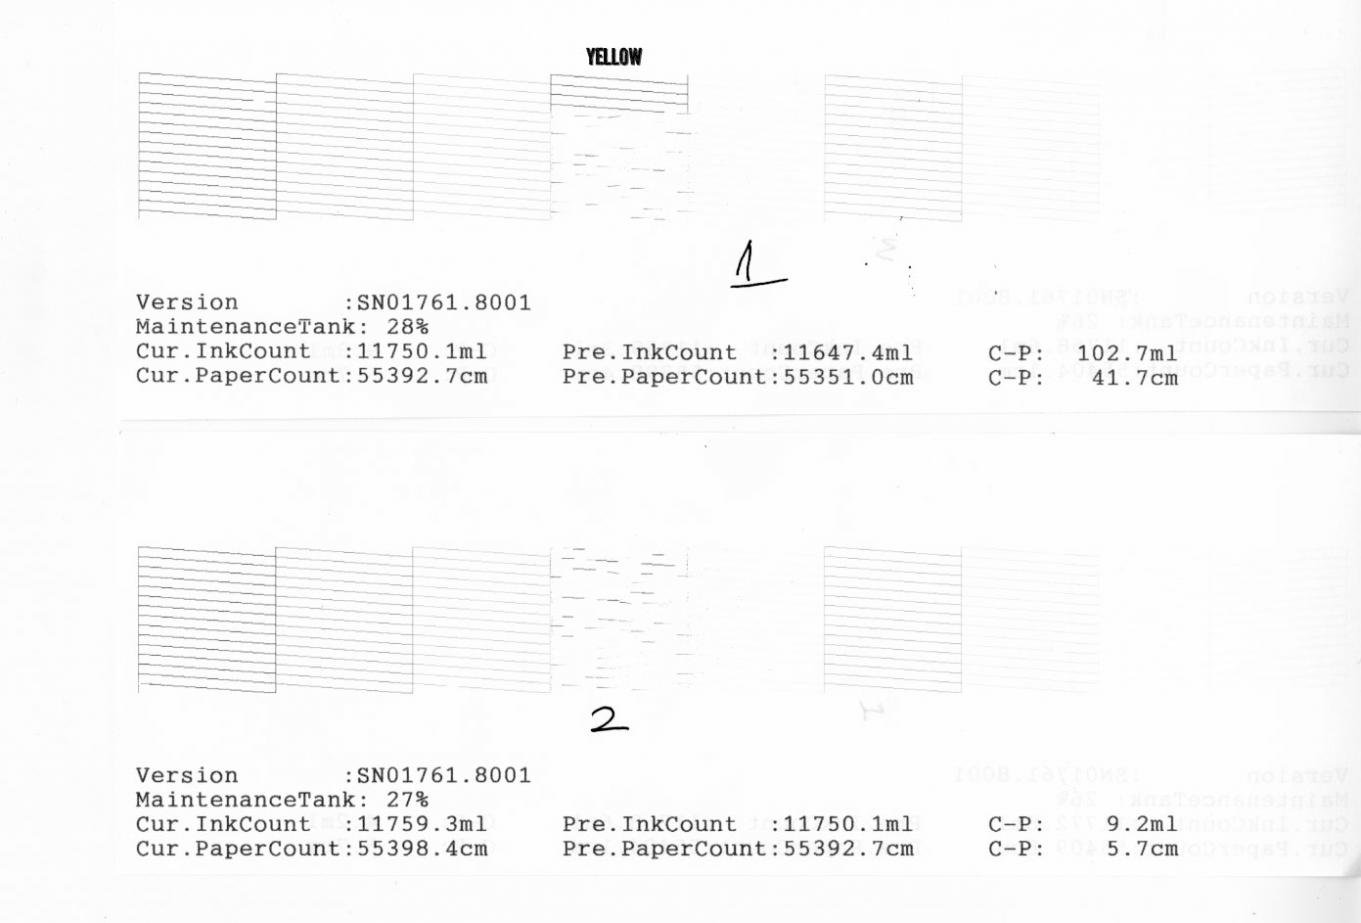
This is what my nozzle checks look like. The yellow channel drops out more and more…I’m up to nozzle check #5 where Yellow is 90% missing.
Hi candela~
I am going to send you a fresh bottle of ink, as well as a new cartridge and damper. I would like you to discard your current cartridge and WN#1 ink, and use the new cart/ink in it’s place.
Since you have already replaced the dampers, you know the procedure to follow. I would like you to remove the yellow/WN#1 cartridge from your printer, then with dampers disconnected from the head, use the 60ml syringe you have to manually draw ink thru the damper/line until the line is empty, then insert the new cart with fresh ink (prime cartridge exit channel first), and again use the syringe to manually fill the line with fresh ink, then replace the damper. While the dampers are disconnected from the head, I recommend gently flushing the yellow channel with your PiezoFlush print head cleaning kit, before reconnecting the dampers and putting the printer back together. Once the printer is back together, do a few regular cleaning cycles, then print a nozzle check to see how things look.
Please let me know if you have questions, how your yellow channel looks after doing this procedure, or if there’s anything else I can help you with.
Warmly~ Dana 
Thank you Dana - I’ll look for a package from you and report on my findings. Please let me know if you need my shipping info.
You’re very welcome, and thanks for reporting your findings. I processed the shipment with your default address, is this correct?
Best~ Dana
Yes, default address is correct. Thanks again!