Better agitation of ink in desktop printers

This post relates to printers that have ink cartridges on the print head - R2400, R2880, R1400, R1410, R1430, R1900, R2000, P400. For these printers it is suggested to print something (at least) once a week in order to keep the pigment in the cartridge suspended. The movement of the head back and forth is supposed to provide sufficient agitation to do this. (Other printers like the R3000, P600, 3880, P800 and larger require an alternative approach.)

My problem has been that it hasn’t been working. If I’m not printing then I’d normally do a nozzle check and print some kind of purge pattern at least once a week. But what I’ve been finding is that despite doing that, after about 4 weeks I’m starting to see a drift in linearity of my curves, and by the 6 week point, I need to do something. Either remove the carts and agitate them or drain and refill.

Roy Harrington has recently released QTR version 2.7.8, and for these printers and a few others has included a 2880 Super resolution (weave) setting. This prints a lot more slowly and takes more passes back and forth to build up the image. More details in the relevant thread:
https://groups.yahoo.com/neo/groups/QuadtoneRIP/conversations/messages/15296

In the process of testing this new setting I found [long story omitted] that printing an entire A4 page uni-directional at 2880 Super did provide enough agitation to restore my curves to linear.

The problem with printing a purge pattern this way is that you could use a lot of ink. It occurred to me that the main objective is to maximise the number of passes back and forth across the page, rather than to push ink through the head. (Which you would want to do on a printer with ink lines and dampers to keep the ink flowing through the lines.)

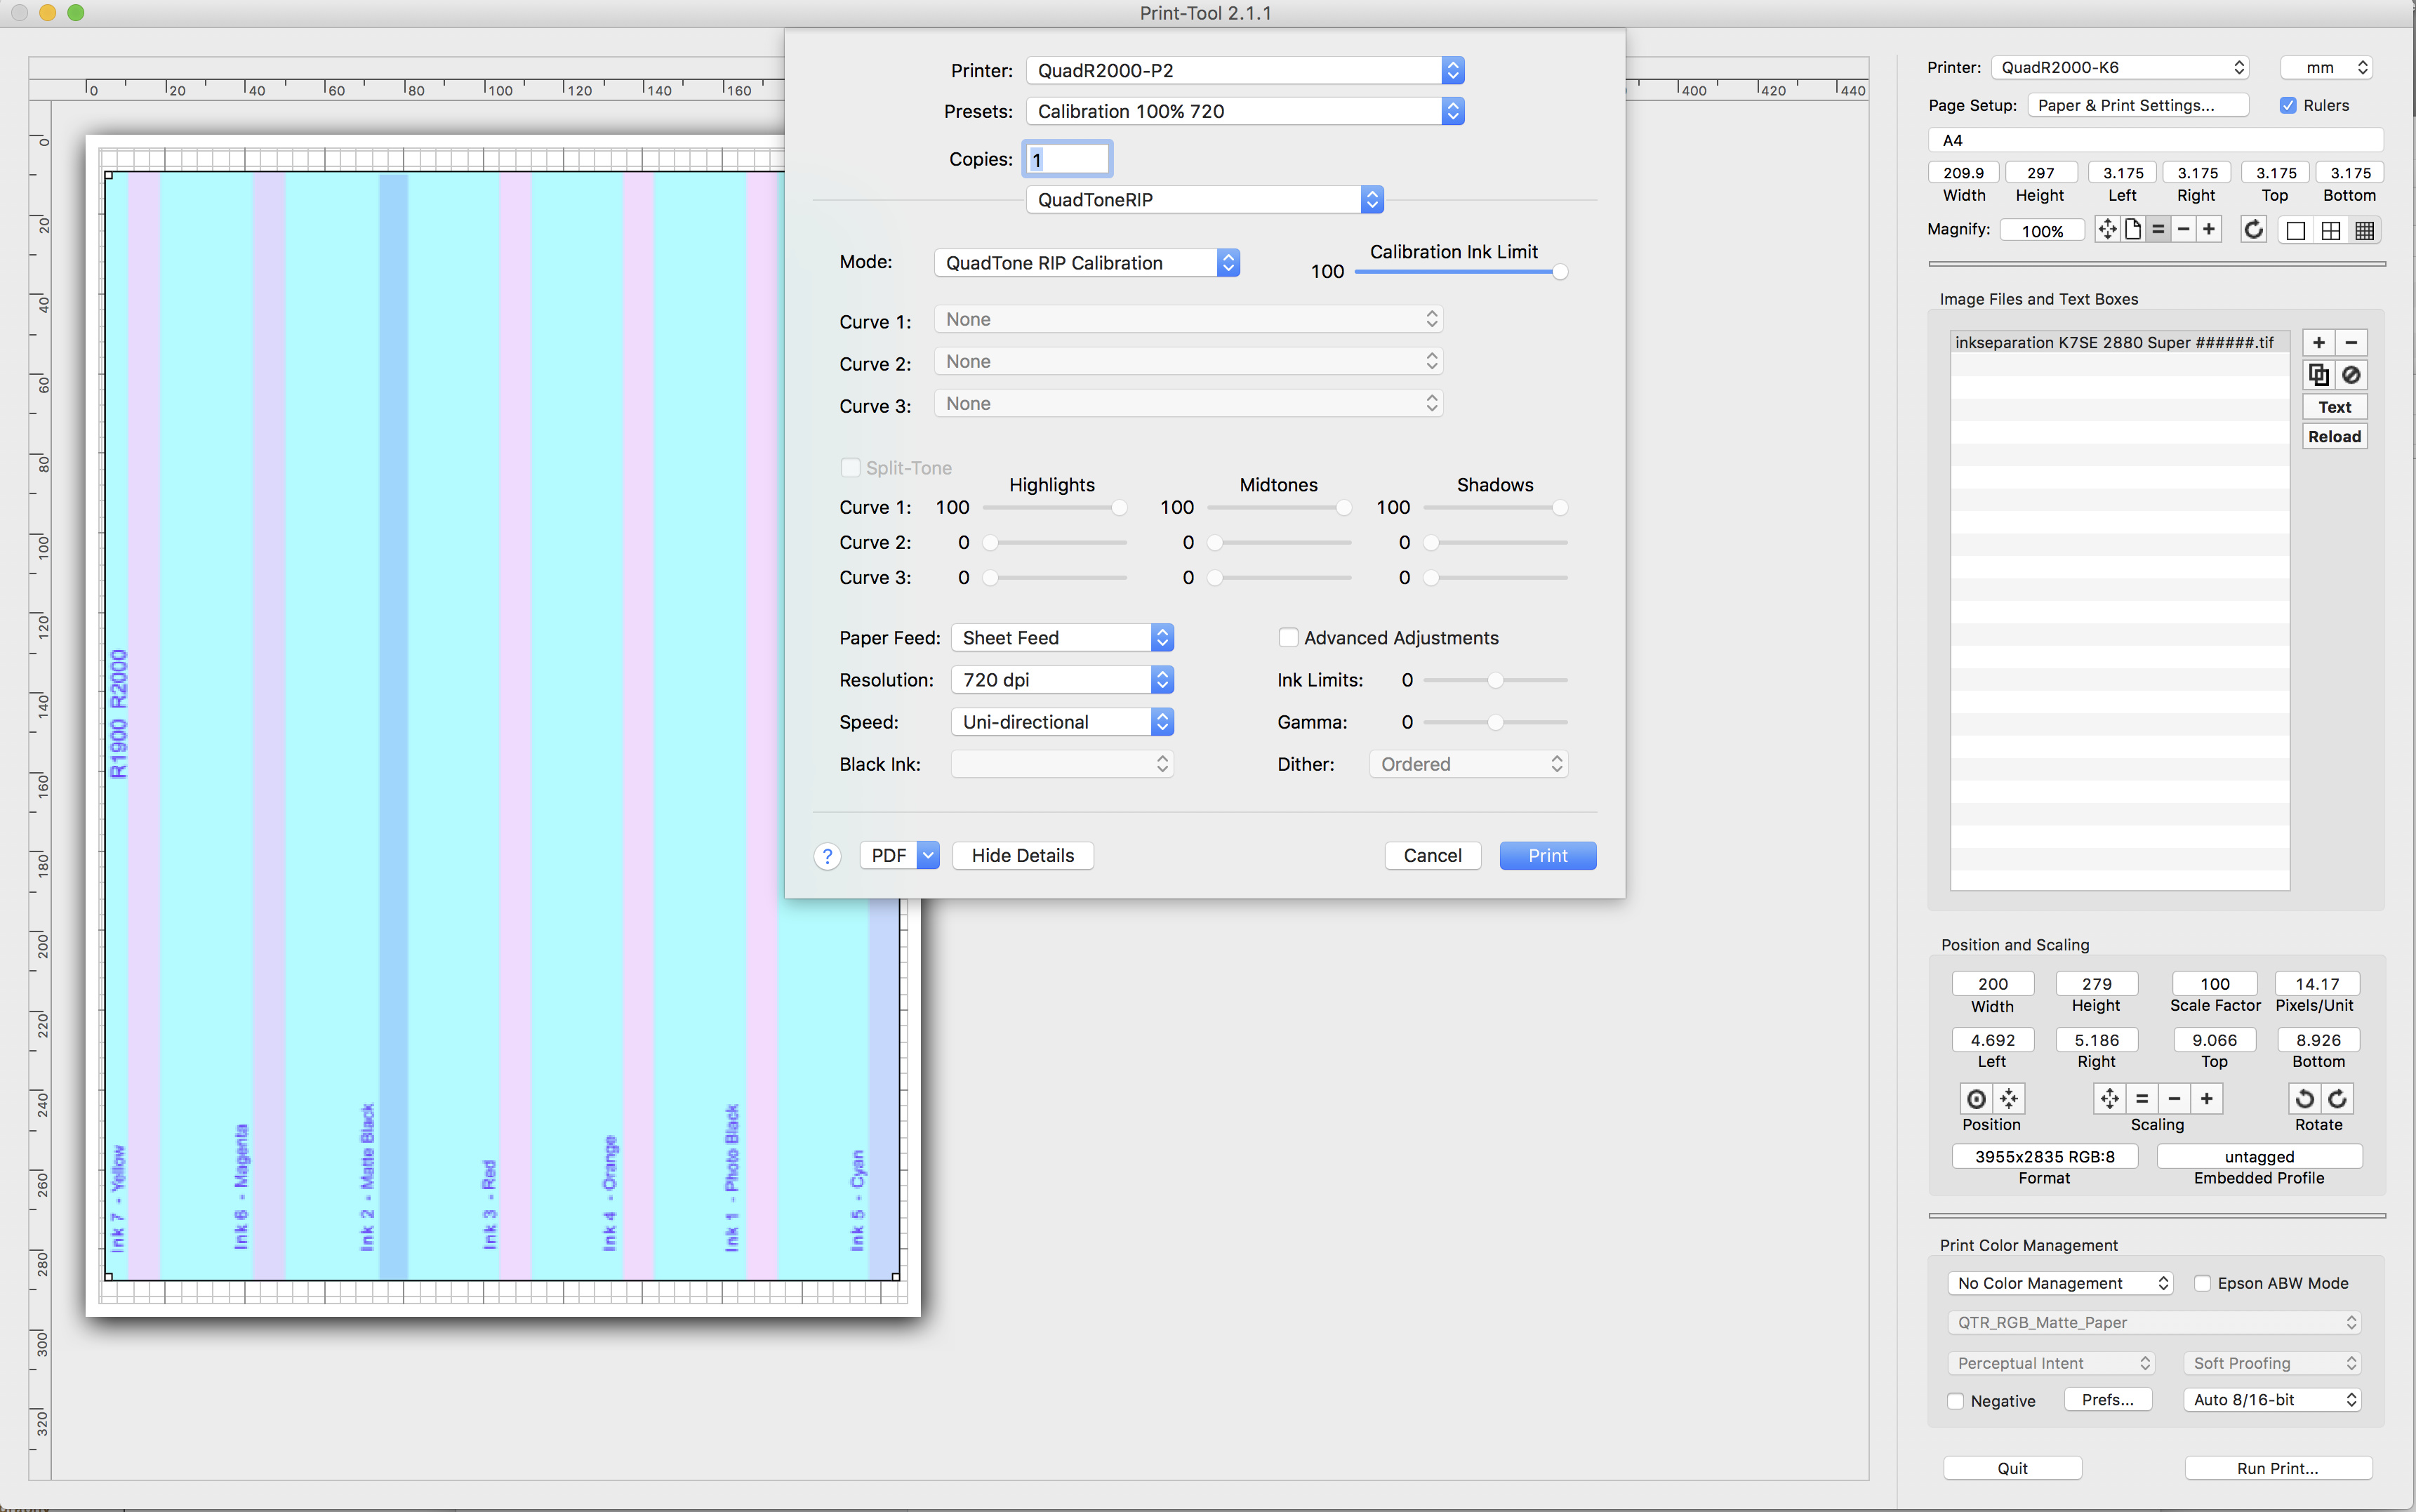
So I designed my own purge pattern. I took the 15% squares from the ink separation page, created some narrow columns spaced across the width of the page, and running the length of the page. Printing this at 2880 Super in calibration mode is mighty slow, but seems to agitate the ink quite well and doesn’t use a ton of ink.

I’ve attached the page I created but most people will need to adapt it. It only contains 7 columns, as I don’t run a purge on GO in the R1900, R2000. You’d need to add a column of (254,217,255) for LLK on a K3 printer. Or remove a column for the R1430. Also the ordering and labelling is intended for the R1900 & R2000, but you’ll get the idea. Also it’s for an A4 page, so readers in non-metric countries will need to resize it for Letter.

Minimal Purge Pattern for R1900 2880-Super.zip (55.9 KB)

p.s. If you print this on an A4 page, you will see some of the infamous first and last inch micro-banding. It’s not really of much consequence for this purpose, and I wanted to use pretty much all of the page to maximise the agitation benefits.

1 Like

In a moment of late-night boredom, I created versions for the K3 and six ink printers. I haven’t tested these so would welcome hearing of any problems. They’re still for A4. For Letter you’d resize them in Photoshop using the nearest “neighbour algorithm”, and you’d probably also de-link height and width to be able resize them to cover all of the page other than the 1/8" unprintable borders. Print uni-directional at 2880 Super for maximum agitation benefit with limited ink usage.

Minimal Purge Pattern K3 2880 Super.zip (54.0 KB)
Minimal Purge Pattern 6 ink 2880 Super.zip (38.5 KB)

Thanks for doing this, it seems like a really good idea. I’m curious how you came up with the “background” color which appears to be cyan. I was expecting a gray scale image for some reason. Also maybe I’m not sending it to the printer correctly. Do you use “Print Tool” to print this? Or how do you send it to the printer?

You absolutely must print these charts in calibration mode. I suggest you read this post in which I explained these strange colours:

The chart is just a modified version of the standard chart that QTR prints out in calibration mode. Instead of printing that chart, you print one of these ones.

I’m mostly not a Mac guy, so I’ll get a Mac user to comment on Mac usage, but I imagine that Print Tool would be best,

1 Like

That was exactly the info I needed! Thanks much for the files and the quick reply!

I’ve been given the attached image to demonstrated QTR Calibration mode on a Mac, although note that this shows the 720 setting, whereas I’d recommend 2880 super (for those printers where it’s available) to print these particular charts, for the reasons stated in my OP.

Mac%20Calibration%20mode

Thanks for posting this. I would like to use it. But I need clarification regarding adding a column for GO on the P400. Is the P400 considered a “K3” printer? If so, then I will add the LLK column to purge GO.

Edit: let’s see if I got this right. I extended the canvas to accommodate an eighth row and filled it with (254,217,255). Then scaled the image to 8.5 x 11" at 360 ppi. Result attached. Minimal Purge Pattern for R1900 2880-Super - JFI.zip (57.0 KB)

I don’t include GO in my purge patterns for the hi-gloss printers (R1900, R2000, P400) because I think it’s a waste of time and GO. You can’t see GO on plain paper and I’ve never had problems with GO misbehaving. Which is why I said “It only contains 7 columns, as I don’t run a purge on GO in the R1900, R2000”.

The reason I went on to say “You’d need to add a column of (254,217,255) for LLK on a K3 printer” in my OP was because at that stage I hadn’t created versions of the purge pattern for the K3 printers, and as they don’t have GO, if someone was to use that initial purge pattern that I posted in a K3 printer they wouldn’t get a purge of LLK. However in post #2 I went ahead and created purge patterns for K3 and six-ink printers, so that second statement was then redundant.

If you feel the need to run a purge on GO then don’t let my stop you, but I’ve never found the need.

Thanks for the clarification. You say that you print this purge pattern twice a week, and I will begin doing that. I currently do a nozzle check every day. If it has gaps, I also do a head cleaning. Suppose I do a nozzle check tomorrow and it has gaps. Would printing your purge pattern be an alternative to head cleaning? Or would the head cleaning still be necessary? I guess I’m asking if printing the purge pattern accomplishes the same thing as a head cleaning. If so, which uses less ink?

My general approach is to print purge patterns as a preventative measure, and also as a first line cure in the event of gaps in a nozzle check. I only resort to a head clean if one is really needed, i.e. if a purge pattern or two doesn’t work. These printers do enough head cleans on their own account IMHO, and a head clean will use more ink than most purge patterns.

My general view is that in these desktop printers, not all gaps in a nozzle checks are genuine clogs. Often they’re just air in the system somewhere. This is particularly true of gaps after a refill, and also if the location of the gaps in the nozzle check moves around from one check to another. A clog will always be in the same position. A clog will probably need a head clean, but otherwise I think that patience (being prepared to wait a day) and purge patterns is better. If there is a lot of air in the system, a head clean can make matters worse, depending on the source of the air.

tl;dr: a head clean is a last resort for me, a purge pattern is a first resort.