follow Chow’s example. He calibrated his display, made a QTR SoftProof ICC of the platinum output. He says he can soft proof and he uses a correction curve to limit his Piezo print output to match the range of the platinum print - and is making hard K6 proofs prior to platinum. That bit is a bit more to explain at another time…
The P2 system was designed for him. I released it to others after he proofed the system. So read his articles I pointed you to. he is doing what you want to do. Check it. He has a pretty sweet system and I think you have the same one. QTR softproofing is documented at the QTR website and you already have Create ICC as part of the QTR download. You need an EyeOne to do it easy using the older software - but others are figuring out how to do it with Munki, etc… none of this is getting easier and Mac truly is no longer a print oriented platform. so you may need to revert to using older OSX in order to run measure tool. 10.4 is the last of the true color management OS from Apple. No one will tell you that if they are an “apple guru” though… but its sadly true. If you’re on Windows you can run what you need to do QTR softproof using Eye1. Xrite did not release it for the new Apple oS.
Once you are calibrated to the platinum print by using the softproof - things should be good for you. But - you do need to make your Photoshop correction curve before you softproof.
You can use the Eye1 to plot density or convert luminosity to density and then plot it with a spreadsheet. There should be ample documentation on that somewhere - or just plug it into my linearization checker spreadsheet. You can plug in the L to get density there. See how linear you are getting by moving the Photoshop curve and measuring off the plat print using a 21 step. That should make your curve in Photoshop easy work.
am i making sense? I hope so - late night typing while making prints and working on other things at the same time are often not a good mix. we will set up our exposure machine and platinum print room this summer and I will be way more help at that point. i do intend to make a UV based curve for platinum in the Summer that is linear on the paper at the start using maybe three different plat/plad mixes… that will be killer helpful.
the curves work now as is on silver and carbon without having to do the Photoshop curve. My plan to make the new UV measured curve work the same way and will release those. For some with more esoteric mixtures there will always be some contrast control from Photoshop.
Very interesting! Exciting times indeed it seems! I need a bit more time to wrap my head around all that. Groggy after a night of heavy metal and booze. I’m using Windows 7 on a Dell XPS with a Phillips 190S monitor. Will I need to buy EyeOne to calibrate this properly? Am aware of Chows blog. That’s where I first heared of Piezo inks. I was wondering whether I could using the correction curve you created just to see how it works. Would help me greatly for making my own curve.
I left my curve in Santa Fe…
If you are comfortable using Photoshop, bring up the Curves window and just approximate his literal curve. Put your points where his are. Give it a go! It will only be a starting point and you should use it as a layer so you can readjust. You can either do it in a scientific way with a spreadsheet and densitometer or spectrophotometer or by eye until your gradient is smooth.
You decide whether to do it by eye or invest in Eye1 spectro (nearly $1,000). Or Munki (about $500) and use the workarounds described on the QTR forum.
I do believe that you should calibrate your display to Gamma 2.20 and use Soft Proofs ,etc… but it comes at a cost. Technically, you can do all this without if you learn to work with numbers instead rather than soft proofing. If you use SoftProofing it is only as accurate as your calibration and that may mean getting a real display (Eizo CG or NEC Spectraview). More bucks. So try by eye first. You need your output linear first.
Drats, that’s a long way. I’m less interested in soft proofing than getting a workable neg for pt/pd really. I don’t understand what you mean by linearized though. Isn’t the meth 3 1_8 curve linear? I thought the whole point was to avoid using correction curves as the profiles were all linear with different densities.
You’re saying I can print the PDN step wedge and use the curve calculator to arrive at a correction curve for my process? It seems Chow’s curve is only mild, which is a good thing. In which way did you have to adjust yours to get the results you wanted. Had no idea Eye1 was such big bucks. Will have to look at other calibration methods as you say.
It is linear only on the film. We output perfect film. But platinum/palladium controls contrast via chemistry. you add one drop of that and you throw off the tonal response and contrast. So you need to create some form of compensation curve in Photoshop. You do not need to do that in Silver or Carbon because they have a more linear response to density based film than does platinum. The idea is to stabilize your chemistry first. Then use the curve when you print the film and see where the white point and black point fall. Also - the mid-point. Adjust this in Photoshop until you’re happy. Do not adjust the chemistry unless you think that your chemistry is too contrast or not contrasty enough for the 1_7 curve.
Otherwise - yes print the PDN curve and use their Curves Calculation II tool. It will do the same thing that I am suggesting you do. But it will calculate for you. I just used his and got acceptable results. We only made 3 prints during the demo. If I was going to make my own setup - I would perfect in a day or two. Send me an email to jon (at) inkjetmall (dot) com and I will forward you the curve I made in Santa Fe. I found a copy of it!
My printer wasn’t recognizing the yellow cartridge. It was reading empty even though there was clearly some ink left albeit not much. I removed the cartridge to refill it.
Here I encountered my other problem! When refilling the cartridge slowly with 10ml of ink (It clearly never needed 15ml) the air hole overflowed with ink! Should the air vent be plugged up when refilling cartridges? The instructions say open, so why should ink be spilling out of the air hole? I’m angling the cartridges with fill hole up. I then rinsed the cartridge gently under the tap with both air hole in. It seems that a little water has entered into the cartridge. Does this mean I should throw the full cartridge away? Is it now ruined?
It’s still not being recognized by the printer, but this is the same situation I began with anyway…
Was the printer “not recognizing” the cartridge, and displaying an error on the status monitor, or was the printer reading it as empty? If the cartridge was nearly empty, and the ink out light turned on, then I suspect the printer was reading it as empty.
It’s normal for a little ink to remain in the cartridge when the printer indicates it’s empty, this is to avoid the cartridge running completely dry, getting air in the print head and interrupting the ink flow (Epson carts work the same way, but you can’t see the ink inside).
The R2880 cartridges can be filled/refilled with the air vent hole open or closed, since they are injection filled model cartridges. I have never had ink flow out of the air hole when refilling R2880 carts (and it’s the model I use most often).
Did you inject ink into the cartridge using the syringe with or without needle attached?
If both the fill and air holes were tightly sealed when you rinsed the cartridge with water, I don’t suspect water got inside the cart, but likely went under the plastic side and is between the plastic side and thin membrane of the cartridge. I am concerned about the effect of water on the chip, and wonder if you started with a normal empty signal, but now may be dealing with a different issue from the water… You can try carefully drying the chip area (though there may be moisture behind the chip), manually reset it using your chip resetter (let me know if the light turns solid red or green after flashing red a few times), then reinstall snugly into your printer.
Please let me know, so I can help you get back to happily printing.
Best regards~ Dana
Hi Dana, thankyou for your quick reply! Yes you’re right, the water got inbetween the membrane. Phew!! I noticed the hole underneath the chip afterwards. It’s now being recognized by the printer so no problem there.
Everything is printing correctly now and I have a perfect nozzle check pattern. I’ve tried printing a few negatives. They are smooth, no banding or other such artefacrs. However I am getting pizza wheel marks!! I’ve been googling all night trying to find some information on how to use the front paper feed as I’ve never used it before.
The problem I’m running into now is that with the front paper feed flap down, which raises the pizza wheels the print head now gets jammed and will not print. It blocks the path of the printer head from moving left to right. Very confused by this, can’t seem to find any answers online anywhere. Hope you can help. Cheers
I’m glad to hear your cartridge is now working and you have a good nozzle check.
The print head should be able to move correctly with the front paper feed tray open, and I just checked ours closely and didn’t see how the print head could be blocked. The pizza wheel metal bar is supposed to rise up on it’s metal guides, and be just under the bottom of the print head, so the head can still freely move back and forth. I wonder if a part is not positioned correctly? Can you post some photos showing the front paper feed open and closed for me to see the pizza wheel bar in relation to the print head? I’ll take a look and let you know if I can see anything obvious, though there’s only so much I can help with in regards to printer repair and physical printer troubleshooting.
Hi Dana, thanks for the help. Epson support are being useless. Have called them twice today to no avail.
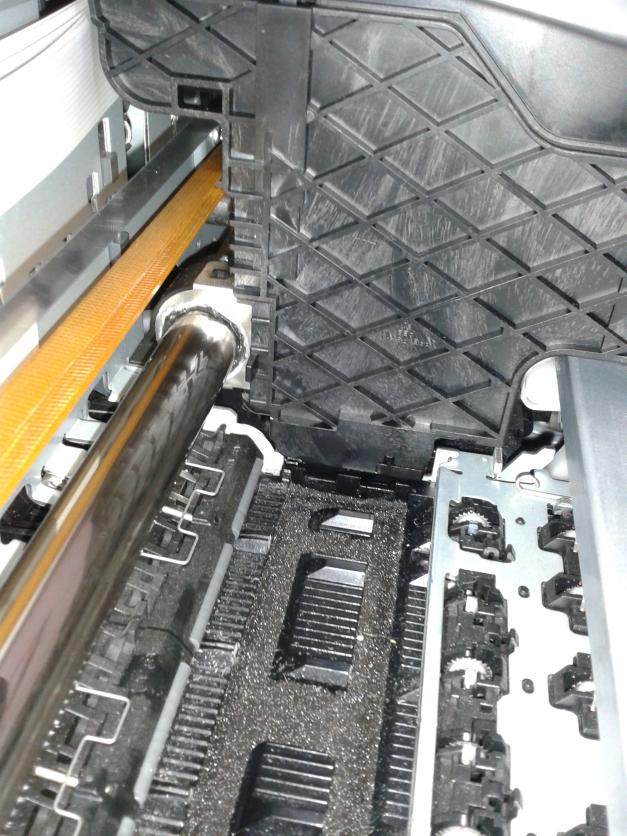
First image = pizza wheels down with front feed hatch closed
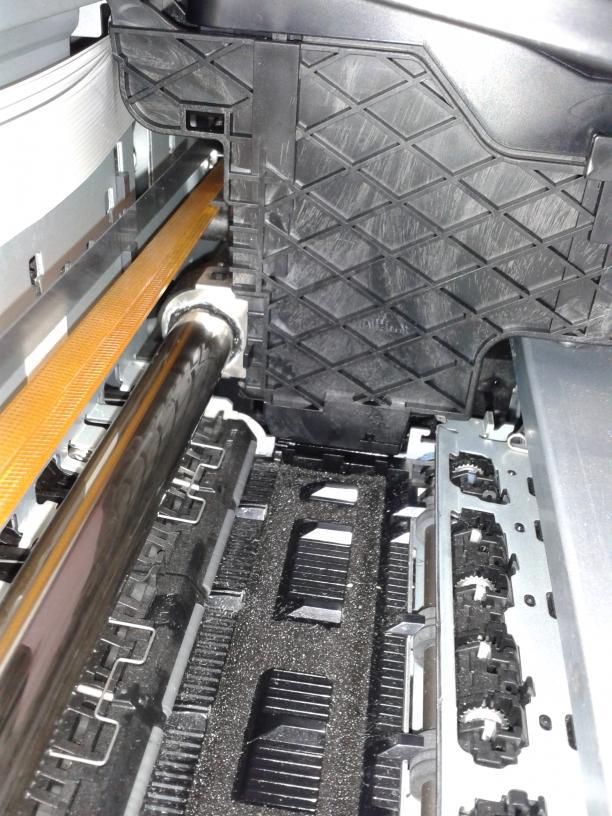
Second image = pizza wheels up with front feed tray open
I’ve read a thread on here that suggests the ‘paper size check’ and ‘sheet size check’ must be turned off in printer properties on the R4800 to accept transparency film. However I can’t find this option anywhere in my printer settings. I don’t think this is necessarly the issue though. My problem appears to be that the head is jammed and won’t move with the wheels up.
Well, I checked out R2880 again and compared to your photos. The differences I see are: 1. it may be the camera angle, but it appears your print head is over to the right side every so slightly more than ours in the home position (I can see more of the right metal pizza wheel bar in your photo than when viewing our printer), and 2. when I open the front paper tray, both the metal pizza wheel bar and plastic bar of rubber rollers raise up to feed paper in. It doesn’t appear the second bar of rubber rollers is raised in your photo, which makes me wonder if something isn’t together correctly and the front paper feed components aren’t all working together as they should…
How exactly is your print head “jammed”- have you tried feeding paper or printing anything thru the front paper path?
With the front feeder tray closed, does the print head move back and forth correctly? What happens when the front tray is open (make sure it’s fully open), and you push the ink change button- does the print head move into the ink change position, or does it jam and flash lights?
Sorry I can’t be of more help with this.
Warmly~ Dana
Dana, when I attempt to print something with the paper feed tray up the head printer starts making a horrendous noise and the belt which drives the head back and fore starts quivvering wildly. With the paper tray down the head moves back and forth fine. I can print using the regular sheet feed without issue. Apart from the pizza wheels obviously. Is there any other way you are aware of to avoid pizza wheels on this model aside from front paper feed?
Also, my printer seems to do a head cleaning every time I turn on the printer. This is absulutely drinking my ink. I’ve already gone thorugh a whole cart in every slot and have zero results to show for it. That’s about $50 of ink wasted already.
This is how the printer works, no matter what inks you’re using. If used a few days a week, the printer can be left on during the week, and only needs to be shut down if it won’t be used a for a few days (we keep printers that are being used regularly on all week, then turn them off on Friday night for the weekend).
When we have used our R2880 for printing on film (which is what we originally developed the digital negative system on), we always use the top auto paper feed path, and haven’t had excessive pizza wheel issues. I just reviewed several film prints made with our R2880, and couldn’t see pizza wheel marks in any of the prints…
Hi Dana, that sounds a good way to conserve on ink but not standby power. I’ve just bought a replacement Epson R2880 printer, one on which the front feed works. Back to square one again. I’ve cleaned the printer throughly. Wiped down the stems, the cleaner blade, the sponge pad, flossed the nozzles with a warm damp strong paper towel, three head cleans and this is my resulting nozzle pattern…
As for the pizza wheels. I’ve consitantly got them since moving to the Piezo warmtone neutral inks with my transparency film. There seems to be no way of avoiding them aside from front feed. Never used to have this amount of pizza wheeling with the Epson inks in ABW mode. Somebody in their blog mentioned the slight fragility but never expected this amount of grief. It’s been almost a two month struggle and still no results. I’ve got paying jobs hanging on this too.
It seems that three print heads are clogged and I don’t have a dummy cartridge with which to unblock them
I’ve used a nozzle cleaning kit and have a perfect nozzle check on 7 of 8 nozzles now. However, the printer doesn’t seem to be recognizing my Photo black cartridge. I had to resort to filling my prevoiusly unused matte black cartridge with photo black ink to get the computer to accept it. Every time I use the photo black cart the printer displays ‘printer busy’. I tried printing with this cart installed and the segment of the nozzle check pattern that corresponds to is completely blank. I can’t understand why this is. It was printing fine before now nothing.
 10.4 is the last of the true color management OS from Apple. No one will tell you that if they are an “apple guru” though… but its sadly true. If you’re on Windows you can run what you need to do QTR softproof using Eye1. Xrite did not release it for the new Apple oS.