I 100% followed the procedure, so yes. I got 20 or so prints, then problems. I did not do an initial fill for the second cart – I just primed it. That cart printed a few times, then stopped printing.
Does the damper a valve? If not, I can remove it and run some go thru it to see if its clogged.
I believe you are dealing with a clogged damper, after flushing, it could have knocked the pigment build up loose inside the damper, then once you put the GO in those loose, built up pigments lodged into the opening of the damper, restricting flow. This is a common complaint associated with clogged dampers, everything is printing fine, then you change inks or flush the line and it dis-lodges the gummed up pigments into the opening of the damper, restricting flow.
You stated that you have no knowledge of damper replacement, from experience we recommend they be replaced at a minimum every 3 year, it’s advisable to replace them every year to keep your printer in good standing. You can order them through Compass Micro https://www.compassmicro.com/ we recommended you replace all the dampers at the same time while you have the printer apart.
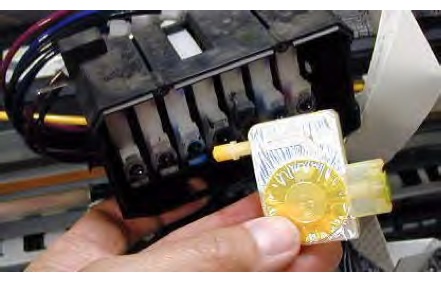
This is what the Dampers look like, if you are going to commit to taking the printer apart to this extent, it is wise to replace all the dampers while you have it apart. They are valve with filters inside to remove any particles from the ink before it goes through the head. They clog up and need to be replaced, we have never taken them out and cleaned them.
Kelly, thanks. At first I agreed that maybe flushing loosened pigment and caused a clog, when investigating replacing the dampers, I tried a manual prime of the GO line by disconnecting the line at the dampers and drawing up GO from the cart. This seems to have worked. I printed about a half dozen 11x17" and a half-dozen 8.5x11", each with a 60000 thick GO coat and no problems so far.
I am back to thinking that the first cart was defective and too much air got in the line. I ordered a new cart and more GO but with continue to print with the slightly contaminated GO until the new stuff arrives.
Since changing the dampers is not difficult, I will do that soon.
Hi John, I am glad to hear you possibly resolved your problem by manually priming the line. You stated you had performed an initial fill when you installed the replacement cartridge, so I figured air in the line was unlikely. If you only performed Power cleanings and printed images, then you most certainly could have had air in that line.
After replacing the Dampers make sure you prime them & after getting it all back together, run the Initial Fill to ensure there is NO air left in the lines.
Good work diagnosing & then resolving your issue.
Kindly,
Kelly
[QUOTE=KellyC;4685]Hi John, I am glad to hear you possibly resolved your problem by manually priming the line. You stated you had performed an initial fill when you installed the replacement cartridge, so I figured air in the line was unlikely. If you only performed Power cleanings and printed images, then you most certainly could have had air in that line.
After replacing the Dampers make sure you prime them & after getting it all back together, run the Initial Fill to ensure there is NO air left in the lines.
Good work diagnosing & then resolving your issue.
Kindly,
Kelly[/QUOTE]
All is well that ends well, thanks. Contaminating a cart was a good less for when I convert the color channels to Piezo.