I’d let it sit for a while now, maybe overnight, then do it again. And yeah, the guy who wrote the QTRgui (not Roy) must have meant “saturation” instead of “calibration” on that slider.
After several several prints and trial and error I am convinced that my issue is withy printer. Not the IJM ink carts. I think that with the mass production of the epson printers that maybe 1 out of how many ever may have a tooling issue in the cart carrier. I have found that if I do at least one printhead cleaning possibly two before printing each day then everything seems to be fine. However this does not work if I remove the foam core DIY I did. I think I just have a bad printer and will deal with it until I can replace it with a P600
+1, although I’ve never had a problem with Stephen Billard’s use of “calibration”, as it’s a slider you’d use when printing the ink separation page to create QTR curves the traditional way. Saturation is for colours. Perhaps he could have used density or ink load limit.
You are absolutely right, Brian, saturation is not the correct term either. Calibration Ink Limit (as it’s labeled in the Mac version of QTR) would be more accurate. In Windows it is labeled Ink Calibration which is vague and prone to cause head scratching. 
Hi Keith,
I did as you suggested: I waited overnight, ran another nozzle check (got the same four gaps in Yellow as usual), and then printed a second purge pattern using QTR_Y flush.tif. This time, I scaled the pattern by 75% (up from 50%).
The pattern showed faint horizontal lines at the leading edge, followed by what looked like solid pink (it’s hard to know if it was truly “solid pink” because I haven’t seen what a clean purge pattern looks like). I was encouraged to see this, as it seemed to indicate that the purge was working. However a nozzle check afterward showed the exactly the same four gaps in Yellow as before. Grrr.
I mentioned earlier in this discussion that Cyan is also showing gaps. In fact, the gaps in Cyan are far worse than the ones in Yellow. I printed a purge pattern using QTR_C flush.tif, also at 75% scale. The pattern showed distinct horizontal lines for the first 3/16", then what looked like solid pink. Again, the purge seemed to be working. However a nozzle check afterward showed exactly the same gaps in Cyan as before.
Wait till tomorrow and repeat?
It’s interesting that the only “colors” giving bad nozzle checks are the leftmost (Yellow) and rightmost (Cyan). The six in the middle have always given clean nozzle checks. Coincidence? Or is there a possible explanation?
Someone earlier in this discussion (Walker?) suggested that I try another set of P400 cartridges. I have two sets. One is filled with piezo ink and one is filled with piezo flush. I’m using the flush set so as not to waste the ink. Do you think I should just swap in the ink cartridges in and see what happens?
Thanks for your help!
John
At this stage its hard to know what to advise. This behaviour is not supposed to happen with a new printer and the latest generation of IJM carts. If you can’t manage a good nozzle check with flush then you’d have to be incredibly lucky to get it working with ink carts, as flush is generally much easier to get working.
Over the last year or two I’ve spend a fair bit of time helping another user attempting to get an R2000 (same printer one generation earlier) working with various generations of IJM carts. Very similar symptoms on and off. I’ve had also them myself with other printers. All I can suggest is print a purge pattern or two do a nozzle check, wait a day, repeat. If after several of these then maybe one head clean and then back to purge patterns and patience. I know, it’s frustrating. As I said earlier, patience is a difficult virtue to practice.
You could also ready my lessons learned post from a few years back, but you may find it discouraging.
1 Like
Brian,
Good advice. I will stick with the flush.
I printed two more purge patterns this morning, one Y and one C. This time I printed at 80% Ink Calibration on photo paper. With photo paper, it’s much easier to see the horizontal lines running the entire length of the patterns. There’s definitely no solid pink.
I did a nozzle check after printing the purge patterns. Sadly, the number of gaps had increased substantially in both Y and C. Maybe I’ll do a head cleaning tomorrow, but my experience with head cleanings has been that they make the situation even worse.
Do you think I should try doing the Epson Small Format Printer Maintenance procedure? This involves running the print head over a paper towel soaked in PiezoFlush in order to clean the underside of the print head.
I generally approach projects with a great deal of patience. This printer is now almost Two months old, and I am unable to use it. When I ordered the printer, I signed up for a Jon Cone workshop to be held in June. Now I am wondering if I should cancel that and lose my deposit. There’s no sense in taking the workshop if I’m still unable to print by then.
John - Sorry that didn’t help. All I can say is that some of these machines can be more finicky than others, both models and individual units.
Currently, I have 2 3880s and a 1430. The 3880 running OEM color inks is pretty much flawless. The 3880 running K7-Carbon is also nearly flawless for maintenance and prints on paper, but for PiezoDN negatives it produces an unacceptable level of “grain” in the highlights. I still don’t know if that something inherent in this model, or if it’s my particular unit. Evenness of dots is much improved with the beta-driver but the dots themselves are still a problem. I’m still hopeful that will be remedied in the next release.
The 1430 makes beautiful negatives, but it is much more troublesome on the maintenance side. This is my second unit. The first threw a sensor error of some sort, shortly after the warranty was up (of course), that I couldn’t solve even with assistance from Walker. I replaced it with a refurb, which has been running well so far. Both of them required a cleaning/purging routine that took several hours after being off for a week or longer. I used a CISS on the first unit, which worked well for a while, then began to drain back into the tanks whenever it was idle. An air leak at the carts or capping station probably. I use the refillable carts with the 2nd unit. They have been much more reliable. especially once I figured out a good refill routine, but still require many more cleaning cycles than the 3880s.
One thing I want to warn you about is using paper towels (including the recommended Bounty brand) for head cleaning. They shed paper fibers which can then be deposited on your negatives. I struggled with this for weeks before realizing that the dust had to be coming from the supposedly clean head. When I cleaned it with a strip of microfiber lens cleaning cloth soaked in PF it improved greatly. I mentioned this to Walker and he recommended using scanner wipes. That problem has cleared up.
Sometimes it’s really hard to know when the solution is just over the hill, and when the situation is hopeless. Several years ago I had a 3800 with one channel completely blocked. I replaced the entire ink supply system, and that printer is still being used with ConeColor inks by a friend. On the other hand, when my dear old 7600 was about 8 years old it suddenly developed a major leakage problem. I worked on it, off and on, for another 2 years before finally giving up and giving it away for parts.
Since your printer is nearly new and still in warranty, you might want to consider putting Epson inks back in and seeing about getting a replacement.
Maybe Walker will weigh in again with some more expert advice.
Keith
1 Like
+100. The rule seems to be that the cheaper the printer model, the more unit-to-unit variability. Hence the issues with the R1430. The P400 is more expensive and so you’d hope there’d be less, but perhaps not. It’s still relatively inexpensive compared to other 13" models.
The new generation IJM carts are supposed to be engineered to be more tolerant of this variability but there are at least a couple of cases - John’s and the user I’ve been working with - where that doesn’t seem to be the case.
+1. Very hard to know.
I’ve struggled with what’s best to use. I don’t do DNG, so my requirements are less critical. Bounty is not generally available in this country, although a few years ago I managed to stumble across a pack in the local Costco. They’re definitely better, but not perfect. I have on occasion used a kitchen wipe product sold in this country as Chux Super Wipes. A little like a microfibre cloth. Not paper and I not likely so shed fibres or particles. I don’t believe that you can buy them in the US, at least not under that name, but since everything plus more is available in the US, you must be able to buy something similar. But I don’t think that any of this is relevant to John at the moment.
I asked Walker if he would send me replacement carts for Y and C, since they’re the only ones with problems. If the variability is in the printer (not the carts), I suspect this won’t solve the problem, but I think it’s worth trying.
On the outside chance it’s the carts and not the printer, I’m asking inkjetmall if they’ll send me two replacement Y and C carts to try. If that doesn’t fix the problem, I’ll put the Epson inks back in, as you suggested.
Thank you for your help and good advice throughout this discussion!
Brian,
I wholeheartedly agree with your statement “You can’t operate like this.”
Regarding the possibility of manufacturing variation in the print head manifold: If the Epson cartridges gave good nozzle checks and the IJM cartridges don’t, then doesn’t it follow that the variation must be in the cartridges, not the printer?
Notice how the IJM carts fit:
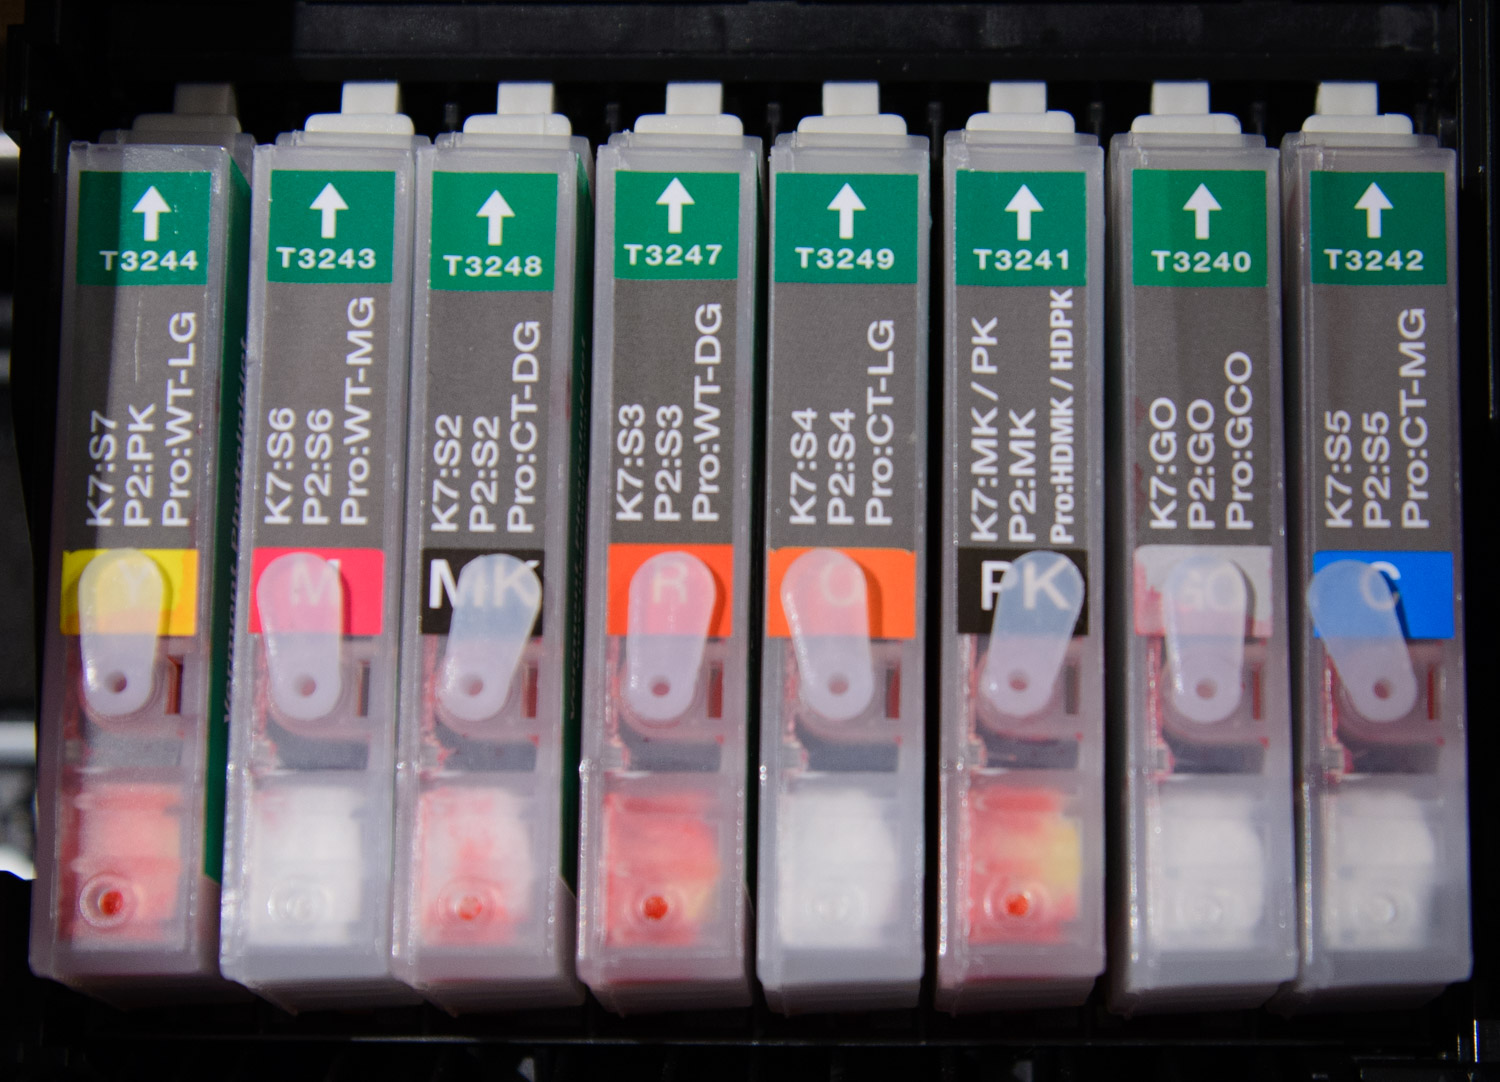
The gaps between carts are irregular and the carts are not perfectly parallel.
Now see how snugly the Epson carts fit:
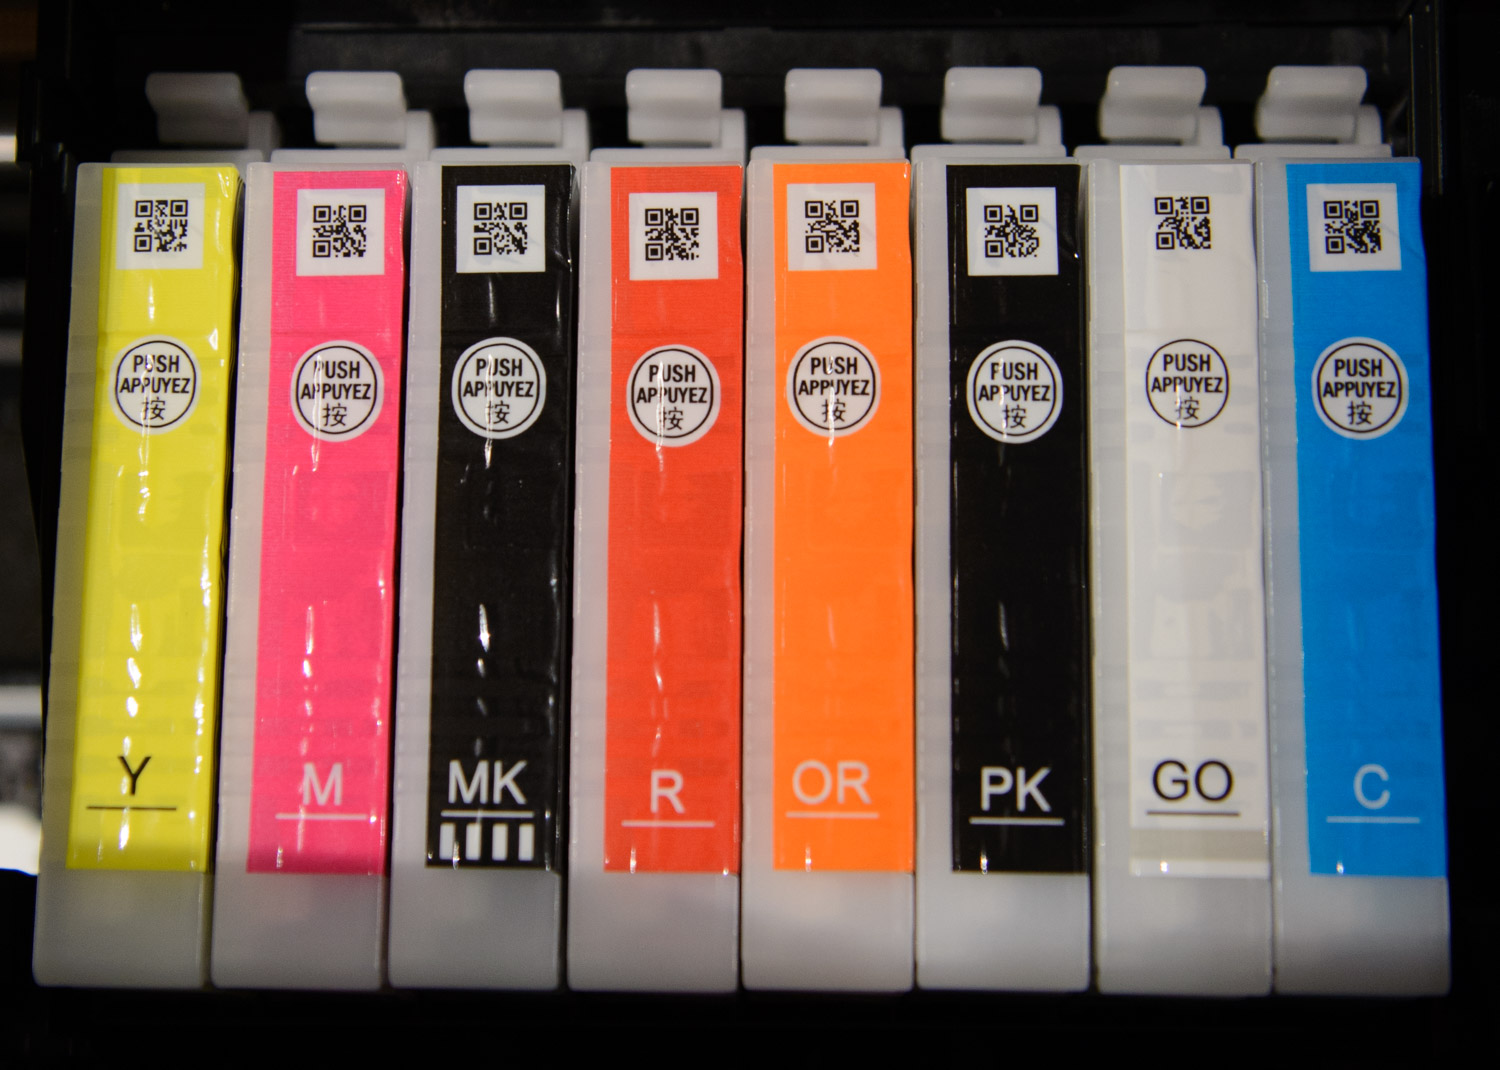
To see why, take a look at the next image.
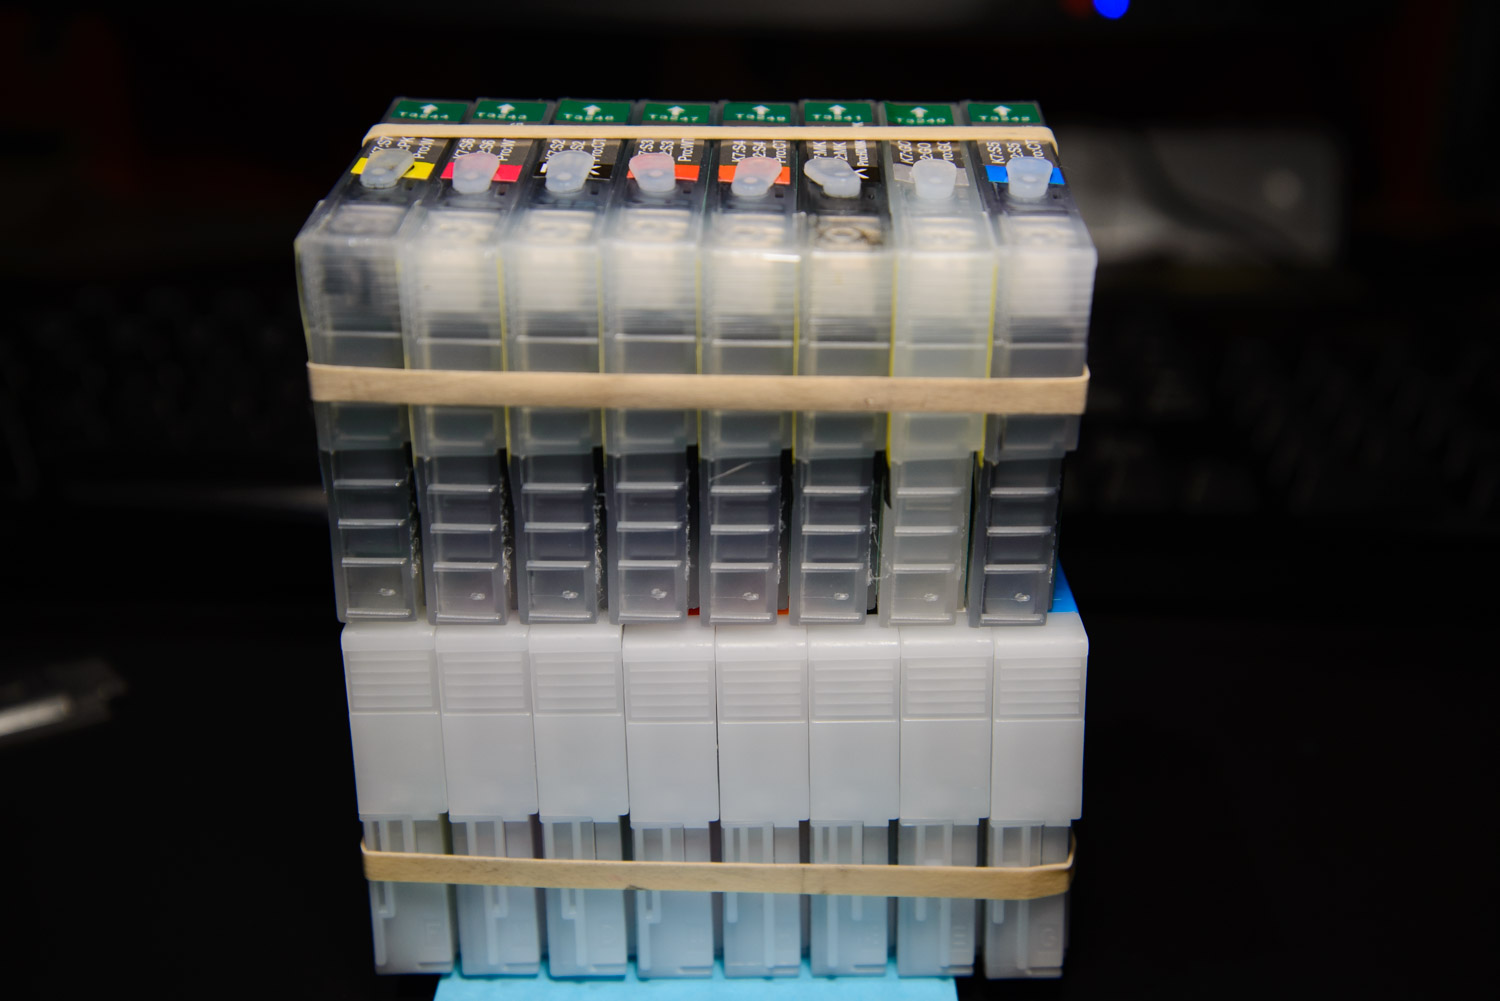
The IJM carts are clearly narrower than the Epson carts. The difference amounts to 5/32" over eight cartridges, or a little less than 1/32" between carts. This is enough for the carts to wiggle laterally within the spacers at the bottom of the carriage.
I have no idea how to reply to a specific post, since not every post has a reply button. So I apologize if this post is out of order.
Walker: I had not yet tried switching chips as you suggested. However today I got around to replacing the Y and C carts with the new ones you sent me (thank you!). I filled them with 15ml flush, ran two head cleanings, and then a nozzle check.
The nozzle check was perfect.
Prior to replacing Y and C, I was getting gaps in Y and/or C as well as GO. Y and C were down to just a few gaps, but the nozzle check for GO was a mess of blobs. After simply replacing Y and C, even the GO printed a perfect checkerboard pattern.
I should mention that, in the hours before replacing the Y and C, I had done several head cleanings, fiddled with foam core, and even taped the bottoms of the carts with gaffer’s tape to space them evenly. This didn’t help, but it didn’t seem to hurt either; gaps were occurring in the same places with every nozzle check I ran.
Before declaring victory and moving on to piezo ink, I need to understand how the end carts could have an effect other carts, such as GO. It couldn’t be the result of the last two head cleanings, since I had been running head cleanings all afternoon and they had no effect on GO. There is something special about Y and C. What do you think?
We’re sending Y and C. (BTW, I did not respond during the weekend as I was not working this weekend.)
BUT, I suggest doing a small part of the scientific process.
- Take your Magenta cartridge and switch it with Yellow (the chips are easily pulled off and placed on).
- Switch Orange with Cyan.
- Make sure the carts are topped off. If you are putting more PF in there, hold your thumb over the outlet hole so you don’t get PF in the air filters (like you have in Y, R, and PK).
- Tap the cartridges against the edge of a table gently to ensure no air is in the outlet.
- Do a cleaning.
- Do a nozzle check.
- Upload here so we can see.
best regards,
Walker
Air in the ink stem has effect on nozzles.
Clogged air inlet has an effect on nozzles.
Tipped carts (more air + ink block) has an effect on nozzles.
Forgetting to use a priming tip or improperly priming (too fast, too slow, at an angle) has an effect on nozzles. (I usually never prime. I just tap the air out of the stem.)
Damaged carts (by manufacture defect or by ship or drop or by miss-filling or miss-priming) can have an effect on nozzles.
Again, I’ve gone through 300-400 of these cartridges on multiple printers without a single problem in manufacture. I’ve run over 3000 small format cartridges in the past year. I’ve been a professional printmaker for 15 years with Epson printers (both small and large). These specific cartridges work better than OEMs in my direct experience. I don’t know what else to say. Glad the replacements are working. There is zero need to do more cleanings. Fill your new carts carefully with Piezo ink (Don’t use your PF carts with Piezo ink.) and enjoy.
all the best,
Walker
John - was this with or without the foam-core?
With the foam core.
I probably agree with Walker that the foam core was unnecessary. It may have had a beneficial side-effect, but it was not the cure. Replacing the Y and C carts was the cure.
The sad fact is that I have learned nothing from this six-week exercise in frustration. I don’t know what caused the problem, and I don’t know what cured it. Or perhaps I should say I don’t know why replacing two carts cured it (and why replacing Y and C also fixed GO).
When I switch to my ink carts this weekend, I won’t be surprised if I get a bad nozzle check. Then I’ll stumble around for another six weeks until some random act fixes the problem.
Or maybe both. Time will tell. Speaking of which …
Yes, that is often the case. It takes a lot of very tedious repetition to be certain of the cause and cure. And as Keith said earlier, it’s hard to know whether the fix is just over the hill or the cause is hopeless. Such is life with refillables. Or at least it can be for a lot of people. Some get lucky. I’ve been both. Hence my lessons post.
Regarding clogged air inlets: Can an air inlet become clogged by holding the cart the wrong way (air inlet side down) while filling? Or after filling, by holding or storing the cart with air inlet side down*, allowing fluid to enter the air inlet area? Or by overfilling a cart?
- obviously I do not mean storing carts upside down!
If the answer to any of these questions is “yes,” then the Filling Procedure (insert 106) should include warnings: Don’t overfill, don’t tip the wrong way, etc…
No. You’d only perform any of the procedures in the small format cleaning kit, including the under the print-head procedure, to remove dried-on ink. This is a new printer that’s only ever had flush as I understand it, so there would be no benefit, and as Keith observed, the under the head routine is not without risk.
1 Like